![]()

 Marine
OWNER’S MANUAL
Comp – Coax – Sub
Congratulations on purchasing our product. Your satisfaction is the first requirement that our products must meet: the same satisfaction as the one gained by those who long for “The Sound Experience”. This manual has been drawn to provide the main instructions required to install and use the system properly. However, the range of possible applications is wide; for further information, please feel free to contact your trusted dealer or our technical support at the email [email protected] Before installing the components, please carefully read all of the instructions contained in this manual. Failure to respect these instructions may cause unintentional harm or damage to the product.
- All components must be firmly secured to the vehicle/vessel structure. Do the same when installing any custom structures you may have built. Confirm your installation is solid and safe. A component coming loose while driving may cause serious damage to the passengers, as well as to other vehicles/vessels.
- Always wear protective eyewear when using tools, as splints or product residue may become airborne.
- In order to avoid incidental damage, keep the product in the original packaging until you are ready for the final installation.
- Do not carry out any installation inside the engine compartment.
- Before starting with the installation turn the head unit and all other audio system devices off, avoiding any possible damage.
- Make sure that the location you choose to install the components does not interfere with the normal operation of any mechanical or electrical devices of the vehicle/vessel.
- Do not install loudspeakers where they may be exposed to excessive water, humidity, dust, dirt, or immersion.
- Do not install the tweeter without the protective grille.
- Do not install the components or make cable run close to electronic or mechanical devices of the vehicle/vessel.
- Be very cautious when drilling or cutting into the vehicle/vessel chassis, making sure there are no cables or structural elements essential to the vehicle/vessel underneath or in the selected area.
- When routing cables, make sure that the cable does not come in contact with sharp edges or near-moving mechanical devices. Make sure that it is firmly attached and protected along its entire length and its insulation is self-extinguishing.
- Only use cables with the proper section (AWG) indicated herein.
- When running the cable through a hole in the vehicle/vessel chassis, protect the cable with a rubber ring (grommet). Be sure to provide proper protection for cables running close to heat-generating devices.
- Do not run the wires outside of the vehicle/vessel.
- Use top-quality cables, connectors, and accessories such as found in the Connection catalog.
- Warranty certificate: For more information visit the Hertz website.
![]() Information on electrical and electronic equipment waste (for those European countries which organize the separate collection of waste). Products that are marked with a wheeled bin with an X through it can not be disposed of together with ordinary domestic waste. These electrical and electronic products must be recycled in proper facilities, capable of managing the disposal of these products and components. In order to know where and how to deliver these products to the nearest recycling/disposal site please contact your local municipal office. Recycling and disposing of waste in a proper way contributes to the protection of the environment and prevents harmful effects on health.
Information on electrical and electronic equipment waste (for those European countries which organize the separate collection of waste). Products that are marked with a wheeled bin with an X through it can not be disposed of together with ordinary domestic waste. These electrical and electronic products must be recycled in proper facilities, capable of managing the disposal of these products and components. In order to know where and how to deliver these products to the nearest recycling/disposal site please contact your local municipal office. Recycling and disposing of waste in a proper way contributes to the protection of the environment and prevents harmful effects on health.
WARNING
Water Resistance
These speakers are designed to be water and spray-resistant, but they are not designed to be submerged or to withstand high-pressure water spray. Please exercise care when washing your boat to avoid damaging the speakers. Do not install on submersibles, personal watercraft or any other vessel likely to be underwater for even a short time.
Installation and Use
When installing speakers in your vessel, it is extremely important that the speakers and their supporting structures are firmly secured to avoid causing harm to persons or property in case of collision. Please review the mounting information carefully and use the supplied accessories to mount this product.
Unless otherwise specified these products are developed for infinite-baffle applications, which means installed without a box. Installing these components in a box or in small enclosures may compromise their low-frequency performance.
Tweeter and lighting
The tweeters and lighting circuit (when this is available) are permanently fixed to the grille. Do not use the product without the grille unless otherwise specified. Do not attempt to remove the tweeter and/ or the lighting LEDs from the grille. Any damages caused by the attempt to remove the grille and/or
tweeter/lighting LEDs will not be covered under warranty.
Tweeter Protection
The crossover is equipped with an electronic tweeter protection circuit designed to minimize the risk of damages to the tweeter. This electronic device monitors the current going to the tweeter and disconnects the tweeter from the signal when it senses an overload. Should this occur while listening to
the audio system simply reduces the volume for a few seconds to reset the protection circuit.
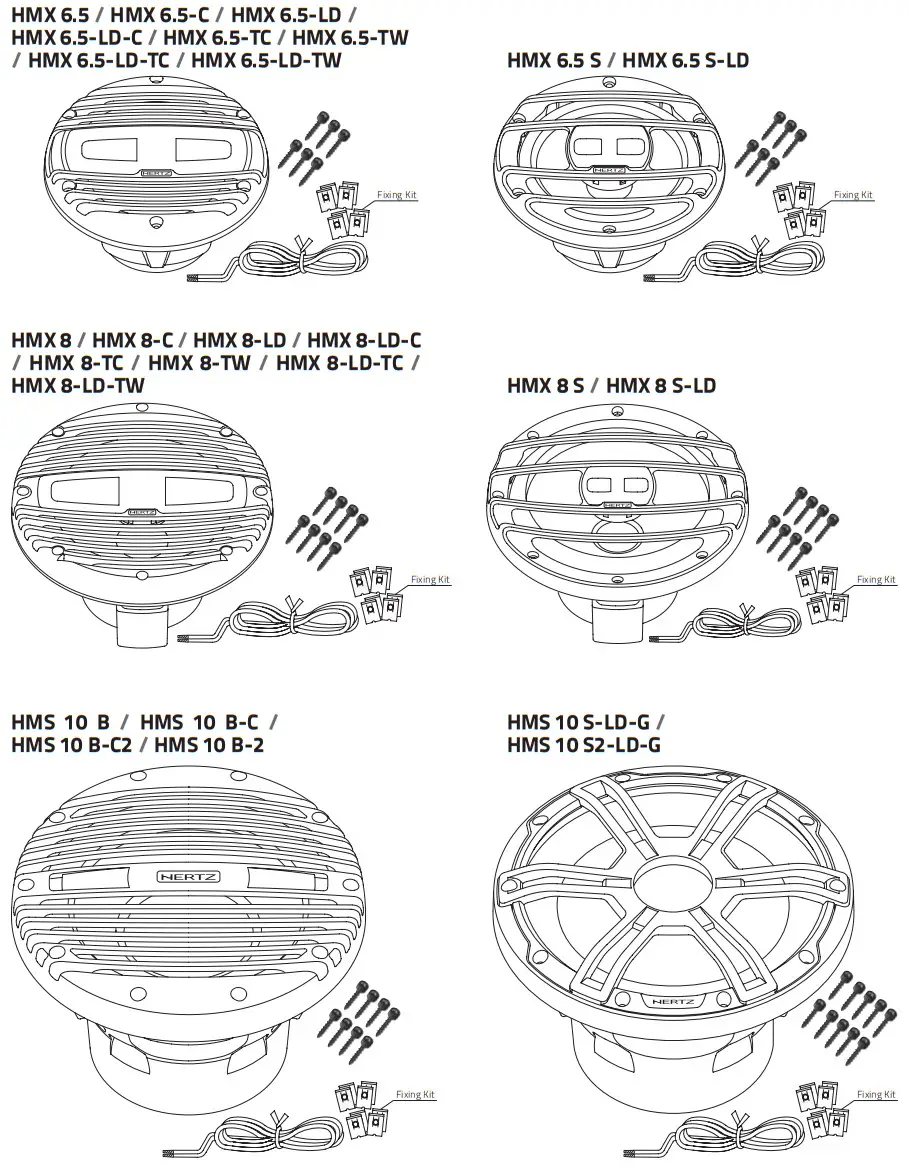
Packaging contents
Dimensions
HMX 6.5/HMX 6.5-C/HMX 6.5-LD/HMX 6.5-LD-C/HMX 6.5-TC/HMX 6.5-TW/HMX 6.5-LD-TC/HMX 6.5-LD-TW/HMX 6.5 S/HMX 6.5 S-LD/ HMX 8/HMX 8-C/HMX 8-LD/HMX 8-LD-C/HMX 8-TC/HMX 8-TW/HMX 8-LD-TC/HMX 8-LD-TW/HMX 8 S/HMX 8 S-LD/HMS 10 B/HMS 10 B-C/HMS 10 B-C2/HMS 10 B-2/HMS 10 S-LD-G/HMS 10 S2-LD-G
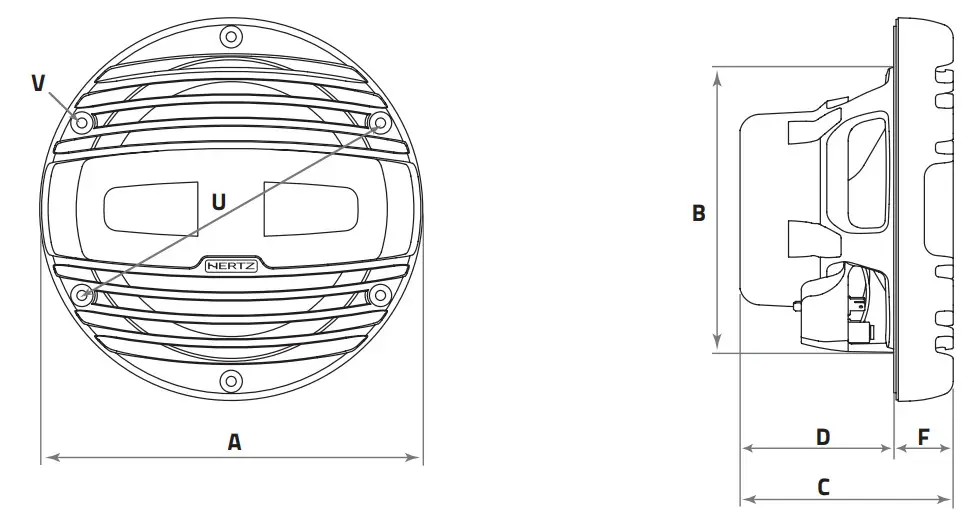
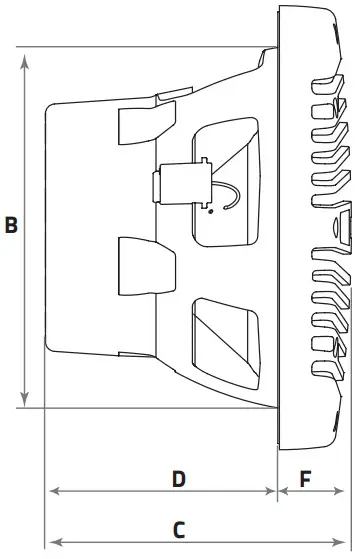
| A | B | C | D | F | U | V | ||
| HMX 6.5 HMX 6.5-C HMX 6.5-TC HMX 6.5-TW HMX 6.5-LD HMX 6.5-LD-C HMX 6.5-LD-TC HMX 6.5-LD-TW HMX 6.5 S HMX 6.5 S-LD | 172,2 | 128 | 95,6 | 69 | 26,6 | 155 | 4,5 | mm |
| 6.78 | 5.04 | 3.76 | 2.72 | 1.05 | 6.1 | 0.18 | in. | |
| HMX 8 HMX 8-C HMX 8-TC HMX 8-TW HMX 8-LD HMX 8-LD-C HMX 8-LD-TC HMX 8-LD-TW HMX 8 S HMX 8 S-LD | 225 | 180 | 123 | 91 | 32 | 205 | 5 | mm |
| 8.86 | 7.09 | 4.84 | 3.58 | 1.19 | 8.07 | 0.2 | in. | |
| HMS 10 B HMS 10 B-C HMS 10 B-C2 HMS 10 B-2 | 277 | 230 | 191 | 145 | 46 | 254 | 5,5 | mm |
| 10.91 | 9.06 | 7.52 | 5.71 | 1.81 | 10 | 0.22 | in. | |
| HMS 10 S-LD-G HMS 10 S2-LD-G | 279 | 230 | 186 | 145 | 41 | 254 | 5,5 | mm |
| 10.98 | 9.06 | 7.32 | 5.71 | 1.61 | 10 | 0.22 | in. |
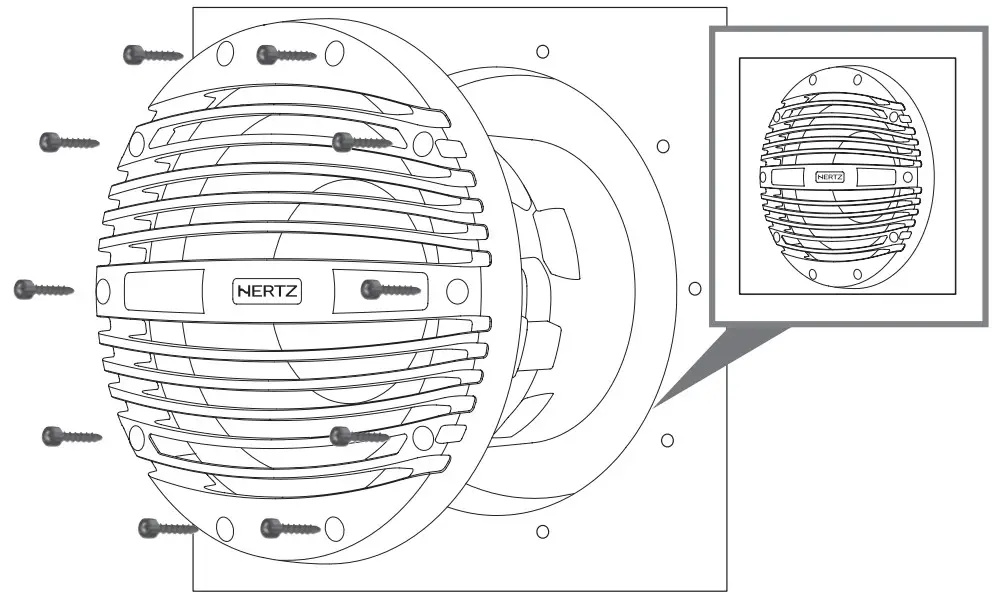
Mounting
HMX 6.5/HMX 6.5-C/HMX 6.5-LD/HMX 6.5-LD-C/HMX 6.5-TC/HMX 6.5-TW/HMX 6.5-LD-TC/HMX 6.5-LD-TW/HMX 6.5 S/HMX 6.5 S-LD/ HMX8/HMX 8-C/HMX 8-LD/HMX 8-LD-C/HMX 8-TC/HMX 8-TW/HMX 8-LD-TC/HMX 8-LD-TW/HMX 8 S/HMX 8 S-LD
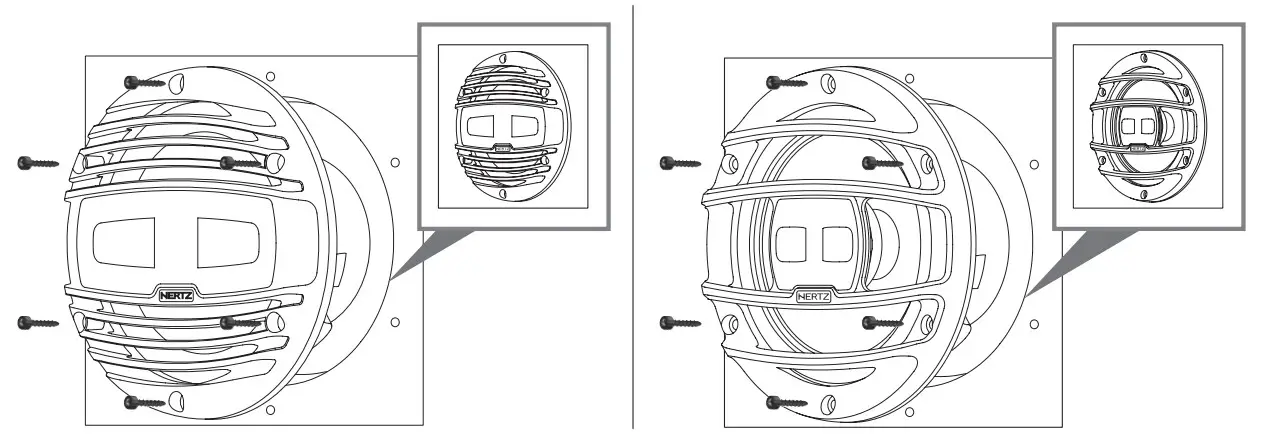
Unless otherwise specified these products are developed for infinite-baffle applications, which means installed without a box. Installing these components in a box or in small enclosures may compromise their low-frequency performance.
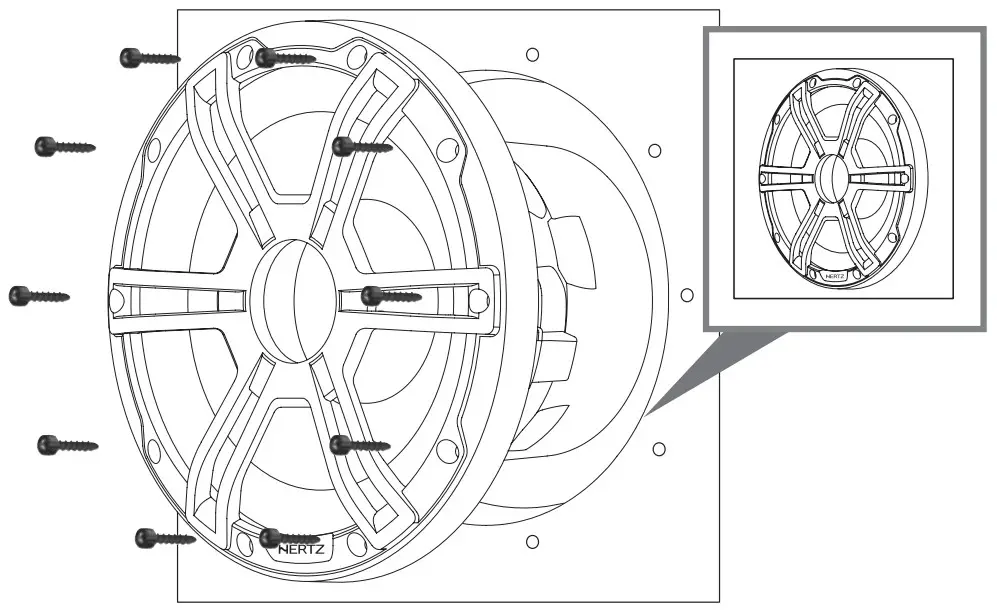
HMS 10 S-LD-G/HMS 10 S2-LD-G
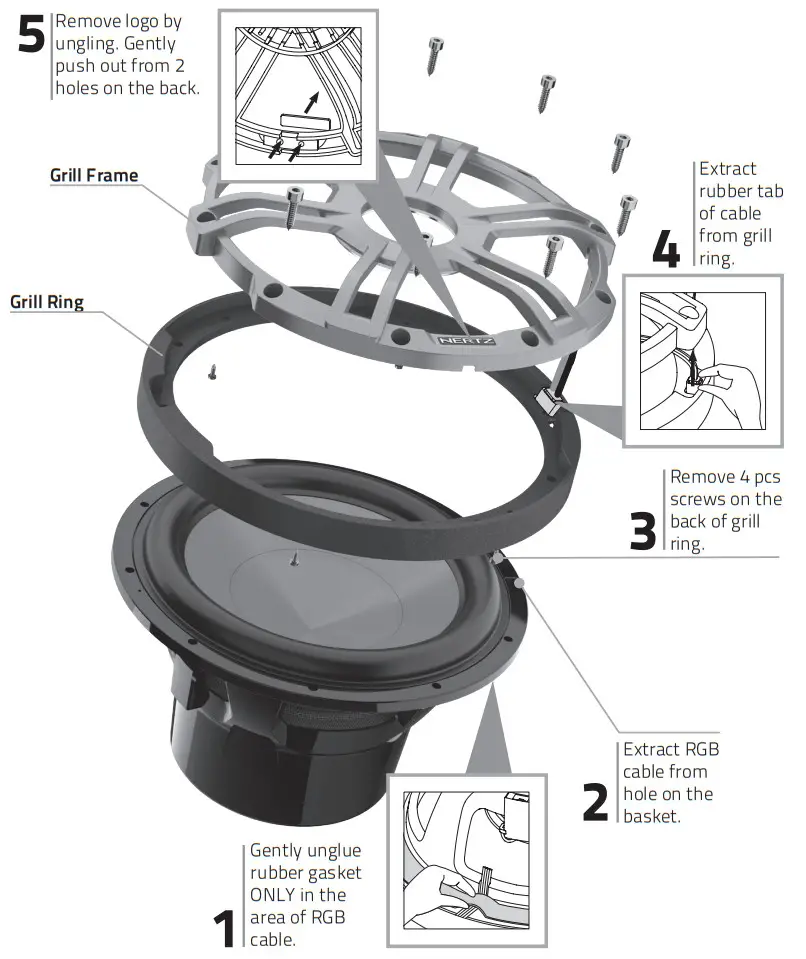
HMS 10 S-LD-G/HMS 10 S2-LD-G Grille disassembly/assembly
Follow the below steps to disassembly the grill. To re-assembly follow the steps back from 5 to 1.
Use soft glue to glue back logo (step 5) and gasket (step 1)
HMS 10 B/HMS 10 B-C/HMS 10 B-C2/HMS 10 B-2
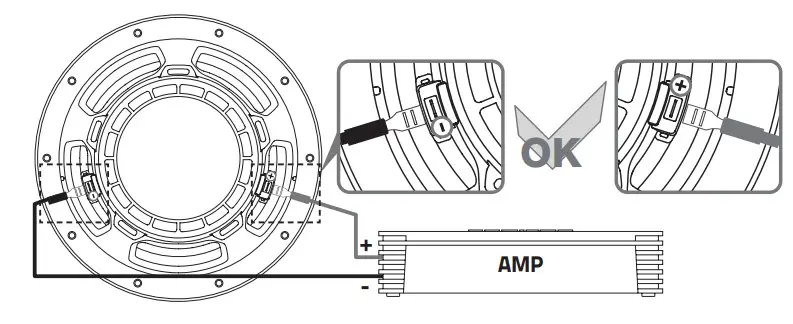
Connections
HMX 6.5/HMX 6.5-C/HMX 6.5-TC/HMX 6.5-TW/HMX 6.5-LD/HMX 6.5-LD-C/HMX 6.5-LD-TC/HMX 6.5-LD-TW/HMX 6.5 S/HMX 6.5 S-LD
HMX 8/HMX 8-C/HMX 8-TC/HMX 8-TW/HMX 8-LD/HMX 8-LD-C/HMX 8-LD-TC/HMX 8-LD-TW/HMX 8 S/HMX 8 S-LD

HMS 10 B/HMS 10 B-C/HMS 10 B-C2/HMS 10 B-2 HMS 10 S-LD-G/HMS 10 S2-LD-G
HMX 6.5-LD/HMX 6.5-LD-C/HMX 6.5-LD-TC/HMX 6.5-LD-TW/HMX 6.5 S-LD/HMX 8-LD/HMX 8-LD-C/HMX 8-LD-TC/HMX 8-LD-TW/ HMX 8 S-LD/HMS 10 S-LD-G/HMS 10 S2-LD-G LED direct wiring
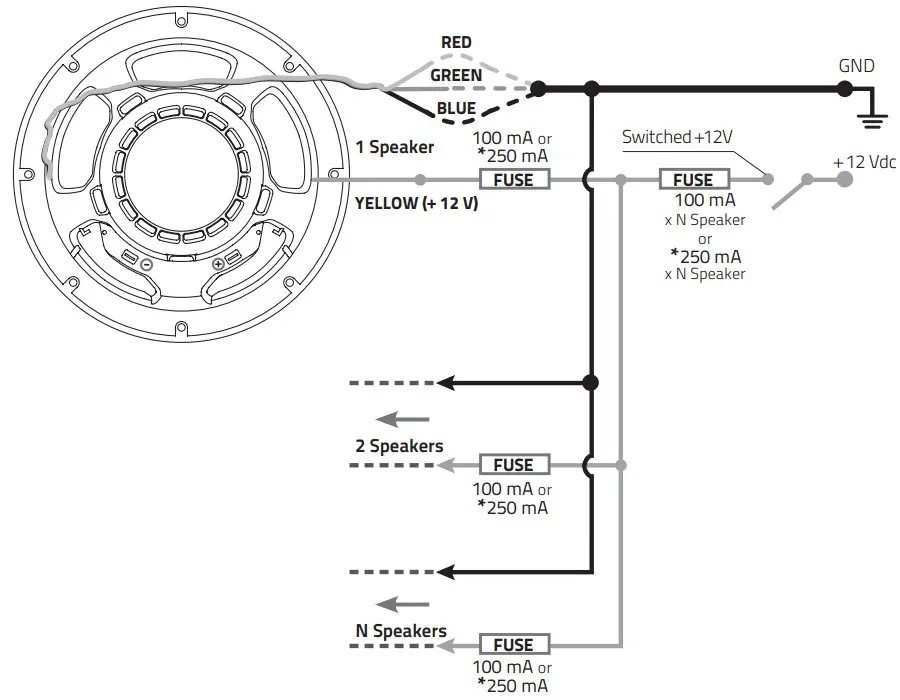
*250 mA only for
HMS 10 S-LD-G/HMS 10 S2-LD-G
| COLOR | RED | GREEN | BLUE |
| WHITE | X | X | X |
| RED | X | ||
| GREEN | X | ||
| BLUE | X | ||
| YELLOW | X | X | |
| PURPLE | X | X | |
| CYAN | X | X |
LED CIRCUIT WIRING
– Voltage provided to the LED circuit must not exceed +12,5 Vdc referred to the system ground (GND).
– Voltage provided to the LED circuit should be switched by an activation circuit in order to turn on the LED lighting only when required and turn it off when the vessel is not used or put into storage.
– Protect the YELLOW (+12V) wire with a 100mA fuse, then connect the YELLOW (+12V) wires from all the speakers together to the main Switched +12 Vdc.
– Fuse the Switched +12 Vdc according to the total number of speakers connected in parallel. We suggest for the fuse value to be as close as possible to the standard value corresponding to 100mA or 250 mA x N speakers rounded in excess. I.e. 6 speakers (3 pairs) in parallel require 100mA x 6 = 600mA, for which the closest standard fuse value rounded in excess would be 630mA.
– Connect the R(Red), G(Green), B(Blue) wires from the speaker to the system ground (GND) referring to the below table according to the color desired among the 7 available options.
HMX 6.5-LD/HMX 6.5-LD-C/HMX 6.5-LD-TC/HMX 6.5-LD-TW/HMX 6.5 S-LD/HMX 8-LD/HMX 8-LD-C/HMX 8-LD-TC/HMX 8-LD-TW/ HMX 8 S-LD/HMS 10 S-LD-G/HMS 10 S2-LD-G LED wiring with HM RGB 1BK
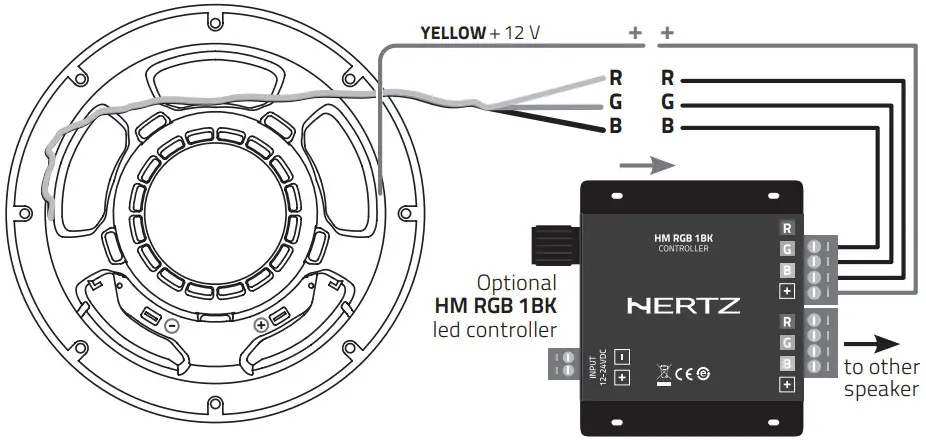
HM RGB 1 BK WIRING: For detailed instructions on HM RGB 1 BK wiring please check the HM RGB 1 BK owner’s manual.
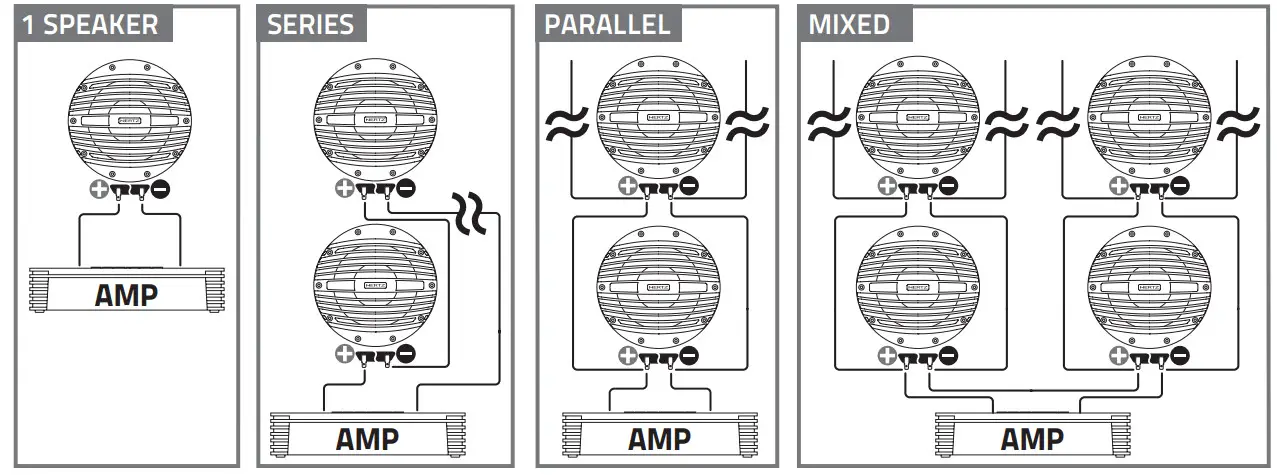
| FREE AIR DCRESISTANCE | HMX 6.5/HMX 6.5-C/ HMX 6.5-LD / HMX 6.5-LD-C/HMX 6.5-TC/ HMX 6.5-TW/ HMX 6.5-LD-TC/ HMX 6.5-LD-TW/HMX 6.5 S/ HMX 6.5 S-LD | HMX 8/HMX 8-C/ HMX 8-LD/ HMX 8-LD-C/ HMX 8-TC/ HMX 8-TW/ HMX 8-LD-TC/ HMX 8-LD-TW /HMX 8 S/ HMX 8 S-LD | HMS 10 B/ HMS 10 B-C/ HMS 10 S-LD-G | HMS 10 B-C2/HMS 10 B-2/HMS 10 S2-LD-G | |
| 1 Speaker | 3,5 | 3,1 | 4,5 | 2,1 | Ω |
| Series 2 Speaker 3 Speaker4 Speaker | 7 | 6,2 | 9,0 | 4,2 | Ω |
| 10,5 | 9,3 | 13,5 | 6,3 | Ω | |
| 14 | 12,4 | 18,0 | 8,4 | Ω | |
| Parallel 2 Speaker 3 Speaker 4 Speaker | 1,8 | 1,6 | 2,3 | 1,1 | Ω |
| 1,2 | 1 | 1,5 | 0,7 | Ω | |
| 0,9 | 0,8 | 1,5 | 0,5 | Ω | |
| Mixed Speaker 6 Speaker 8 Speaker | 3,5 | 3,1 | 4,5 | 2,1 | Ω |
| 2,3 | 2,1 | 3,0 | 1,4 | Ω | |
| 1,8 | 1,6 | 2,3 | 1,1 | Ω |
Desain soundboards Untuk subwoofer
ENCLOSURE DESIGN
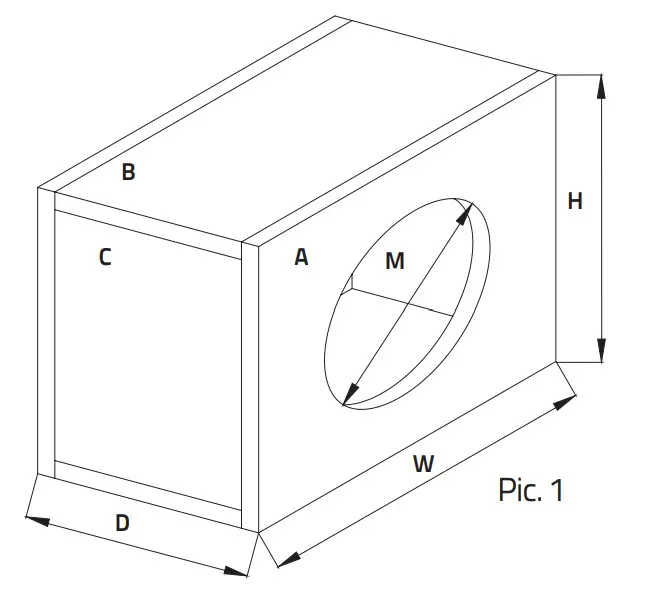
| BOX TECH DATA | Vb | Fb | Qtc | External dimensions Pic. 1 | Mounting Hole – M | Wood Thickness | Suggested Subsonic filter cut-off | Suggested Lo-pass filter cut-off | Damping Material | ||
| W | H | D | |||||||||
| l (cu.ft.) | Hz | mm(in.) | mm(in.) | mm(in.) | mm (in.) | mm (in.) | |||||
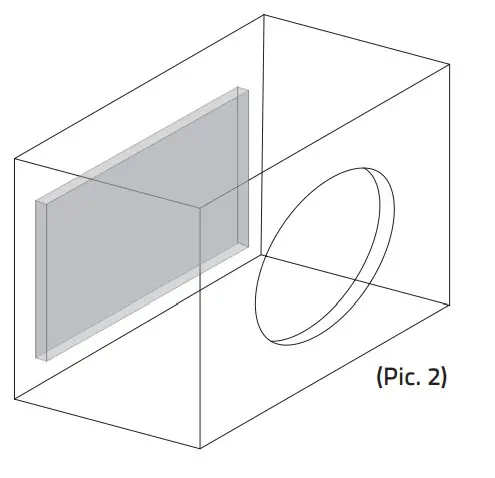
| HMS 10 B/HMS 10 B-C HMS 10 B-C2/ HMS 10 B-2 HMS 10 S-LD-G/HMS 10 S2-LD-G COMPACT | 50(1.77) | 54 | 1,05 | 440(17.32) | 440(17.32) | 365(14.37) | 230(9.06) | 19(0.75) | 20 Hz 24dB Oct | 100 Hz 12dB Oct | Pic. 2 |
| HMS 10 B /HMS 10 B-C HMS 10 B-C2 / HMS 10 B-2 HMS 10 S-LD-G / HMS 10 S2-LD-G PERFORMANCE | 71 (2.51) | 51 | 0,99 | 460 (18.11) | 460 (18.11) | 450 (17.72) | 230 (9,06) | 19 (0.75) | 20 Hz 24dB Oct | 150 Hz 12dB Oct | Pic. 2 |
PANELS LAYOUT
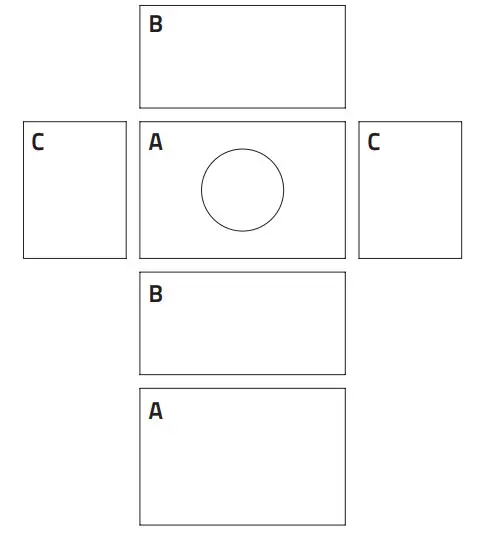
BOX ASSEMBLY AND SHAPE
This manual features the box assemblies and shapes which are easiest to create.
However, the bass frequency performance can be noticeably improved with different box shapes, assembly methods, and construction materials.
| PANELS CUT LIST | A | Qty | B | Qty | C | Qty |
| mm (in.) | Pcs | mm (in.) | Pcs | mm (in.) | Pcs | |
| HMS 10 B/HMS 10 B-C HMS 10 B-C2/ HMS 10 B-2 HMS 10 S-LD-G/HMS 10 S2-LD-G COMPACT (50lt) | 440 X 440 (17.32 x 17.32) | 2 | 440 x 327 (17.32 x 12.87) | 2 | 402 x327 (15.83 x 12.87) | 2 |
| HMS 10 B /HMS 10 B-C HMS 10 B-C2/ HMS 10 B-2 HMS 10 S-LD-G / HMS 10 S2-LD-G PERFORMANCE (70lt) | 460 x 460 (18.11 x 18.11) | 2 | 460 x 412 (18.11 x 16.22) | 2 | 422 x 412 (16.61 x 16.22) | 2 |
Technische specificaties
| Component | Size | Power handling | Impedance | Magnet Size | Voice Coil ∅ | Magnet | Cone | Weight of one component | ||
| Peak | Continuous | |||||||||
| mm (in.) | W | W | Ω | mm (in.) | mm (in.) | Kg (lb.) | ||||
| HMX 6.5 HMX 6.5-C HMX 6.5-TC HMX 6.5-TW HMX 6.5-LDHMX 6.5-LD-C HMX 6.5-LD-TC HMX 6.5-LD-TW HMX 6.5 SHMX 6.5 S-LD | Two Way Coaxial | Woofer 165 (6.5) |
150 |
75 |
4 | 78,5 x 32 x 17 | 25 (1) | High density flux ferrite | Polypropylene with UV inhibitors | 1 (2.2) |
| Tweeter diaphragm 36 (1.4) | 19,7 x 0 x 3 (0.78 x 0 x 0.12) | 20 (0.8) | Neodymium | |||||||
| HMX 8 HMX 8-C HMX 8-TC HMX 8-TW HMX 8-LD HMX 8-LD-C HMX 8-LD-TC HMX 8-LD-TW HMX 8 S HMX 8 S-LD | Two Way Coaxial | Woofer 200 (8) | 200 | 100 | 4 | 90 x 40 x 20 (3.54 x1.57 x0.79) | 32 (1,26) | High-density flux ferrite | Polypropylene with UV inhibitors | 1,66 (3.66) |
| Tweeter diaphragm 36 (1.4) | 19,7 x 0 x 3 (0.78 x 0 x 0.12) | 20 (0.8) | Neodymium | |||||||
| HMS 10 B HMS 10 B-C HMS10 S-LD-G | Subwoofer | 250 (10) | 500 | 250 | 4 | 140 x 60 x 30 (5.51 x 2.36 x 1.18) | 50 (2) | High-density flux ferrite | Polypropylene with UV inhibitors | 5,1 (11.24) |
| HMS 10 B-C2 HMS 10 B-2 HMS10 S2-LD-G | Subwoofer | 250 (10) | 500 | 250 | 2 | 140 x 60 x 30 (5.51 x 2.36 x 1.18) | 50 (2) | High-density flux ferrite | Polypropylene with UV inhibitors | 5,1 (11.24) |
Elektro-akoestische parameters
| HMX 6.5/HMX 6.5-C/ HMX 6.5-LD/HMX 6.5-LD-C / HMX 6.5-TC/HMX 6.5-TW/ HMX 6.5-LD-TC/ HMX 6.5-LD-TW /HMX 6.5 S/HMX 6.5 S-LD | HMX 8/HMX 8-C/HMX 8-LD/HMX 8-LD-C/HMX 8-TC/HMX 8-TW/HMX 8-LD-TC/HMX 8-LD-TW/HMX 8 S/ HMX 8 S-LD | HMS 10 B/HMS 10 B-C/HMS 10 S-LD-G | HMS 10 B-C2/ HMS 10 B-2/HMS 10 S2-LD-G | |
| D mm | 125 | 174 | 210 | 210 |
| Xmax mm | 3.65 | 4.5 | 13.5 | 12,3 |
| Re Ω | 3.5 | 3.1 | 4.5 | 2,1 |
| Fs Hz | 65 | 50 | 41 | 41 |
| Le mH | 0.53 | 0.52 | 0.9 | 0,46 |
| Vas l | 8.8 | 29.46 | 37 | 31 |
| Mms g | 14 | 27.3 | 69 | 75,6 |
| Cms mm/N | 0.4 | 0.37 | 0.22 | 0,18 |
| BL T•m | 5.2 | 6.6 | 10.2 | 8,3 |
| Qts | 0.7 | 0.58 | 0.71 | 0,6 |
| Qes | 0.75 | 0.61 | 0.76 | 0,63 |
| Qms | 11.5 | 11 | 11 | 12,3 |
| Spl dB | 89 | 91 | 88 | 88,5 |
![]()
PART OF ELETTROMEDIA
Strada Regina Km 3,500 – Marignano
62018 Potenza Picena (MC) Italy
T +390733870870 – F+390733870880
www.elettromedia.it


