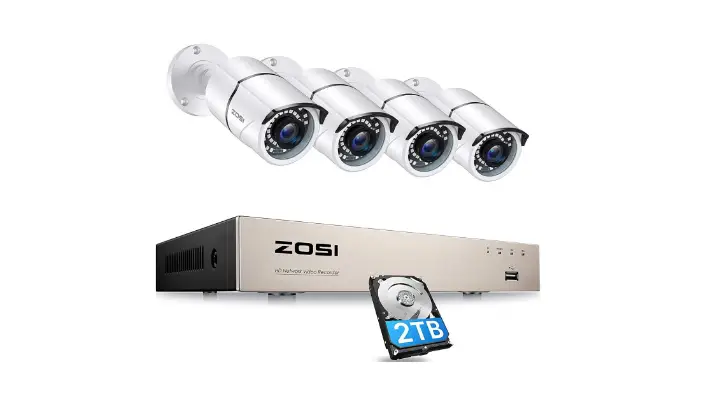
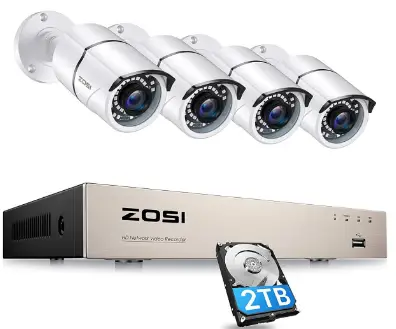
Zosi z19.4.T.1 NVR Monitor system
Statement
Thank you tor purchasing this product. Z0SI is committed to providing its customers with a high-quality, reliable security solution. ZOSi cannot assume responsibility for any consequences resulting from the use thereof.
Before Installation
This product may require cabling. It is strongly recommended that all products and components be tested prior to installation.
Applications
The system is a standalone syslem. It will need to be connected to a monitor to start live view (Such as a PC monitor, TV, etc By adding a 3.5 SATA hard drive to the NVR, you can recordšplayback recordings from the cameras. By connecting the NVR to the Internet, you can view the cameras anywhere anytime.
Tips:
These instructions are to assist your installation of the system and remote surveillance.For more instructions and details, please contact us.
Tech Support
- For prooucts introduction& specífications, please visit www.zositech.com.
- For FAQ and troubleshooting, please visit ZoSI Help center https://support.zositech.com
- If you need customer support, email us and expect response within 24 hours: [email protected]
Connecting your system
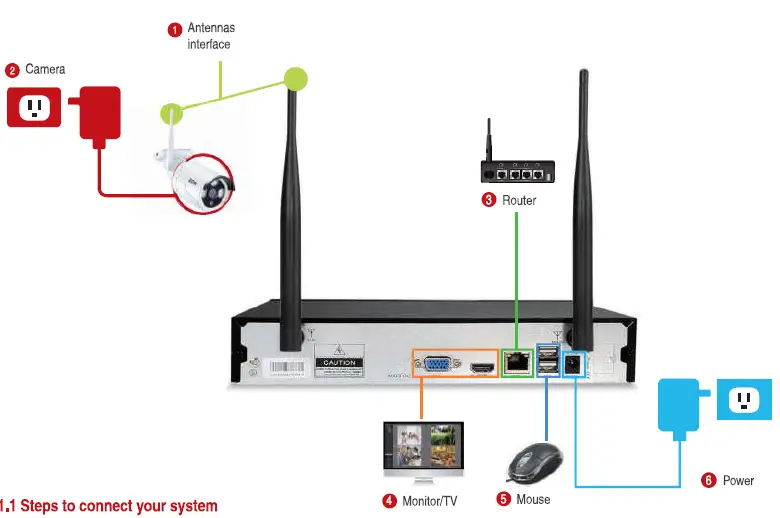
Steps to connect your system
- Install the antennas for the cameras and the NVR.
- Connect the cameras to their power supplies (Smaller 12V 1A power adapter).
- Connect the NVR to the Router via an Ethernet cable. IP Camera Video inputs: Just in case any of your cameras are out of
- Wifi range, you can connect cameras to the router with an Ethernet cable
- Connect a monitor to the NVR via its HDMI or VGA port (HDMI and VGA cables are not included).
- Plug the mouse (included) into the USB port at the rear panel of the NVR.You will then be able to operate the NVR with the mouse.
- Connect the NVR to its power supply (bigger 12V 2A power adapter). Within seconds, you should see the camera’s image live view on the monitor.
Username: admin
Password: None (means empty, no need to input anything, just click login)
Tips:
To protect your privacy, please right-click the mouse > Go to System Setup > System Admin > User > set password to change your password.
Camera Mounting Spots
- Mount the cameras anywhere within the Wi-Fi range, and plug them to power with included power adapters (smaller ones are for cameras).
- The cameras should start to stream videos to NVR within 1 minute.
- If ft does not display a video on your monitor, the distance may be too long or there are too many obstacles. Please move the cameras closer to the NVR.
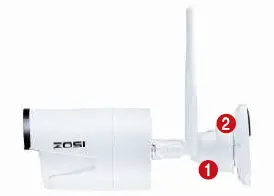
Adjust the camera
- Adjust to the position you viant up or down.,
- The neck of the stand attached to the mounting base, rotate the stand by loosening the radial joint locking ring. Once in position ,tighten the ring again.

Wired connection
- If some of the cameras’ mounting spots are out of WIFi range, you need to hard wire the cameras to the NVR to get images.
- Use standard Network cables to connect the cameras to the Router

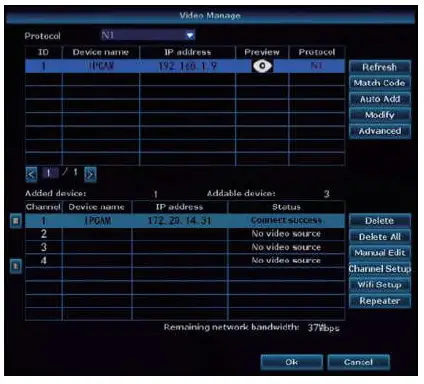
- After connecting the camera to the router,please right click the mouse > go to Video Manage” > click “Refresh”> click “Auto Add”.Then you will see the camera is added to the NVR and display video on the screen.

Tips:
- If you want the camera to work wirelessly, use Match Code to add camera to NVR. See the section 6 in this manual about Add camera by matching code.
- If you want the camera to work wired, use Auto Add. This requires you hard wire the cameras to router to get it work.
View on Smartphone
Step 1: Connect the NVR to the Internet
Connect the NVR’$ WAN port to a LAN port of your router with an Ethernet cable. When the NVR is connected to the Internet, within minutes you should see the Cloud ID and status shovis “ONLINE” on the right bottom corner on your screen.(f the Cloud ID is not displayed please go to System Setup and tick the Cloud ID icon)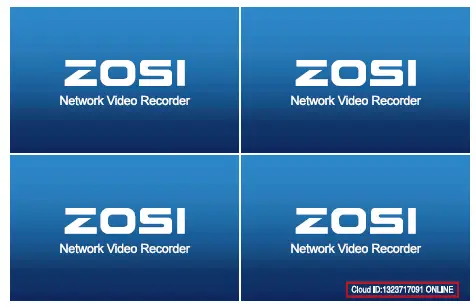
Step 2: Download the ApP
Search 2OSI Cloud’ in App store or Gogle Play Or Scan the OR Code to download the App.
Step 3: Run the App
- A: Install the free App.
- B: Tap Register and enter your User name, Password, Email to create a new account.
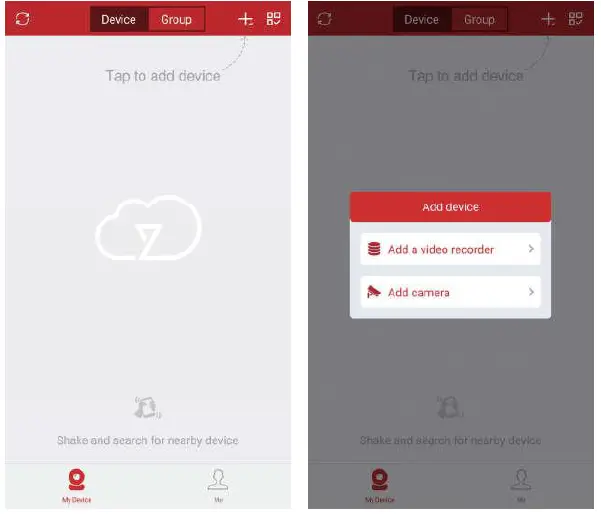
- C: Login the App, Tap”+” icon on the upper right corner of the screen> Add a video recorde.

- D: Configure the following information

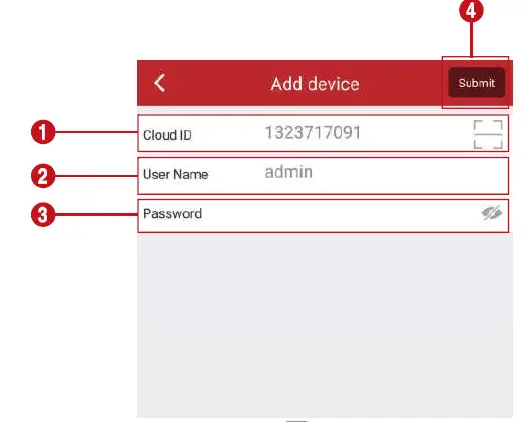
Cloud ID: This Cloud ID can be found at the bottom right corner of your monitor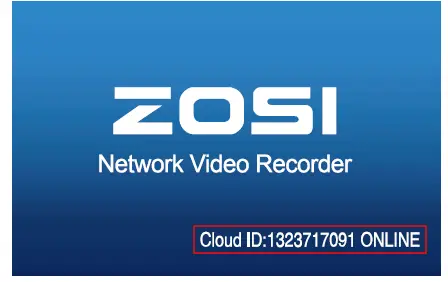
Or right click the mouse> go to System Setup > Network Setup > Scan the QR code.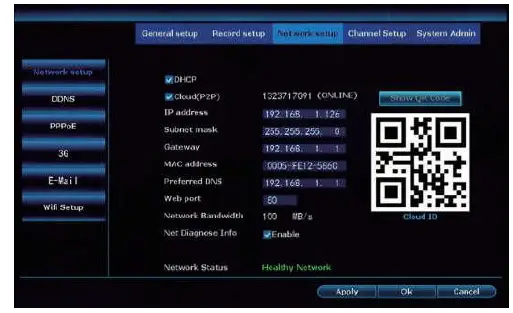
- User Name: Enter the NVR’s User Name (default: admin)
- Password: Enter the NVR’S Password (default: No password required, just leave blank)
- Tap Submit.
E: Tap the channel number to connect the cameras, then you shall see the live view of the cameras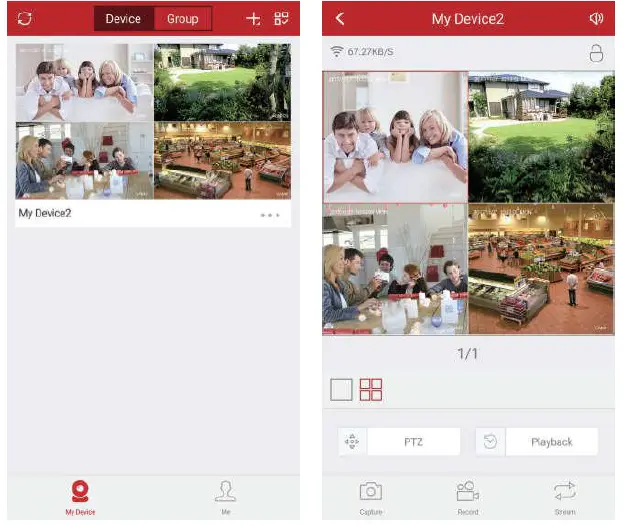
Playback on mobiles
In the App, when viewing the camera’s live image, you can choose list style or time style for playback. List style–>choose playback date ->choose time ->search ->click to play. Time style->channel selection->date selection (drag the timeline can choose the time you need to play and drag the time axis and click then can play the video of that time)
Tips:
Videos in playback are HD main streams, which require a very good transmission condition. Kindly suggest you playback in LAN. Remote playback out of LAN may not 100% work due to connection & network conditions. Fast for/ard & backward buttons may not work due to big video stream. But you can move to a certain time point by using the time bar.
View on PC Client Software
Step 1: Go to https:/support.zositech.com to download the PC Client Software zone Cloud.exe
After opening the ZOSI Cloud software, the User login interface will be popped up.Enter username. password and then click Login” to enter the ZoSI Cloud operational interface. You may enable Remember me/password” so that you don’t need to enter the login password in future Z0si Cloud operations.
Step2.1: add device by Cloud ID
- Go to the right top. Choose add and choose Cloud ID/Go to Device management. Choose add device by Cloud ID.
- Cloud ID: same as Cloud ID
- Username: Enter the NVR’s User Name (defauit: admin)
- Password: Enter the NVR’s Password (default No passv/ord required, just leave blank)

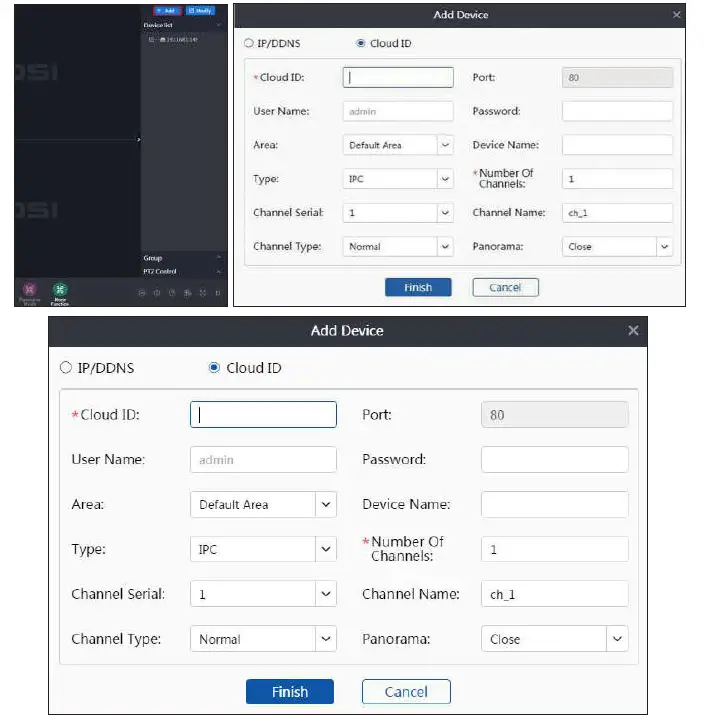
Note: same as the IP Pro/ZOSI Cloud account Descriptions in smartphone Channels: same as your NVR’s channel
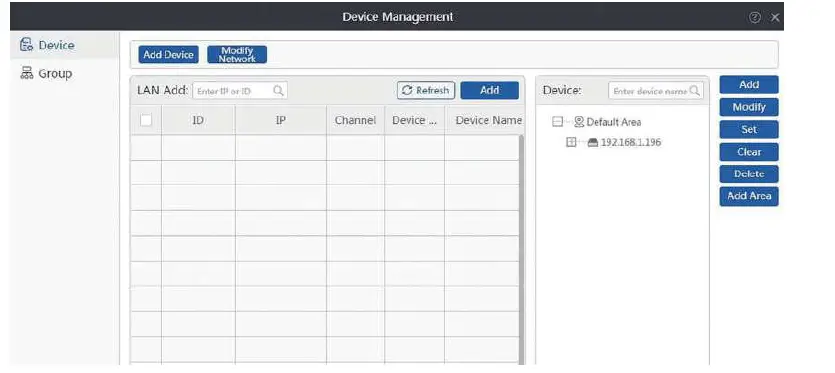
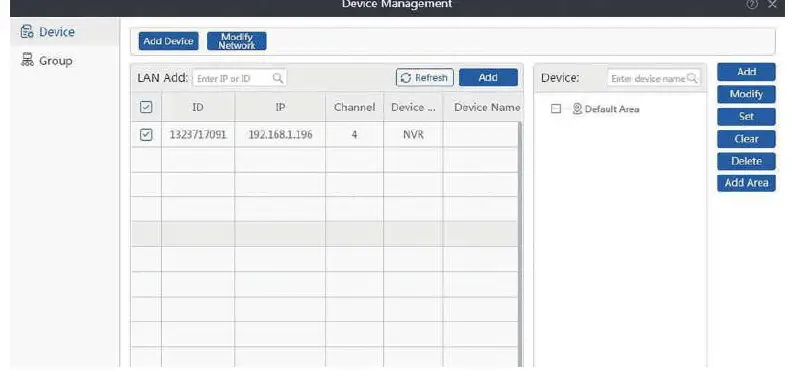
Step2.2: Add device in local network
- Please click on the o Refresh button.

- Please click the “Add” button to add the device and the added device will be shown up at the device list which located at the right side. If you didn’t change the device’s description, the added device will be shown up as IP address.

Step2.3: Image Preview
After adding the device successfully, Double-click the device name in the list, start or stop all the view playing as below: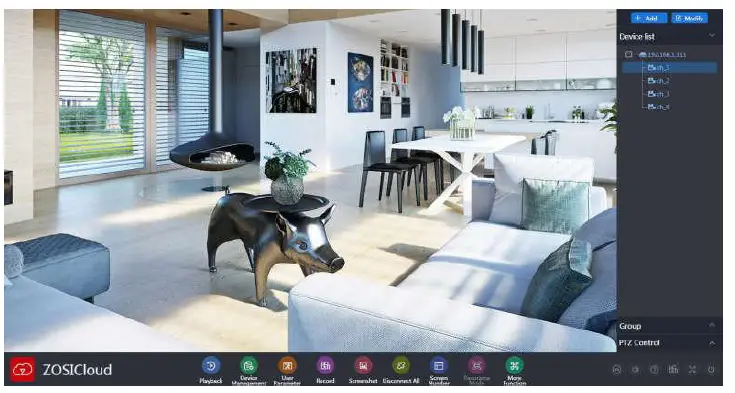
View on PC via IE
When your PC is located on the same LAN as the NVR (normally means they are connected to the same router).
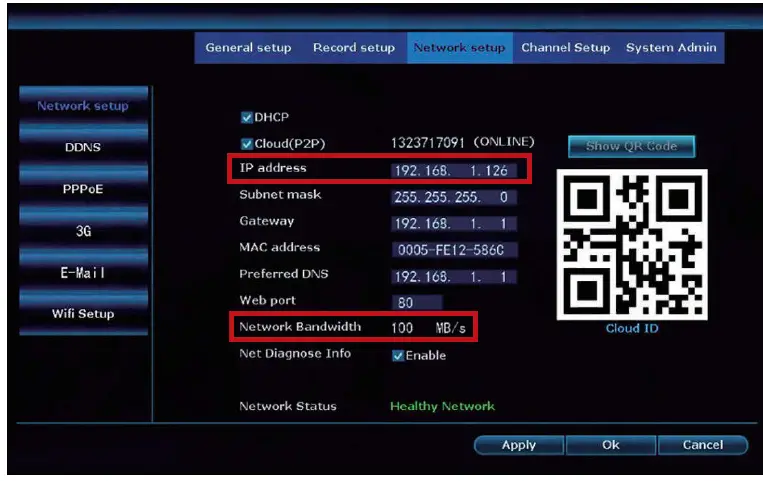
- Step1. Find the IP address and Web port # of your NVR (P address can be found in System Setup> Network Setup).

- Step2. Enter the NVR’s IP address in your IE browser in the format http://youripaddress, for example, http://192.1.1.126 (f the default WEB port 80 has been changed e.g. to 100, you will need to add the new port number when you input the IP address in the browser, for example, http:/192.168.1.126:100).

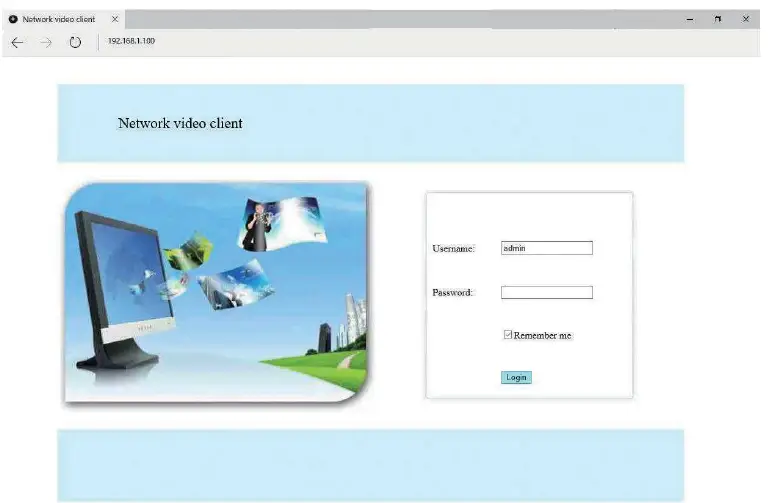
User Name: Enter the NVR’s User Name (default: admin)
Password: Enter the NVR’s Password (default: No password required, just leave blank.)
When your PC is not located on the same LAN as the NVR (For example: view your home cameras from your office PC)
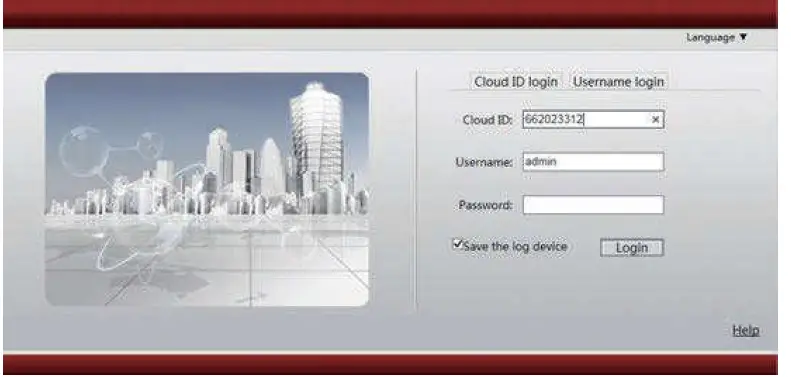
- Step1.Open your Internet Explorer (1E) browser and visit www.e-seenet.com
- Step2. Input Cloud ID, Username, and Password to login.

- Cloud ID: The Cloud ID can be found at right bottom corner of your monitor.
- User Name: Enter the NVRS User Name (defaut: admin)
- Password: Enter the NVR’s Password (default: No password required, just leave blank)
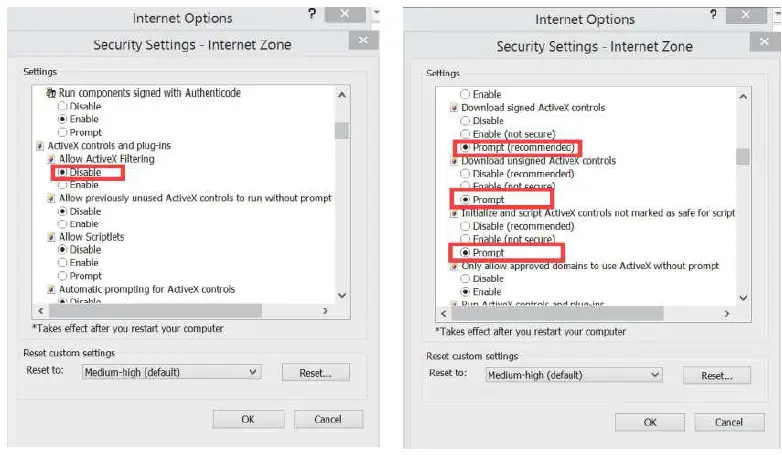
- Step 3: If this is the first time that you use the progam, then please dovinload and run the WebClient.exe control and follow The pop up message.
- Click Tools > Internet Options > Security> Internet > Custom Level
- Scroll down until you see ACTIVEX CONTROLS AND PLUG-INS.
- (lf you have Internet Explorer 9 or 11, change ALLOW ACTIVEX FILTERING to DISABLE. Other versions of lE will not have this option.)
- Change the follow ACTIVEX controls to PROMPT:
- Download signed ACTIVEX controls
- Download unsigned ACTIVEX controls
- Initialize and script ACTIVEX controls not marked as safe for scripting
- Step4: Please click OK, and exit the Security Setings” Menu when you complete the settings.

Add camera by matching code
- When you use Match Code
- Add new add-on cameras to your system
- Re-pair camera to NVR when they lose connection. You need to delete the Network Unreachable channel at first, then re-pair the camera to an unoccupied channel. (unoccupied channel always shows No Video Source under Status.)
Tips: The IP cameras in pre-packed kits have already been paired to the NVR. So the cameras will automatically connect to the NVR once they are plugged in power.
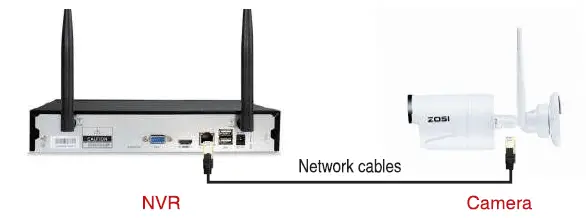
Add a camera by matching the code.
- Power on the camera which has no video and connect this camera to the NVR via a network cable

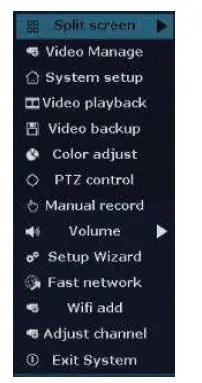
- Right-click the mouse in the blank of the main interface, select “Video Manage”

- Click ‘Refresh”, find the camera’s IP Click “Match Code’, then the NVR will start to match code to the camera.

- After matching the code successfully, the “status will show “Connect success’. Then you will see the camera is added to the NVR and display video on the screen.

REC 7. Record video
The system may not includes Hard Drive(depending on the kit you selected). This system works with 3.5″ SATA Hard Drive or 2.5″ SATA Hard Drive.
Install a Hard Drive (it your system has a pre-installed Hard Drive, please skip this step)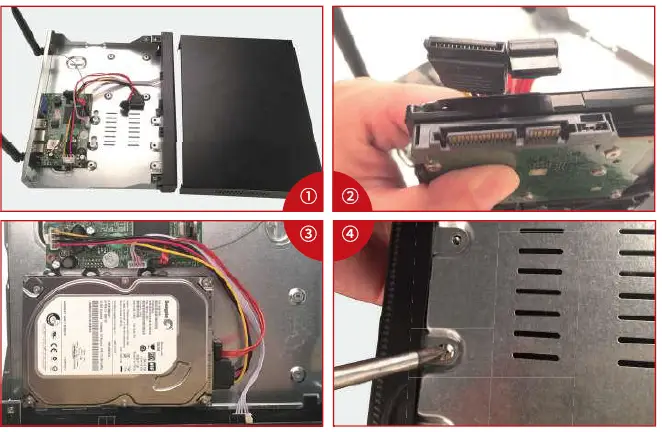
- Unplug your NVH from the power supply, unscrew and remove the top cover.
- Connect the SATA power and data cables from the NVR to the corresponding ports on your Hard Drive (as shown).
- Place the Hard Drive into the NVR. Any cable should cross up over the Hard Drive.
- Holding the Hard Drive and the NVR, gently turn it over and line up the holes on the Hard Drive with the threaded holes on the NVR. Using a Philips screwdriver, screw the provided screws into the holes, and reassemble the cover.
Tips:
- After installing a Hard Drive, you need to first format the Hard Drive before you can record
- Right click the mouse > go to System setup > General setup > HDD Setup> Select the Hard Drive (format) > click Format> Click Yes> OK.
Record video
- Right click the mouse > go to System setup > Record setup > Channel choose how many> weekday chose Everyday > Tme >Copy to > All > Ok.
- You shall see the record setings for all channels. Change the record seting according to your prelerence and apply the changes
Playback video
Playback on screen/monitor
Right-click the mouse> Choose Video playback > Choose the time and date you want to playback and Manual search> Choose the channel you want to playback and click Playback.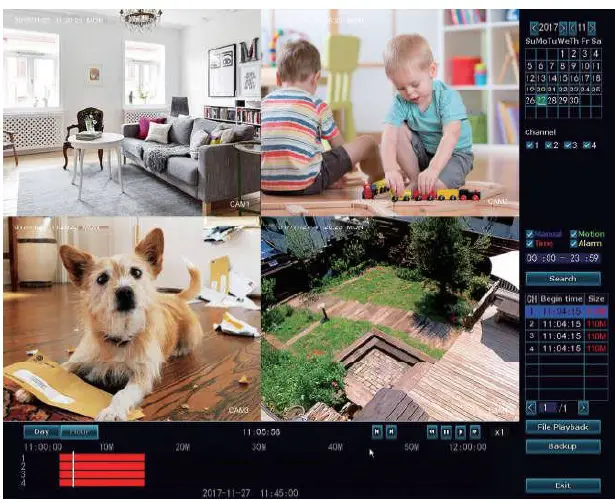
Video Detection
Step1: Right click the mouse > System setup > Record setup > Tick the (Motion) > Click Copy to > Click OK to save the setting
Set Motion Detection Recording, The NVR will record only when motion is detected.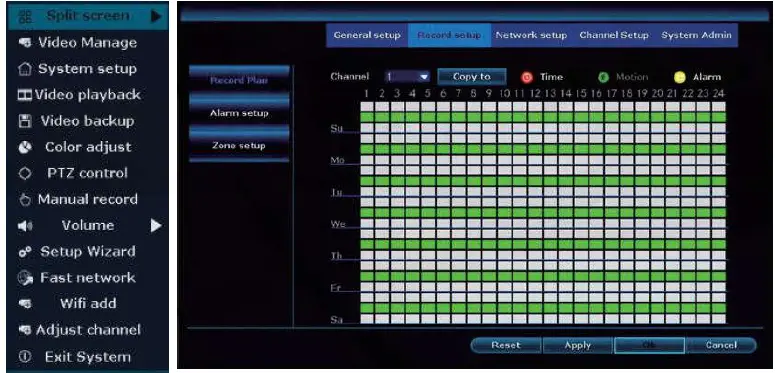
Step2: Go to Channel Setup > Video detection > Choose Detection Motion > Set sensitivity > Tick Alarm, Buzzer, Email notice or App alarm >Click Copy to > Click OK to save the setting.
Note: the area being monitored for motion can be edited under Area Edit..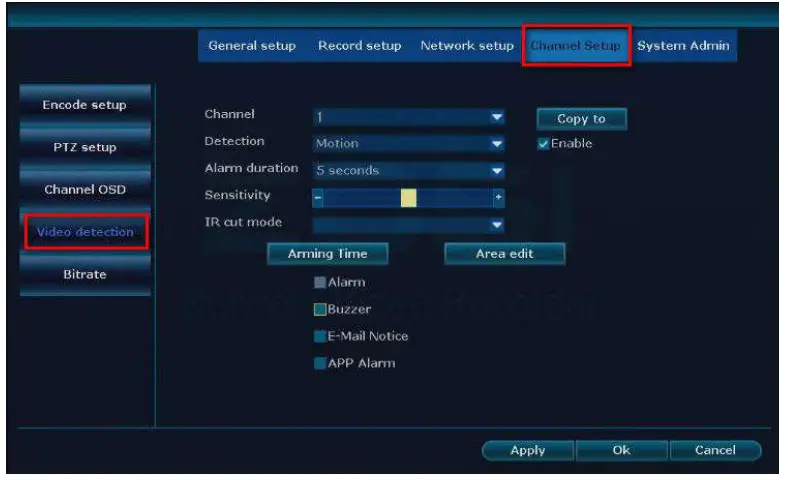
Time scheduled Record
Set time scheduled recording, the NVR will record the specified time period that is set by the user. Right-click the mouse > System setup > Record selup > Tick the (Time)> Set the Schedule time > Click Copy to(if you want to apply the seting to other channel or all channels) > Click OK to save the settings.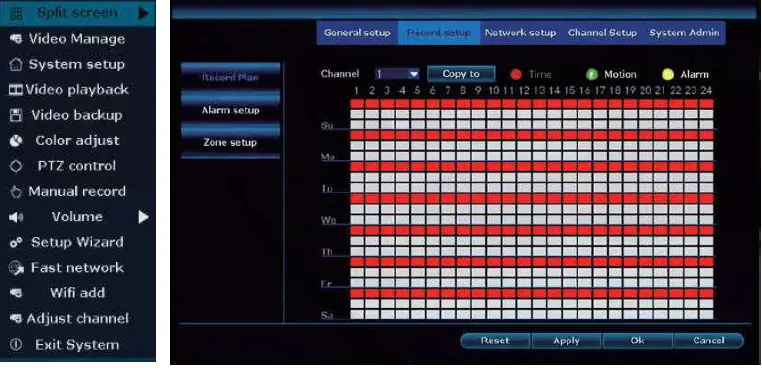
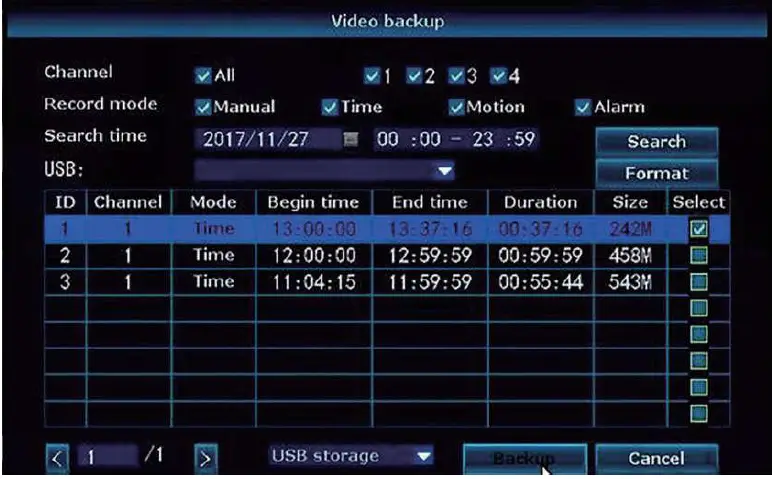
Backup videos to USB storage
- Prepare a USB flash disk for backup
- Right click the mouse > Choose Video backup > Choose the channel, Record mode and Search time > Search > Select the video you vwant to backup > Click Backup.

Extend WiFi Range
Wireless connection is easy and convenient, but it’s not a universal application. Because of the character of WIFi, the wifi signal will be decreased when going through some obstacles. Some methods can be applied to bypass obstacles and extend Wifi range.
Position the Antenna Correctly
Wifi range is like an apple and the antenna of NVR is in the center of it. Wifi signal is strong all around the WiFi range. The antenna of the NVR should be put straight up, if not, the WiFi signal will be weak. According to the signal transmission character of antenna, the antenna of cameras should overlap or parallel to the NVR WiIFi range, as the pictures shown below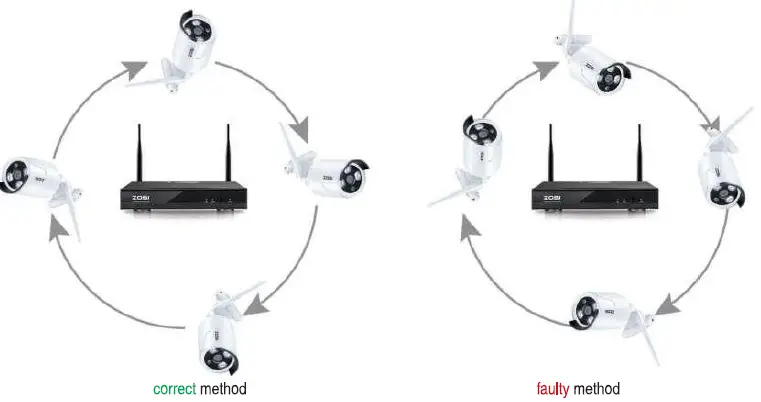
Use Antenna Extension Cord to prolong WIFI distance
Method of installing the antenna extension cord.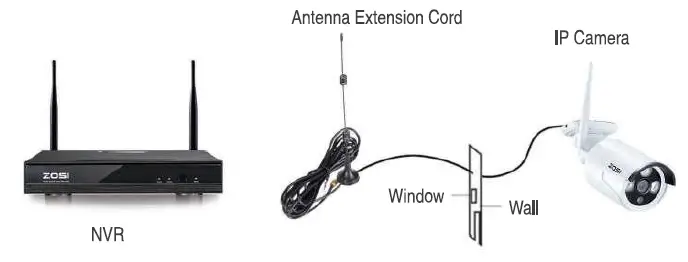
Repeater Setup
Repeater function can’t strengthen V/iFi signal for wireless NVR kit, but can extend the distance by repeaters-WiFi cameras. Only when the repeater cameras and repeated cameras are positioned correcty, WiFi distance will be extended. Repeater function and 3 meters antenna extension cord are two methods to extend WIFi range. Users can choose one according to real situation.
Step 1: Access the Repeater Setting
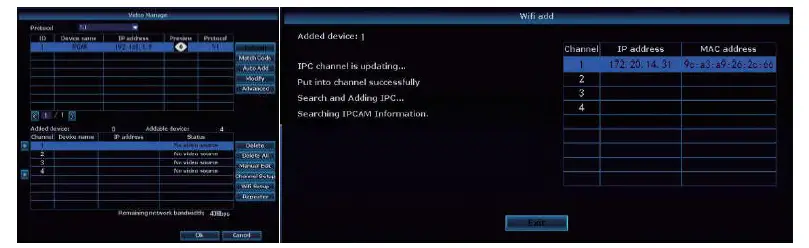
Right-click the mouse to select the “Video Manage”, then click Repeater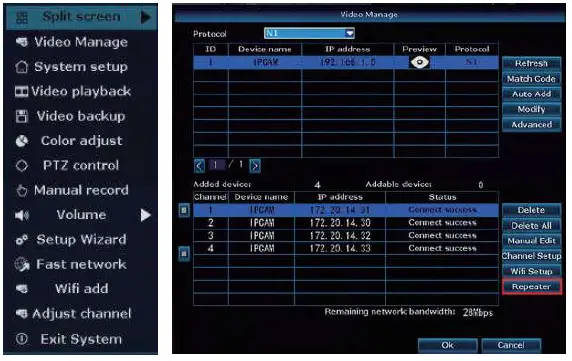
Step 2: Set up Repeater
Firstly click the button ” behind the CH2, then add the CH3, finally click “Apply’ to save the settings (t will take about 1 minute)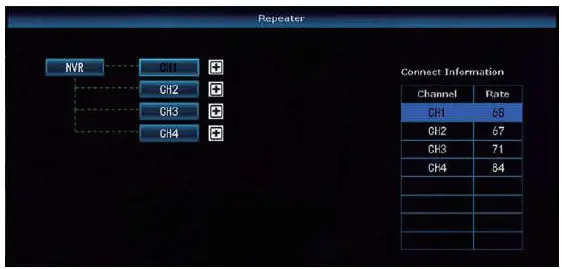
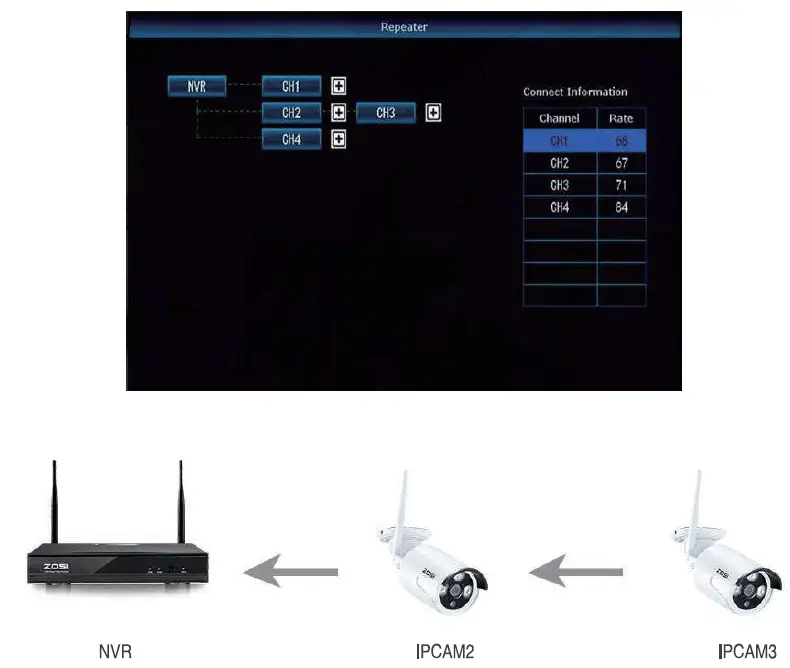
As the picture shown above, when the IPCAM3 is placed at somewhere that is out of NVR wifñi range, and the IPCAM2 in between ith strong WiFI Signal, users can put the IPCAM3 close to the NVR and plug it into power supply, setup repeater for the IPCAM3 through the IPCAM2, and then instal the IPCAM3 to the presupposed place.
Step 3: Delete the repeater
- Move the mouse to the CHx (x is the channel number)which is required to be deleted, left-click the mouse to delete, and then click ‘Apply and “OK.
- You can configure a repeater only when the transmission distance needs to be increased
- As the coverage of the NVA wireless system can meet most of the situations, it’s suggested that do not configure the repeater blindly.
- Repeater configuration can not enhance the signal of the cameras, it’s just to extend the distance by the relay vay.
- Only when the cameras be placed reasonably.t can achieve distance extension( The most effective way is to put the cameras and the NVR in the same line)
FAQ
FAQ 1
Q: How to upgrade the NVR system?
A: Please follow the below steps to upgrade the NVR system.
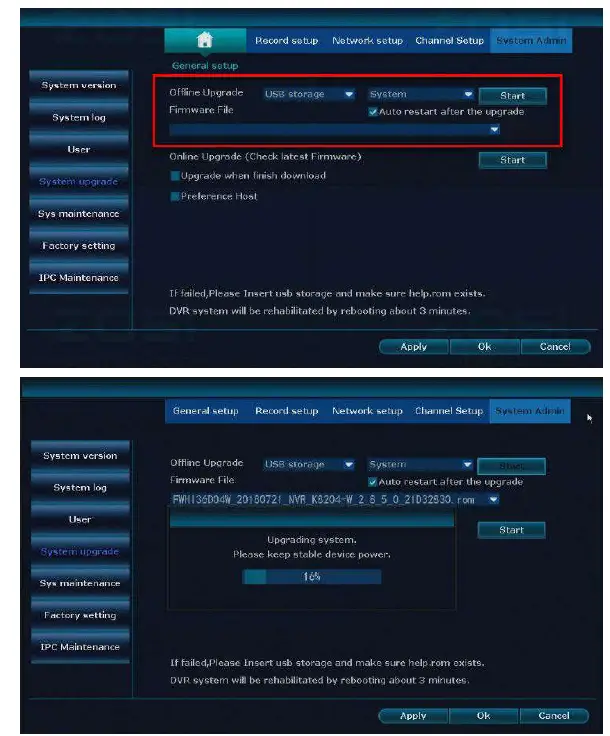
Method 1: Offine Upgrade
- Contact Tech support service @ z0sitech.com to get the upgrade file
- Please copy the NVR upgrade file ***”.rom to your USB USB flash disk, and do not change the name of the upgrade file.
- Right-click the mouse > System setup > System admin > System upgrade > USB storage> click start.

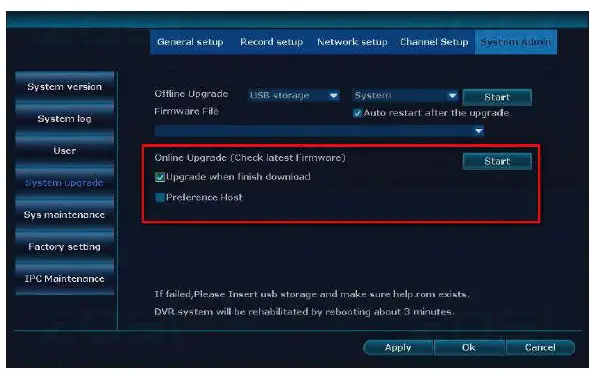
Method 2: Online upgrade
- NVR must be connected to the Internet (See the section 2 in this manual about connect the NVR to the Internet)
- Right-click the mouse > System setup > System admin > System upgrade » Check “Upgrade when finish download” > click Start

Note:
- Do not power off the NVR during the upgrade process, otherwise, the upgrade will be failed.
- During the upgrade process, if the upgrade is failed because of improper operation.
- Starting the emergency recovery method can be used to restore the system, please restore the system according to the following steps: check the upgrade file and copy it to the root category of the USB flash disk. Then insert the USB flash disk into the NVR, and power on the NVR. You will hear the sound “Dee’, and please wait for about three minutes after that the system would be recovered and automatically restarts.
FAQ 2
Q: I cannot get any display on TV from the NVR system.
A: This is caused by a resolution compatibility issue.
- The default Output resolution of the NVR is 1280″1024, which may not be compatible with some monitors. Here is how to solve it:
- Connect the NVR to any other monitor via VGA; (or you may also try any other monitor via HDMI to see if you can enter the menu)
- When you are able to see the menu, right-click the mouse, go to System Setup > General Setup> Screen Setup > VGA resolution; change it to 1080p@60, Apply to save it
- Connect the NVR back to your primary screen via HDMI and you should have a working monitor.
FAQ 3
Q: Some camera does not have video, or it comes in and out
- The IP cameras have not been paired to the NVR, please refer to section 6 in this manual to add camera by matching code
- You are experiencing insufficient WiFi signal caused by obstacles or signal interference. There are 2 methods to boost your wifi.
- To extend Wifi Range, please refer to section 12 in this manual
- For setup repeater, please refer to section 13 in this manual
FAQ4
Q: Why some buttons on the App do not function?
A: The App is developed not only for the model you purchased, so it has to cover all functionalities, which your model may not have. This as you might be able to add new add-on devices to the s in the future.


