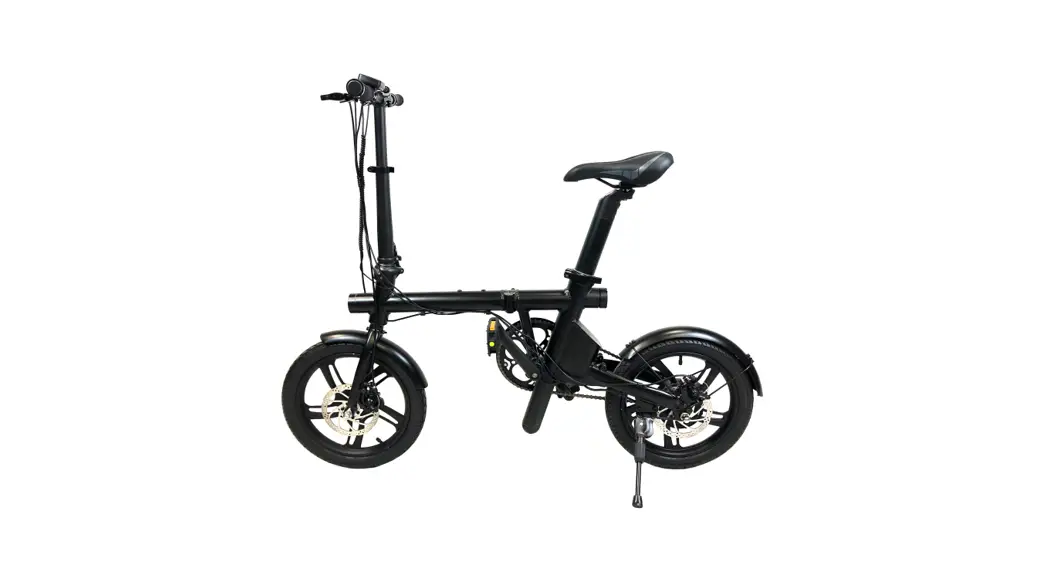
![]() UrbMob Fld16 Compact Electric Folding Bike
UrbMob Fld16 Compact Electric Folding Bike
Instruction Manual
This is a precision instruction, please make sure you read this carefully before you try your first ride. If you doubt about any information inside this instruction, please contact us or your local distributer.
Meet your E bike
| 1 Handlebar sleeve | 11 Frame |
| 2 Display | 12 Front light PCB |
| 3 Power-off brake handle(Left) | 13 LED front light cup |
| 4 Handlebar | 14 Front light lens |
| 5 Power-off brake handle(right) | 15 Front light cover |
| 6 Handlebar sleeve | 16 Fender screw |
| 7 Vertical stand tube | 17 Fork |
| 8 Fixed buckle | 18 Front fender |
| 9 Pole with folding system | 19 Front wheel |
| 10 Limiting stopper parts |
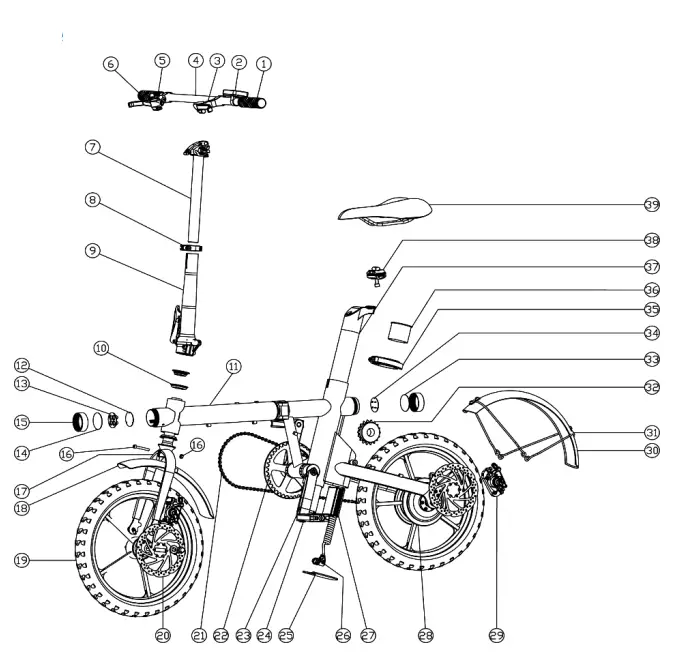
| 20 Front disc pad | 30 Rear Fender |
| 21 Chain | 31 Holder for fender |
| 22 Chain wheel | 32 Flywheel |
| 23 Sprocket crank | 33 Rear light lens |
| 24 Pedal | 34 PCB board rear light |
| 25 Cover plate of controller box | 35 Seat pole quick dismantling |
| 26 Power line | 36 Inner support sleeve |
| 27 Controller | 37 Battery |
| 28 Motor | 38 Clamp of seat cushion |
| 29 Rear disc gear | 39 Seat cushion |
Parameter
| Product name: E-bike | Motor : 250W brushless geared DC motor | Break: 160mm disc break |
| Model name: UrbMob Fld16 | Rated output power: 250W | Rim: 16 inch Al-Alloy 13G36H |
| Size: 1320*580*980mm | Motor efficiency: ≥80% | Tire: Kenda 16*2.125 |
| Folded size: 710*360*630mm | Rated RPM: 300r/min | Chain wheel: Pro wheel 52T |
| Wheel base: 930mm | Rated voltage: 36V | Fly wheel: 14T |
| Net weight: 14kg | Max torque: 40N.m | Rear hub: Sigma AluAlloy |
| Range: 25-40km | Overcurrent protection: 12±1A | Chain: KMC |
| Standard load: 100KG | Low-voltage protection :30±1V | Handle bar: EVA |
| Top speed: <25km/u | Kwh :≤1.2Kw.h | Display: Kunyenga LCD |
| Charge time: 4-7Hs | Ride system: 5 classes PAS + cruise | Controller: Kunyenga sine wave FOC |
| Battery type: Lithium-ion | Tire diameter: 16inch | Break lever: Alu-Alloy E-bike lever |
| Battery capacity: LG 36V 6.4Ah | Frame: 16 inch 6061 Alu-Alloy foldable | Saddle: KNUS |
| Noise : ≤62db(A) | Front fork: 16 inch 6061 Alu-Alloy | Pedal: Foldable pedal |
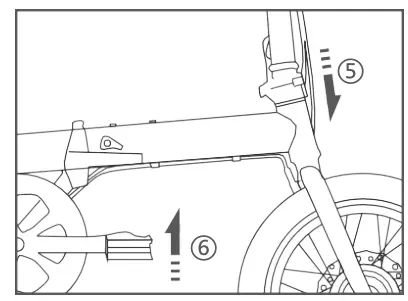
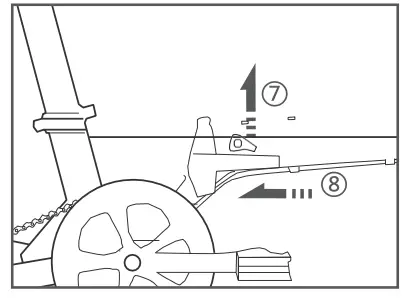
Fold your E-bike 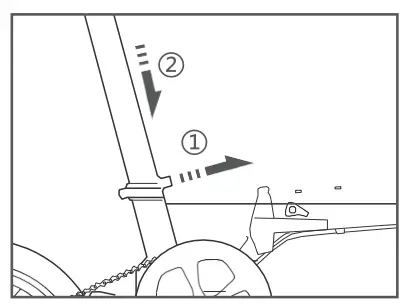
- Grab the seat post (important). Loose the clamp.
- Push the seat post till the ground slowly tight the seat post clamp.

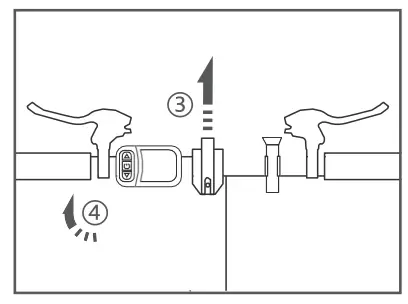
- Loose the handle bar clamp.
- Turn the handlebar clockwise till vertical, tight the clamp.

- Release the lock clamp, fold the head tube.
- Fold the pedal by pushing it level.

- Release the safety cap.
- Null the lock bar, fold the main tube.
Opeerate your E-bike
Display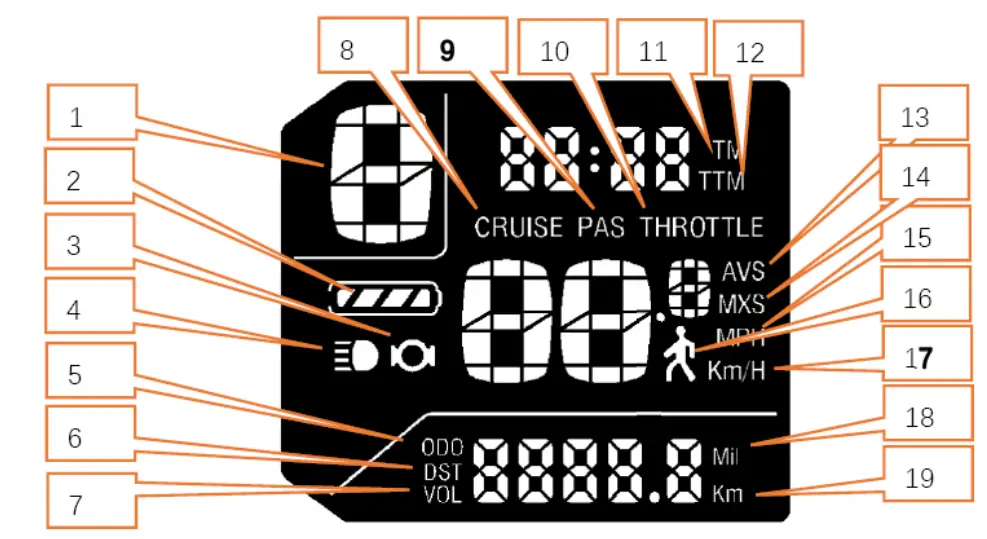 Operate your E-bike
| 1 | ASSIST | Gear | 11 | TM | Single ride time |
| 2 | battery status | 12 | TTM | Accumulated time | |
| 3 | Brake sign | 13 | AVS | Average speed of a single ride | |
| 4 | Front light open sign | 14 | MXS | Single maximum riding speed | |
| 5 | ODO | Accumulated mileage | 15 | MPH | Real time riding speed (British system) |
| 6 | DST | Single ride mileage | 16 | non zero start sign | |
| 7 | VOL | Battery real time voltage | 17 | Km/H | Real time riding speed (Metric) |
| 8 | CRUISE | CRUISE sign | 18 | Mil | Mileage (British) |
| 9 | PAS | Power assist sign | 19 | Km | Mileage (Metric) |
| 10 | THROTTLE | THROTTLE handlebar open |
Operate your E-bike
II Display Function
- Power on and power off
Long button , power on; Press the long key again to power off. When the bike stops and does not operate the display for 10 consecutive minutes, the display will automatically shut down and power off. (Shutdown time can be set)
 - Key operation
After power on, short button , gear increase, long press to turn on front light (need controller support); Short press to switch the display of ODO, DST and Vol. Short key to reduce gear.
 - Automatic prompt interface (fault code display)
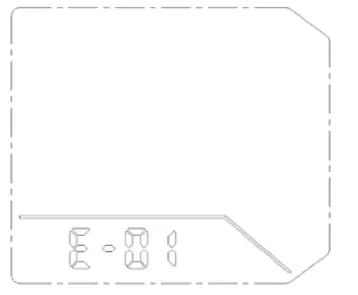
Fault code definition
E-01 motor fault
E-02 THROTTLE handlebar failure
E-03 controller failure E-05 controller under voltage
E-06 communication failure, the display cannot receive the controller signal
E-07 communication failure, controller cannot receive display signal
When there is a fault in the electrical system, the fault code flashes. After the fault is eliminated, the display will automatically exit the fault code interface. - Internal parameter setting
After power on, long press and  key to enter the internal parameter setting
P01: backlight brightness adjustment, 1 darkest, 3 brightest;
P02: mileage unit, 0: km; 1:MILE ;
P03: voltage class: 24 V, 36 V, 48 V
P04: sleep time: 0 is not sleep, other numbers are sleep time 1-60 minutes;
P05: power gear: 3, 5, 9, 0;
P06: wheel diameter: unit, inch; Accuracy: 0.1;
P07: speed measuring magnetic steel number: 1-100 optional;
P08: speed limit, range 0-50km / h, 50 means no speed limit (this parameter is based on KM)
P09: Zero / non-zero start setting, 0: zero start; 1: Non zero start;
P10: drive mode setting, 0: power start; 1: Electric drive; 2. Assist and electric drive coexist;
P11: resistance sensitivity setting, range 1-24;
P12: power start strength setting, range 0-5;
P13: power magnetic steel plate type setting, 5, 8 and 12 magnetic steel quantity types;
P14: controller current limit setting, range 1-20a;
P15: it has not been opened for the time being;
P16: long key to clear ODO for 5 seconds and total time TTM clear;
P17: cruise function setting, 0: no cruise; 1: Cruise;
 E-05 controller under voltage
Charge your E bike
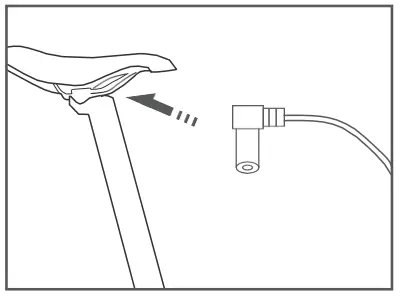 Charging port is right beneath the saddle covered by a rubber dust-free cover, uncover it, plug the charger into the port; cover the port again when charge
 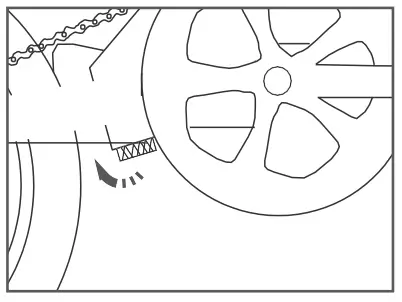 If you want to charge your battery separately, roll out the power port, release the seat post clamp, pull out the seat post battery, then repeat the steps above.
Accessory list
- front mud fender
- rear mud fender
- reflectors
- ring
- lamp Please mount accessories according to your needs.
Attention
Battery & Charge
- Red indicator on the charger means charging, when it turns green ,please stop charging your battery;
- Do not expose to temperature -20 ℃ < or > 35 ℃,Fully charge the battery and store separately if not use for over 30 days. Fully charge it every 60days, or the battery may self-discharge and be damaged. This damage is not covered by the Limited Warranty;
- Never expose your battery to damp environment or soak into water, never short circuit the battery terminals, This damage is not covered by the Limited Warranty;
- Charge with the original charger only;
- Do not disassemble/punch battery pack. Do not place it in fire or drop from high, Avoid contacting with contacts;
- Turn off E-bike’s power before charge it. Plug the charge port first then the AC plug;
- Do not cover any items on the charger during charging;
- Pull out charge port before the AC plug;’
- Please keep battery outreach from children.
- The capacity of Li-battery will decrease when -10 ℃<;
- Recycle or dispose of in accordance with local regulations.
Ride & Maintain
- Must with your helmet on and follow the local laws and regulations ;
- Read this instruction carefully before riding a E-bike;
- Start your ride with the 3rd PAS class ;
- Keep the lamp on at night ;
- Fully check break system ,tire pressure ,and battery remain before riding ;
- Do not ride with 1 or more persons, do not jump ;
- Do not intense riding ;
- Do not ride into water (pools) over 3cm;
- Replace & check the quick-wear parts(like break pad)in time
- Juveniles Pregnant Intoxicated are not allowed to ride bike
- Keep your E-bike away from damp, high temperature or corrosive environment ;
- Keep your E-bike away from sun-scorched and rain drenched;
- Check screws chain and other parts regularly, this is part of your own daily maintenance.
![]() This E-bike is distributed by
This E-bike is distributed by
www.UrbMob.eu


