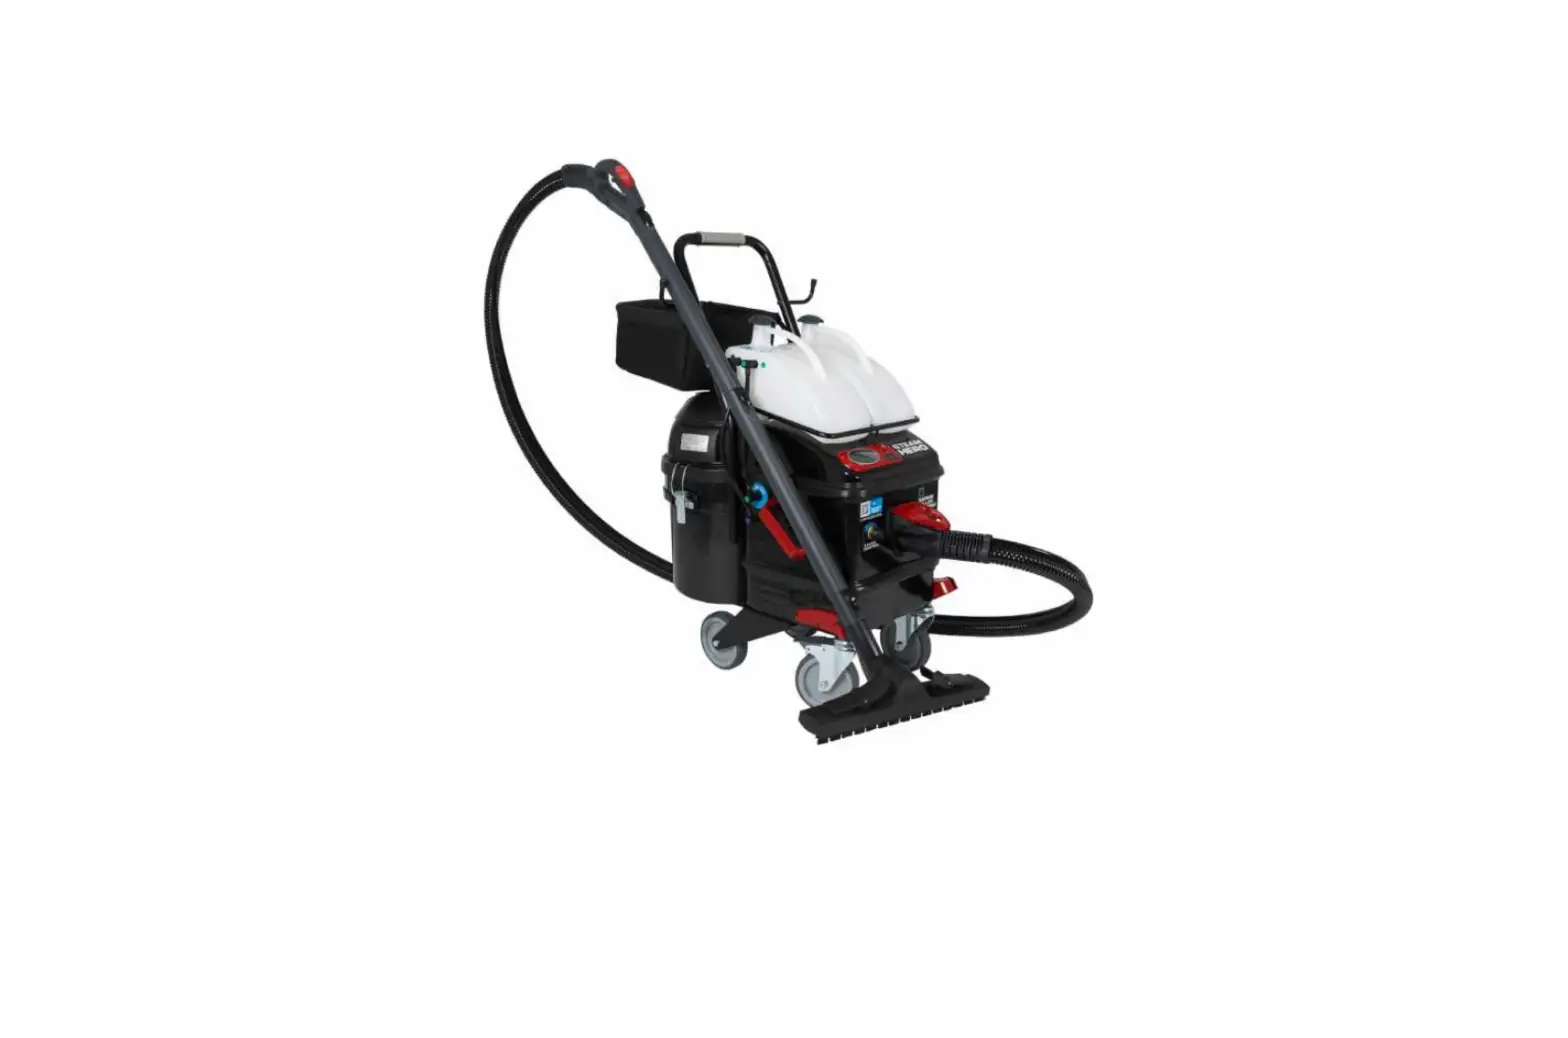
US STEAM SteamHero Commercial Steam Vacuum Cleaner User Manual
Overview
![]()
- D0 NOT leave the steam cleaner unattended while plugged in
- Turn off all controls and unplug the electrical cord when not in use
- DO NOT use with a damaged cord or plug
- If the steam cleaner is not working as it should, has been dropped, damaged, left outdoors or dropped into water, call for service before using
- NEVER attempt to disassemble this steamer
- DO NOT handle the electrical plug with wet hands
- DO NOT use near children
- DO NOT pull or carry by power cord
- Keep cord away from heated surfaces
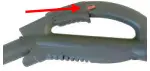
- ALWAYS set safety switch on hose handle into the locked position when not in use
- Not setting safety switch to locked position could result in an injury
- Keep body, hands, and feet away from accessories or nozzle when steam is in active use
- ALWAYS test a small area before cleaning a large area on any type of surface to make sure no damage will occur
- The steam cleaner should be the only appliance plugged into an outlet
- Use only a 12 gauge / 15 AMP rated or higher rated extension cord with max length of 25ft
- Any alteration of electrical cord supply on this steam cleaner will void all warranties
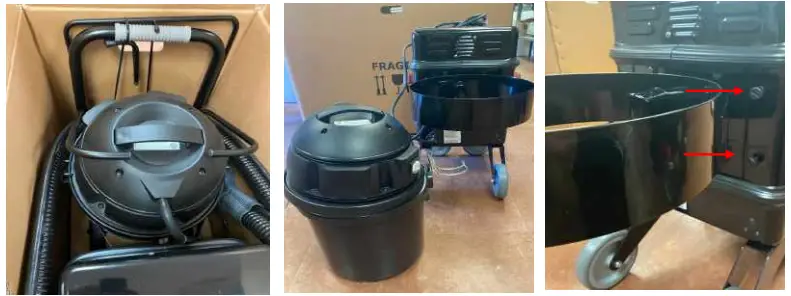
Assembly

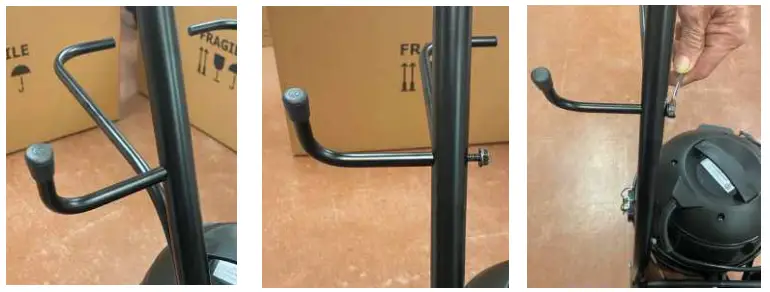
- Remove Handle Assembly from shipping box
- Un-latch collection tank from motor and remove tank and motor
- Remove 4 screws from back of the SteamHero

- Attach handle and re-insert 4 screws (hand tighten only) into back of the SteamHERO
- Re-attach collection tank

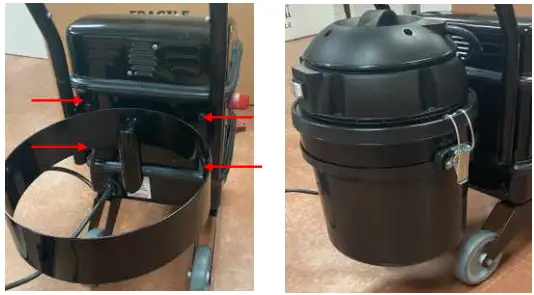
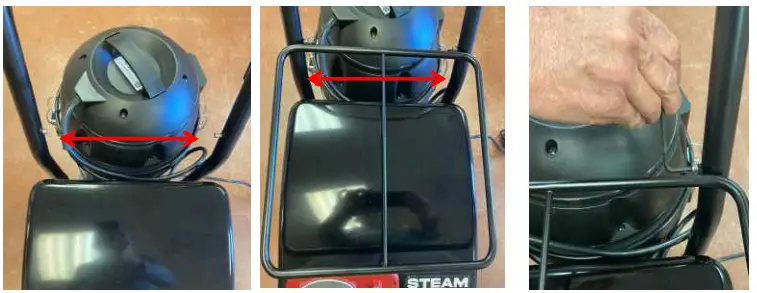
- Attach hanging brackets
- Using 10mm wrench attach hex head bolt to bracket
- Tighten until snug

- Remove allen head bolts from handle
- Insert reservoir bar holder and replace allen head bolts
- Tighten using allen wrench

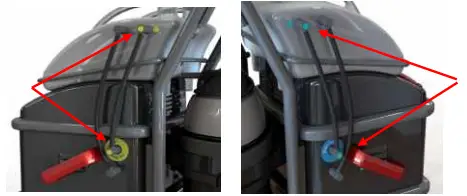
- Attach tank hoses to side of SteamHERO
Line up colored hoses with color indicated hole on the reservoir tanks
Quick Start
Start-Up
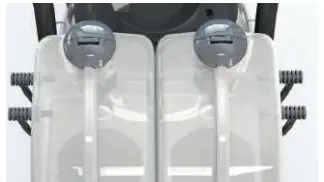
- Add Water
- Remove grey cap and add tap water to both tanks
- Each tank holds one gallon

- Plug into Electrical Outlet
- The SteamHERO should be the only appliance plugged into the electrical outlet
Extension Cord - Use only a 12-gauge / 15AMP rated or higher rated extension
cord - Max length: 25ft
- The SteamHERO should be the only appliance plugged into the electrical outlet
- Push the ON/OFF Button


 It will take 10 minutes for the SteamHERO to heat up and reach working temperature
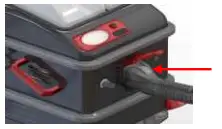
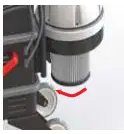
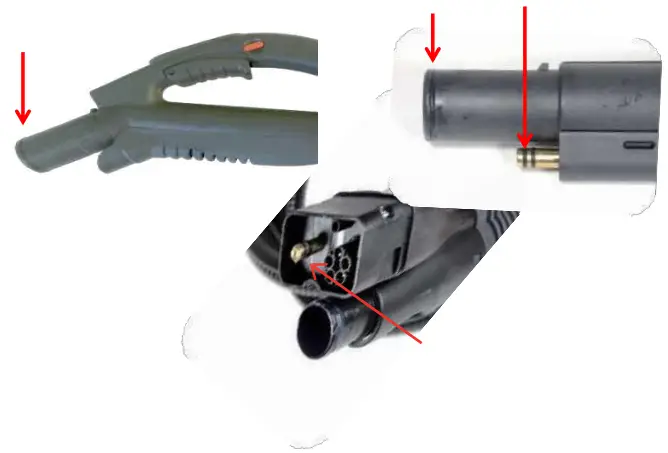
 - Connect the Hose
- Secure the SteamHero by pushing down the front brake locks; locking the wheels will make it easier to push the hose into the steamer

- Secure the SteamHero by pushing down the front brake locks; locking the wheels will make it easier to push the hose into the steamer
- Insert the hose into the connection port
- Push until you hear a “click”

- Push until you hear a “click”
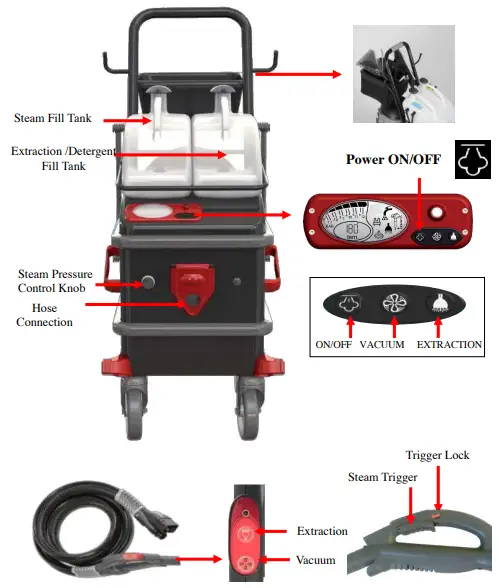
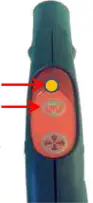
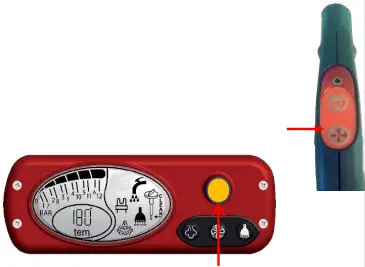
- Steam Control
- Unlock by pressing RED button on hose handle
- Squeeze trigger

- Adjust Steam Pressure
- Turn the knob on front of SteamHero to increase or decrease steam pressure

- Turn the knob on front of SteamHero to increase or decrease steam pressure

Hot Water Injection / Extraction
The Extraction function will inject water into the steam.
This function is valuable when using the steam mop or hard to clean areas. The SteamHero becomes an extractor when combining this function with the vacuum.
Activate by pushing and holding the ![]() button on the hose handle, until the light turns on.
button on the hose handle, until the light turns on.
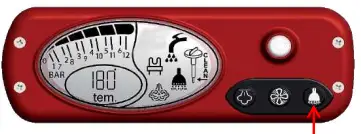
Increase / Decrease water injection by pushing and holding the ![]() button on the console.
button on the console.
Vacuum
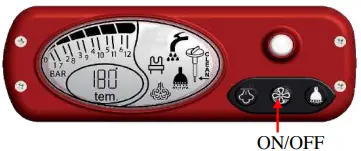
Activate the VACUUM:
- Pushing the
 button on the console OR
 - Pushing the button on the hose handle
- Increase / Decrease suction by holding the button on the hose handle.
The indicator light will change colors depending on the level of suction.
Green = Low Suction
Orange = Medium Suction
Red = High Suction
Warning:
To use the vacuum to soak up water, the polyester filter must be removed first.
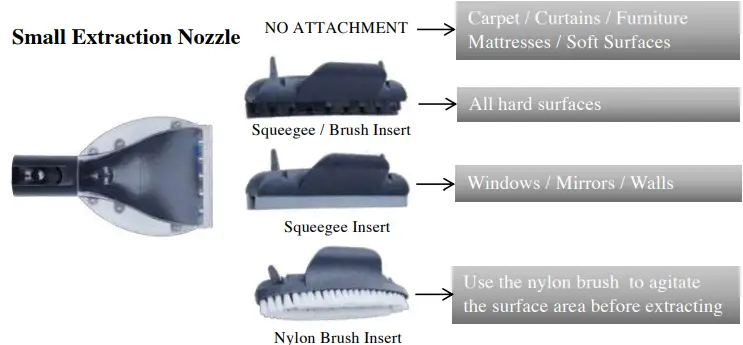
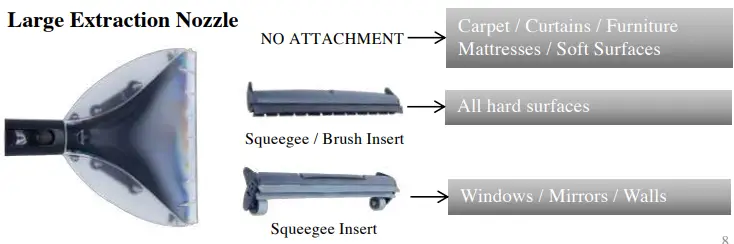
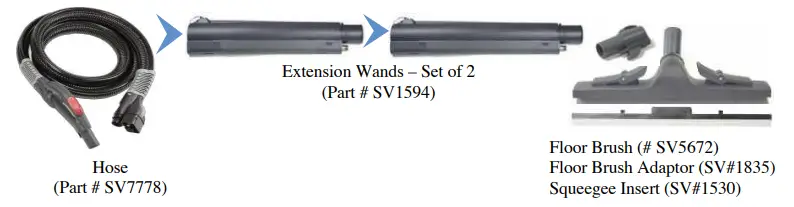
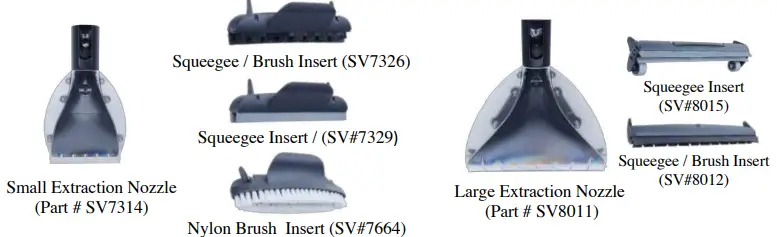
Extraction
Your steam vacuum uses a separate reservoir tank to inject water into the steam as it’s released from the extraction nozzle. Use the extraction function in combination with the vacuum for deeper cleaning of soft and hard surfaces.
- Use the extraction nozzle for cleaning furniture, curtains, mattress, windows, walls, and floors.
- After cleaning, use the vacuum to remove excess water for faster drying.

Accessories
(to order visit www.ussteam.net)
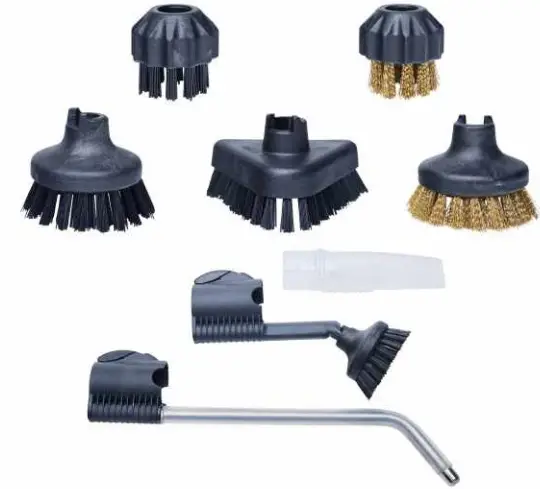
Brushes
1” Round Nylon
1” Round Brass
3” Round Nylon
3” Triangle Nylon
3” Round Brass
Vacuum Attachment
(Part # SV5645)
Short Jet Nozzle
(Part # SV7302)
Long Jet Nozzle
(Part # SV5439)
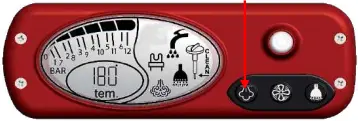
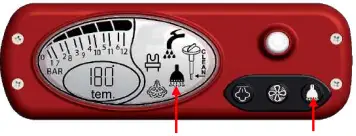
Indicator & Warnings

Boiler Symbol

- Will flash during warm-up and during use
- Will stop flashing when the SteamHero is ready for use
Steam Symbol

Increase (+) or decrease (-) steam pressure by turning the black steam control knob on the front of the SteamHERO
![]() Extraction / Hot Water Injection is activated
Extraction / Hot Water Injection is activated
![]() De-scale Warning (see instructions page 11)
De-scale Warning (see instructions page 11)
Low Water Indicator
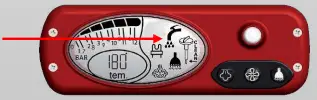
The SteamHero will let you know when it is low on water. It will stop producing steam you will hear a beep, and the Low Water Symbol will flash indicating one or both of the reservoir tanks are empty.
- Refill both the steam and extraction tanks with tap water
- Empty and drain vacuum collection tank
Troubleshooting
| PROBLEM | SOLUTION | |
| The SteamHERO powers ON after plugging into the electrical outlet and then turns OFF | This is normal: Push the ON/OFF Button on the console to power ON the SteamHERO | |
| Does not turn on when the power button is pushed | The SteamHero should be the ONLY appliance plugged into the electrical outlet: Check the fuse box for tripped circuit breaker Extension cord must meet the following requirements: 12-gauge 15AMP rated or higher 25 ft. max length | |
| Alarm is activated during warm-up | Refill the steam reservoir tank If tank is full, remove black hose on the side of the reservoir tank. Water should be dripping from the hose. Replace hose and push ON/OFF button on the console to restart the pump If tank is full, then remove fill cap and see if the pick-up hose is submerged Push the ON/OFF button on the console to restart the pump | |
| Alarm sounds during use | The SteamHero is out of water: Refill both the steam and extraction reservoir tanks Push the ON/OFF button to reset | |
| No vacuum suction | The collection tank is dirty or full. Check hose for foreign objects Check and replace filter | |
| No steam when squeezing trigger: | Check the hose connection Is the “lock” activated on the hose handle? Adjust Steam Pressure Knob on front of SteamHERO | |
| No water is released during extraction | Check the spray nozzle for mineral build up Descale as needed to remove (see manual for instructions) | |
| Error Codes: Will show on console screen | 01 – Refill Steam tank 02 – Refill Extraction tank 03 – Boiler did not refill 05 – Descale boiler | 11 |
Maintenance
Your SteamHero will require minimal maintenance,
IF you use it regularly or
IF you clean and drain water from the boiler when not in use.
After Each Use
- Clean all accessories with hot soapy water
- Clean hose
- Empty vacuum bucket
- Check and clean vacuum filter
- Refill Steam and Extraction Reservoir tanks
Every 4-6 Months
- Descale the boiler (instructions on page 11)
- Check and replace vacuum filter as needed
Once per Year
- Check O-rings on hose and extension wands for wear or damage
- Replace O-rings if needed (you received an O-ring kit with your purchase)
De-scaling
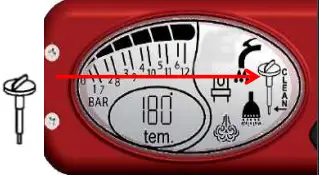
Hard water will cause lime mineral deposits to build up in the boiler. This can damage the boiler if not removed by descaling. We recommend descaling the SteamHERO every 6 months or earlier if the warning indicator light starts flashing and the display shows the word: CLEAN
WARNING: The SteamHERO MUST be cool and at room temperature before descaling.
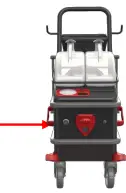
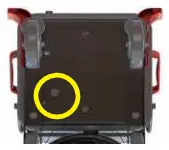
- Identify drain cap on bottom of SteamHERO.
- Turn the cap counter-clockwise.
- Place container under the drain cap to catch the water.
- Remove cap and drain boiler completely.
- Replace drain cap and hand tighten.

- Completely empty the steam reservoir tank.
- Mix ¼ gallon vinegar + ¼ gallon water and pour into steam reservoir tank.

- Turn SteamHERO “ON”
 for 1 minute to fill the boiler with de-scaling mixture.
 - Add enough descaling mixture into the boiler to cover the bottom surface.

- Turn “OFF” the SteamHERO and let mixture sit in boiler for 30 minutes.
- After 30 minutes, remove drain cap and completely empty mixture from boiler.
- Replace drain cap and hand tighten.
- Empty descaling mixture from reservoir tank and fill with tap water.
 If the descaling mixture draining from boiler is extremely dirty, repeat steps and descale a 2nd time.

Specifications
| POWER SUPPLY | 120 V. 60Hz |
| READY TIME | 10 MINUTES |
| BOILER REFILL SYSTEM | AUTOMATIC REFILL |
| STEAM FLOW ADJUSTMENT | TURN DIAL CONTROLER |
| PRESSURE | 10 BAR / 145 PSI |
| MAX TEMPERATURE | 356 °F |
| BOILER VOLUME | 1/2 GALLON |
| BOILER MATERIAL | AISI 304 |
| WATER TANK CAPACITY | 1 GALLON – EXTERNAL TANK |
| DETERGENT/ TANK CAPACITY | 1 GALLON – EXTERNAL TANK |
| VACUUM RECOVERY CAPACITY | 2.2 GALLON WET/DRY WITH WASHABLE FILTER |
| VACUUM POWER ADJUSTMENT | YES, 3 LEVELS |
| BOILER POWER | 1700 W |
| VACUUM POWER | 1200 W |
| AIR FLOW | 95 m3/h – 56 CFM |
| MAX DEPRESSION | 2.100 mm H2O – 82.6 in H2O |
| DIMENSIONS L x W x H | 29.3“ x 18.4“ x 36.6“ |
| HOSE LENGTH | 10 FT |
| NET WEIGHT | 61.7 lbs |
Notices
Read all instructions before using this steam cleaner.
WARNING: STEAM GENERATED BY THE STEAM CLEANER IS EXTREMELY HOT AND WILL CAUSE INJURY IF IT COMES IN CONTACT WITH THE SKIN OR EYES. USE AS DIRECTED BY THE MANUAL AND ONLY AIM THE STEAM HANDLE AT THE CLEANING AREA.
![]()
- DO NOT leave the steam cleaner plugged in while unattended
- Turn off all controls and unplug the electrical cord when not in use
- DO NOT use with a damaged cord or plug
- NEVER attempt to disassemble this product in a way not instructed in this manual
- DO NOT handle the electrical plug with wet hands
- DO NOT use near children
- DO NOT pull or carry by cord
- Keep body, hands, and feet away from nozzle or brush steam / Steam can cause burns
- ALWAYS set safety switch on hose handle into the locked position when not in use
- Not setting safety switch to locked position could result in an injury
- ALWAYS test a small area before cleaning a large area on any type of surface to make sure no damage will occur
- DO NOT expose machine to freezing temperatures while not in use
- DO NOT store gasoline or other flammable vapors and liquids in the vicinity of this or any other appliance
ELECTRICAL CONNECTIONS
The steam cleaner uses 110 Volts and will pull 13.1 Amps. It should be the only appliance plugged into an outlet.
- Use only a 12 gauge / 15AMP rated or higher extension cord
- Any alteration of electrical cord supply on this steam cleaner will void all warranties
- Make sure all switches on front of unit are in the off position before plugging unit into electrical outlet
- For circuit breaker protection, plug the unit into an outlet isolated from other equipment or turn the other equipment off while using the steam cleaner
- The combined electrical amperage of other equipment and the steam cleaner together may cause a circuit breaker to trip.
- Always press the power button to OFF before you unplug the unit
- Removing the ground prongs from the power cord will void any and all warranties and can cause risk of shock or injury
In order to reduce the risk of fire, electric shock, personal injury or damage to property, follow these instructions carefully. When using electrical appliances, basic safety precautions should be followed.
KEEP FOR YOUR RECORDS. THIS MANUAL MUST BE RETAINED FOR FUTURE REFERENCE. PLEASE READ, UNDERSTAND AND FOLLOW THE INSTRUCTIONS AND WARNINGS CONTAINED IN THIS MANUAL BEFORE USING THIS VAPOR STEAM CLEANER.
Warranty & Repair
SERVICE AND SUPPORT
Many issues can be resolved by calling our service center at (817) 888-8313 / Monday-Thursday 9-5 p.m.
CST, and Friday 8-12 p.m.
All repairs must have an RMA.
RMA’s can be requested from the website: https://ussteam.net/repair Steps for Repair:
- Request RMA.
- RMA number will be emailed along with a shipping label.
- Box up your steamer and include Repair Form.
- Go to FedEx for drop off.
- DO NOT SEND IN A REPAIR WITHOUT AN RMA.
WARRANTY
Your steamer comes with a warranty which becomes effective on the date of purchase from US STEAM and is granted to the initial customer and is nontransferable. Any claims under this warranty must be made before the end of the applicable warranty period.
Your steamer is warrantied for a period of 1-year from original date of purchase for defective material, parts, and workmanship. The warranty EXCLUDES accessories, attachments and normal wear parts, when used in accordance with operating instructions under normal and reasonable use.
During the term of the warranty, all labor and parts to place your product in proper operating condition will be a covered service. You have an EXTENDED warranty covering 2 additional years for defective boiler or heating element. Extended warranty does not include labor cost and return shipping. US STEAM’s responsibility is limited to repair, replacement, credit or refund, any of which may be selected by US STEAM at its sole discretion.
The limited warranty covers only defects arising from normal use and does not include malfunctions or failures arising from: misuse, abuse, neglect, alteration, usage not in accordance with user manual and instructions, depletion of consumables, acts of nature, or damage caused by repairs where such repairs were made without US STEAM’s express approval.
Warranty is Void:
- Damage due to misuse, abuse, negligence, and normal wear related to the product usage
- Any repair or attempted repairs outside of the US STEAM Service Center will void all warranties
- Lack of proper maintenance or use not in accordance with the provided instructions and/or owner’s manual
- Disassembly or attempted disassembly of your steamer
- If the steamer is designated for residential but utilized in a commercial application
- Using an improper electrical source such as using an extension cord that is not at least 12 gauge / 15AMP rated or higher extension cord
- Adding chemicals or cleaning solution to the boiler or reservoir tank
- Parts subject to wear and tear not determined defective or items such as O-rings, brushes, hoses, accessories
GOVERNING LAW, JURISDICTION AND COSTS
All disputes arising out of or related to the warranty shall be governed by the laws of the State of Texas. In the event the customer and US STEAM® LLC are unable to resolve any customer dispute, and any collection action, suit, or other judicial proceeding is commenced, the prevailing party in any such action, suit, or proceeding shall be entitled to recover any cost and attorney fees incurred.
![]() Floors, Kitchen, Grills & Bathrooms
Floors, Kitchen, Grills & Bathrooms
Chemical free cleaning in all food prep and storage areas.
![]() Patient Beds, Wheelchairs & Curtains
Patient Beds, Wheelchairs & Curtains
Steam is a proven killer of virus and infection causing germs
![]() Delis, Freezers & Butcher
Delis, Freezers & Butcher
Chemical free cleaning in areas of food storage and preparation
![]() Desk, Tables & Partitions
Desk, Tables & Partitions
Cleaning with steam guarantees a clean, germ-free work environment increasing productivity, employee retention and reducing sick days.
![]() High Touch Areas, Bathrooms, Locker Rooms & Gym Mats
High Touch Areas, Bathrooms, Locker Rooms & Gym Mats
Steam kills on contact, no dwell time.
![]() Equipment, Lockers & Saunas
Equipment, Lockers & Saunas
Kill viruses and germs found on workout equipment and gym floors.
![]() Toys, Playgrounds & Beds
Toys, Playgrounds & Beds
Steam clean high touch areas where kids pass germs. Extreme cleaning with
steam can reduce sick days for kids and employees.
![]() Seats & Floors
Seats & Floors
Combine steam and extraction into one system for more efficient detailing.
A Better Way to Clean
US STEAM®
2440 Chamber Street, Ste A
Venus, TX 76083
www.ussteam.net
(817) 297-7745


