![]() PREMIUM SMART GRILL
PREMIUM SMART GRILL
& SANDWICH PRESS
KAPGRSWPRSA
User Guide
SAFETY & WARNINGS
Please follow basic safety precautions as follows:
- Take the appliance out of the package and remove all the packaging material. Check the appliance for completeness.
- This appliance can be used by persons with reduced physical, sensory or mental capabilities or lack of experience and knowledge if they have been given supervision or instruction concerning use of the appliance in a safe way and understand the hazards involved.
o This appliance shall not be used by children. Keep the appliance and its cord out of reach of children. Children being supervised not to play with the appliance. - Ensure that drip tray is inserted correctly at the back of appliance.
- Connect the plug to a properly installed socket, ensure that the voltage (220-240V~50~60Hz) matches your domestic power supply.
- If the power cable is damaged, in order to avoid danger, it must be replaced by kogan.com or an authorised representative. Cease use and contact help.kogan.com for support assistance.
- To protect against electric shock, do not immerse the cord, plug or appliance into water or any liquids
- Do not touch the hot surface of the grill during or after operation.
- When the appliance is not in use, the plug should be pulled out of the socket to avoid electric shock and leakage fire due to aging insulation.
- The appliance should be placed in a dry environment and this product should not be used outdoors.
- Always maintain a physical distance of 200mm from the appliance during operation.
- Keep the appliance on a stable surface when in use. Do not use near flammable articles.
- When the appliance is on, carefully move the food tray or other accessories to avoid scalding with hot oil or high temperature liquid.
- No objects shall be placed on top of the appliance. Do not cover or block the heat dissipation positions of the appliance.
- Do not place oversized pieces of food or metal items on the grill, as these may cause fire or danger.
- Cleaning and user maintenance shall not be performed by children.
- This appliance is intended to be used in household and similar applications such as:
o Staff kitchen areas in shops, offices and other working environments;
o Farmhouses;
o By clients in hotels, motels and other residential type environments;
o Bed and breakfast type environments.
OVERVIEW
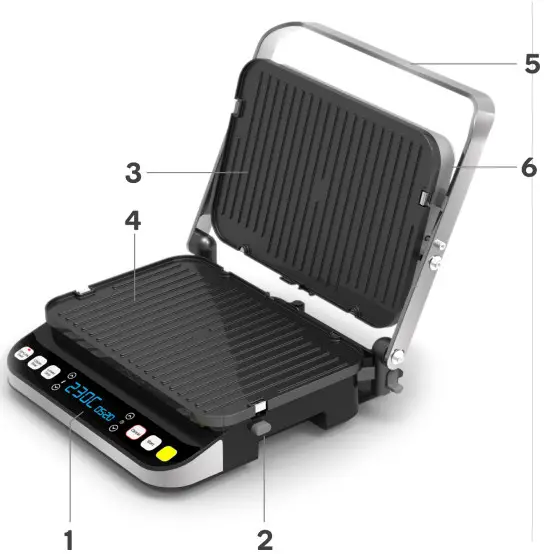
| Control panel Hot plate unlocking button Upper grill | Lower grill Handle Lid |
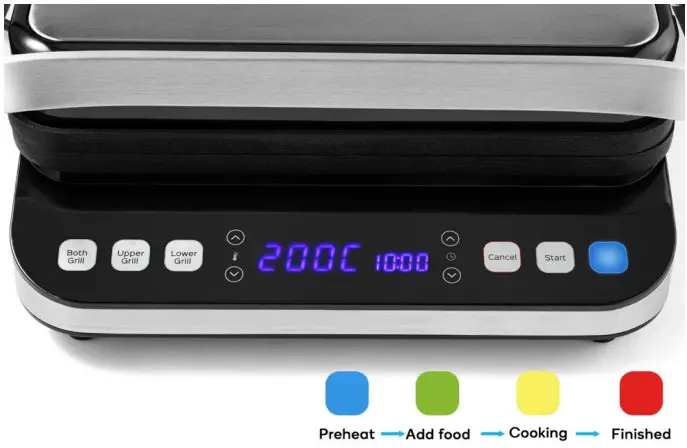
Control Panel
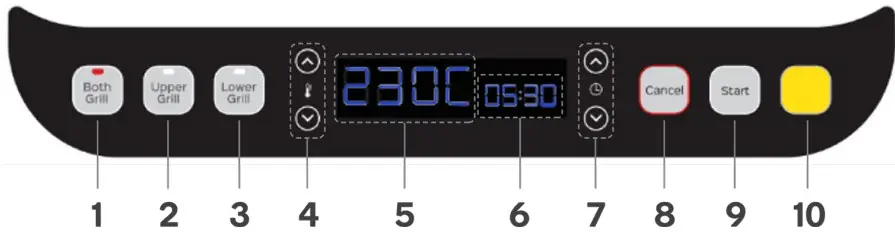
| 1 | Both Grill button | Both grill plate heating together |
| 2 | Upper Grill button | Only upper plate heating |
| 3 | Lower Grill | Only lower plate heating |
| 4 | Temperature buttons | Increase and decrease cooking temperature |
| 5 | Temperature display | Displays the temperature (°C) |
| 6 | Time display | Displays the cooking time |
| 7 | Time buttons | Increase and decrease cooking time |
| 8 | Cancel button | Cancel cooking, return to standby mode |
| 9 | Start button | Start cooking |
| 10 | Indicator light | Light indicates current status: • Blue: Preheating • Green: Add food • Yellow: Cooking • Red: Finished |
BEFORE FIRST USE
- Take the appliance out of the packaging and remove all the packaging material.
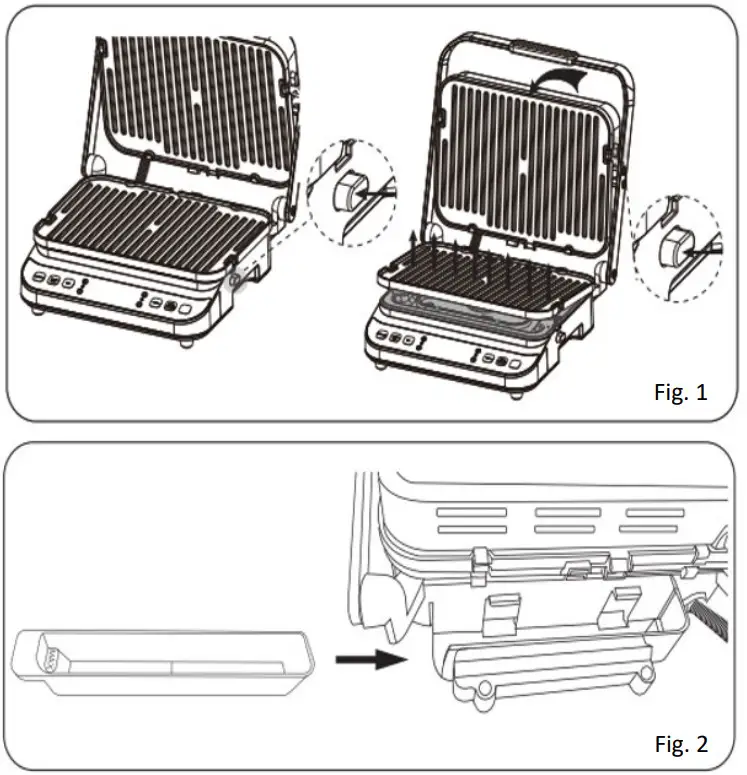
Check the appliance to ensure all components are present before disposing of any packaging material. - Remove the grill plate by pressing the “Unlock” button and taking it out (Fig 1).
- Before using it for the first time, clean the grill plate (or the waffle plate) with warm water and a mild cleaning agent, then thoroughly dry the parts.
- Select the desired cooking surface and insert the grill plate (or the waffle plate), Ensuring it is properly in place.
- Ensure that the drip tray is inserted correctly at the back of appliance (Fig 2).
OPERATION
Notes:
- Before first use, clean the grill plate with warm water and a mild cleaning agent, then thoroughly dry all components.
- The matching grill accessories should be used correctly to avoid fire or injury caused by artificial operation.
- Connect the appliance to a wall outlet and switch on. The unit will beep, all indicator lights flash on, and the display will read “OFF”.
- Select the desired cooking function (Both Grill / Upper Grill / Lower Grill) by pressing the corresponding button. Default time and temperature will show on the display during first use. For subsequent uses, the unit will remember the last setting temperature and time; when turning on the unit, setting temperature and time of last use will show on the display.
- Adjust cooking time and temperature by pressing ˄ and ˅ temperature buttons (increase and decrease). The unit will beep once when a button is pressed.
- Press “Start” button, the unit will begin preheating. When the unit starts preheating, the display will show “PRE”, the setting temperature, and the indicator light will show as blue. When preheating has finished, the temperature and time shown on the display will flash, the unit will beep 5 times, and the indicator light will turn green.
- Place food on the grill plate and press “Start” button again, the unit will start counting down and the indicator light will turn yellow.
Note:
If “Start” button is not pressed within 30 minutes, the unit will go into standby mode. - When the countdown is over, the unit will beep five times and go into standby mode. “Done” will show on the display, and the indicator light will turn red.
- Press “Cancel” button – the display will read “OFF”.
Notes:
- Always use a heat-resistant plastic spatula to remove food from the grill
- To remove the grill plates, press the unlocking button and take them out.
- Ensure grill plates have been correctly positioned back into place before using again.
Operation notes:
- During operation, it’s possible to press the “Cancel” button to exit current operation and select new desired function (Both Grill / Upper Grill / Lower Grill).
- During operation, it’s possible to press ˄ and ˅ time or temperature buttons (increase and decrease) to adjust both time and temperature. The unit will adjust cooking according to the new time/temperature within 3 seconds.
- When unit in standby mode, you can press both ˄ and ˅ temperature buttons together for 3 seconds to change between ˚C and ˚F.
- The unit will remember the last setting temperature and time; when turning on the unit, setting temperature and time of last use will show on the display.
- Tolerance of 20˚C for heating.
Time and temperature range:
| Function | Default display | Temperature range | Time range | Keep warm |
| Both grills | 230°C 05:00 | 80-230°C,5 .k C /step) | 30 seconds – 60 minutes (30s /step) | / |
| Upper grill | 200°C 10:00 | 80-220°C (5°C /step) | 30 seconds – 60 minutes (30s /step) | |
| Lower grill | 200°C 10:00 | 80-220°C (5°C / step) | 30 seconds – 60 minutes (30s /step) |
Suggested temperature and times:
Grill plate:
- Beef: Temperature 230˚C, time 3-6 minutes
- Chicken: Temperature 180˚C, time 3 minutes
- Sandwiches: Temperature 160˚C, time 6-8 minutes
Waffle plate:
- Waffles: Temperature 160˚C, time 5-6 minutes
Note:
Cooking results may vary, adjust these times to your individual requirements. Keep in mind that these settings are only intended for reference purposes. As ingredients differ in size, shape, weight, and consistency, we cannot guarantee that the times outlined below represent the best setting for your specific ingredients.
Helpful tips:
- For satisfactory result, add a little cooking oil or cooking ingredients to the plates.
- Close the grill plates during preheating.
- Open the lid by lifting the handle only. Remove the food with a heat-resistant plastic spatula. Never use tongs or a knife as these can cause damage to the nonstick coating of cooking plates.
CLEANING & CARE
Even if the appliance is not being used, disconnect the mains plug from the socket before cleaning it and/or the individual parts.
- Disconnect the appliance from the mains and allows it to cool down completely.
Caution! The grill is still very hot. It takes a while to cool down. - Press the unlock buttons to removes the plates from the grill.
- After removing the grill plates, you can clean them in warm soapy water or in the Dishwasher
- Remove the drip tray at the back of the appliance wearing gloves, empty the drip tray into a heat-resistant pan, rinse it in warm, soapy water and dry it thoroughly later.
Note:
Before removing the drip tray, make sure that the temperature of oil or oil residues is less than 40℃, otherwise it can cause burn injuries if it’s too hot.
Disposal![]() This marking indicates that this appliance should not be disposed with other household wastes. To prevent possible harm to the environment or human health from uncontrolled waste disposal, recycle it responsibly to promote the sustainable reuse of material resources.
This marking indicates that this appliance should not be disposed with other household wastes. To prevent possible harm to the environment or human health from uncontrolled waste disposal, recycle it responsibly to promote the sustainable reuse of material resources.
SPECIFICATIONS
Voltage: 220 -240V~50~60Hz
Power: 2000W (1000W+1000W)
ERROR CODE
| E1 | Open circuit of upper | NTC |
| E2 | Short circuit of upper | NTC |
| E3 | Open circuit of lower | NTC |
| E4 | Short circuit of lower | NTC |
Need more information?
We hope that this user guide has given you the assistance needed for a simple set-up.
For the most up-to-date guide for your product, as well as any additional assistance you may require,
head online to help.kogan.com ![]() kogan.com
kogan.com


