
![]()

QC CERTIFICATE
Product: Adventure Armor Mixed-Reality FPV Racing Kit
Serial#:
result: QC PASSED
SCAN TO GET THE MOBILE APP

https://www.unirobotix.com/adventurearmor/app
![]() Adventure Armor
Adventure Armor
GENERAL INFORMATION
I. OVERVIEW
The Adventure Armor Mixed-Reality FPV Racing Kit (hereinafter “the Kit”) provides every item you will need to turn a living room, a backyard, miniature craftwork, a small place in the forest, or anywhere you could imagine into mixed reality. gaming environment, where you will find plenty of joy from playing the Adventure Armor mobile game within. The Kit contains the following items:
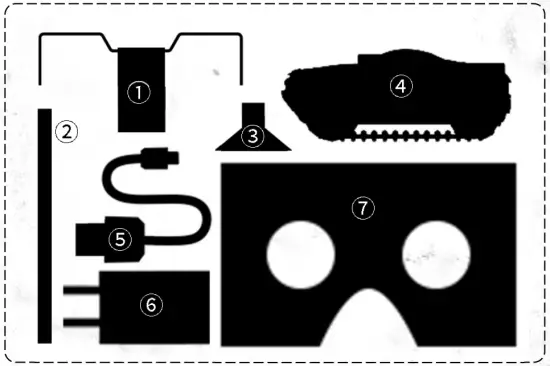
○1 Time Attack Cards ×11
○2 Beacon poles ×22
○3 Beacon bases ×22
○4 Infiltrator MK1 ×1
○5 USB cable ×1
○6 Charger ×1
○7 Remote sight ×1
II. QUICK START GUIDE
This guide demonstrates a few steps to set up the items to make them game-ready.
Step 1: use the USB cable and the charger to charge
Infiltrator MK1 from the AC outlet, or use the USB cable only to charge from a computer’s USB port.


*Warning: avoid letting children use the charger.
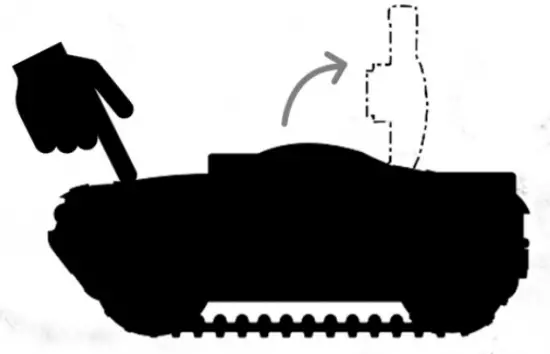
Step 2: when Infiltrator MK1 is fully charged, the status indicator light will automatically turn off. Flip the optical turret 90 degrees up. Press and hold the power button for 3 seconds until the status indicator light starts blinking. Place Infiltrator MK1 on the field.
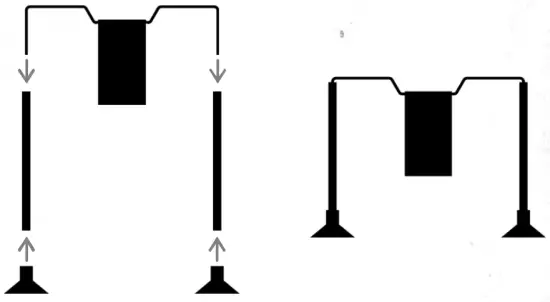
Step 3: assemble a Time Attack Card, two beacon poles, and two beacon bases into a Mixed-Reality beacon.
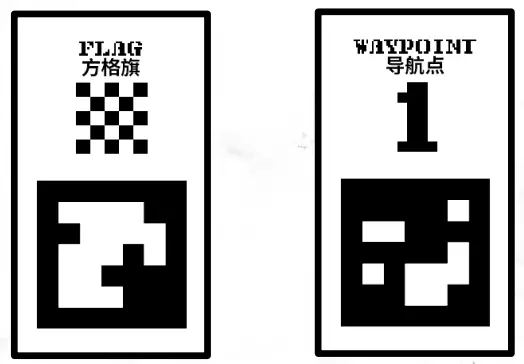
Step 4: place at least one “Flag” beacon and the “Waypoint 1” beacon on the field which is considered to be the gaming environment.
Step 5: scan the QR code shown below or on the back of the package to download the Adventure Armor mobile game from the Apple App Store or Google Play. Follow the in-game tutorial to start a game.

https://www.unirobotix.com/adventurearmor/app
III. HARDWARE SPECS
Infiltrator MK1
| Exterior dimensions | 64mm × 44mm × 27mm |
| Wheelbase | 40mm |
| Ground clearance | 4mm |
| Approach angle | 45° |
| Weight | 32g |
| Engine power | 240mW |
| Engine torque | 12mN·m |
| Top speed | 1.17km/h |
| Battery capacity | 300mAh |
| Charging voltage | 5V |
| Working radio frequency | 2.4GHz |
| Remote control distance | 5m |
| Video resolution | 1280×720 |
| FOV | 60° |
Remote sight
| IPD | 64mm |
| FOV | 78° |
| Applicable myopia | < D 5.00 |
| Compatible mobile devices | Android/iOS phones w screen sizes range from 4 to6 inches |
| Weight | 111g |
| Major material | Paper, PC |
IV. SYSTEM REQUIREMENTS
Android platform
| Operating System | Android 6.0 or higher |
| SoC | Qualcomm Snapdragon 820 equivalent or higher |
| Memory | 2GB or higher |
| Storage | Minimum 150MB available |
| Sensors | Camera, touch screen, accelerometer, gyroscope |
iOS platform
| Operating System | iOS 9.0 or higher |
| SoC | Apple A9 or higher |
| Memory | 2GB or higher |
| Storage | Minimum 250MB available |
| Sensors | Camera, touch screen, accelerometer, gyroscope |
INFILTRATOR MK1
I. OVERVIEW
Infiltrator MK1 is a tracked reconnaissance vehicle. It can be remotely controlled by the mobile game Adventure Armor.
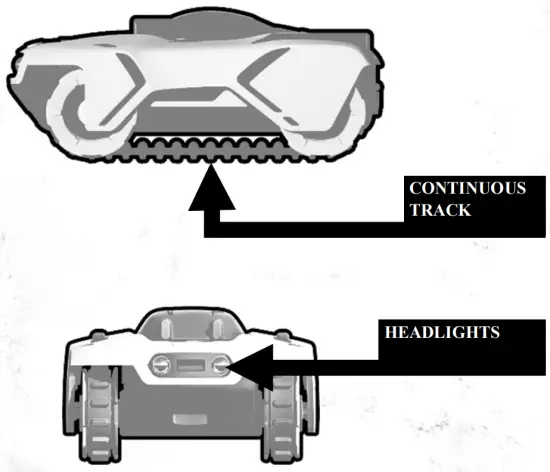
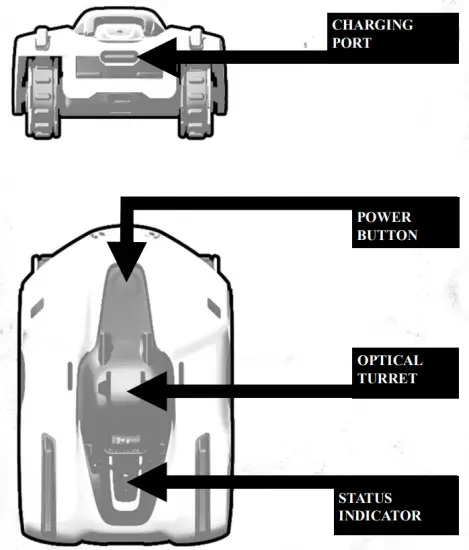
II. POWER BUTTON
The power button can be either clicked or held down. The three tables below describe how these actions behave under specific statuses.
Status 1: power is off
| Click | Turn on the headlights for 5 seconds. Click again repeatedly before time runs out will keep the headlights constantly on. It is useful when you are looking for a handy flashlight. |
| Press and hold for 3 seconds | Power up Infiltrator MK1 to get it ready for establishing a connection to the Adventure Armor mobile game. |
Status 2: power is on but not connected to the game
| Click | Manually turn on the headlights for 5 seconds. Click again repeatedly before time runs out will keep the headlights constantly on. |
| Press and hold for 3 seconds | Power down Infiltrator MK1. |
| Idle for 5 minutes | Infiltrator MK1 will automatically power down to save energy. |
Status 3: power is on and connected to the game
| Click | No response. Since the headlights control is overridden by the game. |
| Press and hold for 3 seconds | Power down Infiltrator MK1. |
III. OPTICAL TURRET
The optical turret is equipped with a camera.
Please flip it up 90 degrees before starting a game, otherwise, you will not be able to see the streaming video captured by Infiltrator MK1 on your smartphone or remote sight. Do not forget to flip the optical turret down before putting Infiltrator MK1 in your pocket, backpack, or handbag, otherwise, the camera may be damaged.
*Warning: do not bend the orange flexible printed circuit by hand. Always let it naturally bend by flipping the optical turret.
IV. STATUS INDICATOR
The status indicator is an orange signal bulb that blinks at a specific frequency to indicate the status of Infiltrator MK1.
| Status | Signal frequency |
| Power is off | Constantly off |
| Being charged | Blink slow |
| Power is on | Blink fast |
REMOTE SIGHT
The remote site allows you to access the holographic control interface. For more information about this interface, please refer to the in-game tutorial.
To set up the remote site, simply follow the 3 steps below:
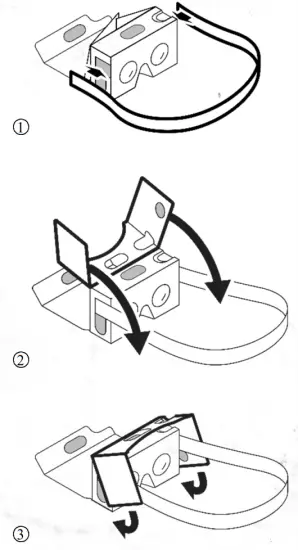
Place your smartphone in the remote sight as shown below when the game asks you to:

*Note: for the first time, press the gear button and scan the QR code printed on the bottom of the remote site. This operation will correct the image distortion automatically. A trigger is located on the top right corner of the remote site. Push it for interaction in the holographic control interface:

*Note: press the cover of the remote sight tightly after placing the smartphone so the vacuum sticker could prevent the phone from slipping out.
MIXED REALITY BEACONS
Mixed Reality beacons have specially designed patterns that can be read efficiently by the Adventure Armor mobile game’s Computer Vision feature.
The pattern is located at the position shown below on the Time Attack Card.
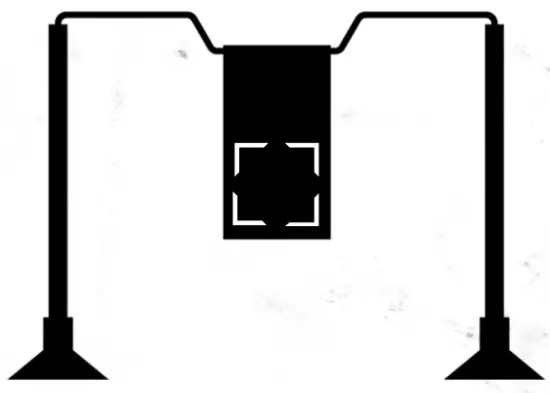
*Note: if the game has difficulty reading the Mixed Reality beacons in dark, try turning on the headlights.
ADVENTURE ARMOR MOBILE GAME
I. GAME MENUS
In the root menu, there are several buttons to access the corresponding sub-menus. 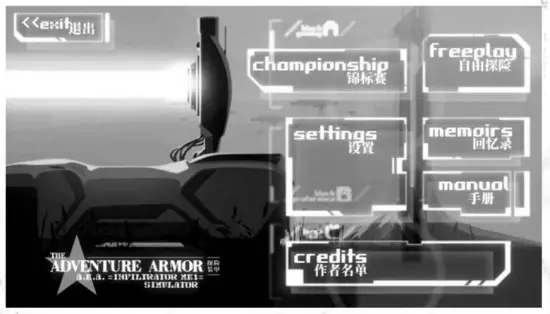
Championship:
The main entrance to start a racing game. In this sub-menu, you will be able to create a local game, share the game to the online server, join an online game, view the leaderboard, or start a race. The game started from the championship will try to read the Mixed Reality beacons on the gaming field, in order to analyze scores.
Freeplay:
Start a game immediately without analyzing scores. you will be able to control Infiltrator MK1 freely for exploring, practicing, taking photos, and recording videos.
Settings:
This sub-menu provides various options to set up languages, sound effects, music, etc. And advanced settings for fine-tuning Infiltrator MK1’s handling.
Memoirs:
Here stores the captured photos and videos. In this submenu, you can select, delete, share these media files, or copy them to the gallery of the smartphone.
Manual:
This is the in-game manual that contains detailed guides and tutorials for the game. It is recommended to read the manual before starting the game for the first time.
Credits:
Displays members and groups involved in the development of the Adventure Armor mobile game.
II. 2D CONTROL INTERFACE
The 2D control interface provides the possibility to play the game without wearing remote sight. This interface is sufficient to finish a race. Two control mechanisms are provided in this interface: virtual joystick control and tilt control.
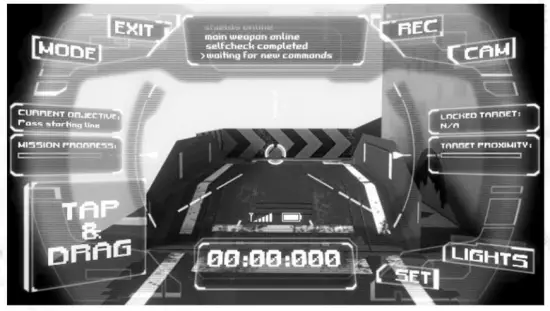
For detailed instructions on using the 2D control interface, please refer to the in-game manual.
III. HOLOGRAPHIC CONTROL INTERFACE
To get the best gaming experience, a holographic control interface is strongly recommended. In this interface, a 360-degree panoramic control chamber is simulated. And the Infiltrator MK1 can be controlled via head motion sensing. 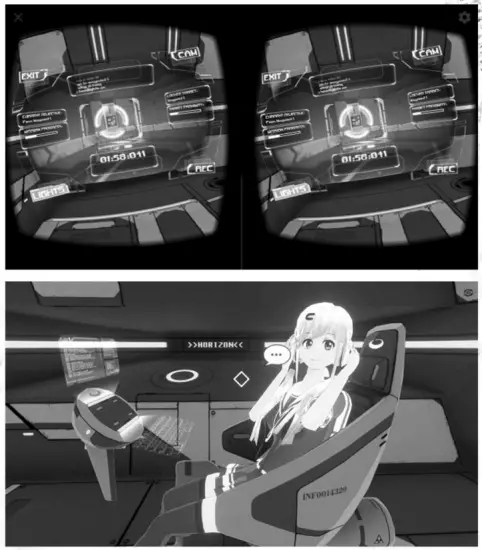
The Visualized Artificial General Intelligence (V.A.G.I.) a character named UNI is sitting by your side as a co-driver to assist you with operating the Infiltrator MK1. Simply chat with her and you will know what to do. For more information about using the holographic control interface, please refer to the in-game manual.
TROUBLESHOOTING
| Problem | Solution |
| Cannot power up Infiltrator MK1 | Fully charge Infiltrator MK1 and try again |
| Cannot connect to Infiltrator MK1 | Restart Infiltrator MK1 and make sure the Adventure Armor mobile game’s permissions are all enabled, then try again |
| No streaming video | Make sure the optical turret is flipped up. Fully charge Infiltrator MK1, restart, and try again |
| Infiltrator MK1 does not go straight when I want it to | Try steering calibration in the settings menu, or tell UNI |
| No sounds or music | Check the SFX or music volume in the settings menu, or tell UNI |
| Infiltrator MK1 only spins around | Check if any continuous tracks get stuck |
| Difficult to read Mixed Reality beacon | Turn on the headlights |
| Cannot read the Mixed Reality beacon at all | Tell UNI to switch on Computer Vision |
| Images or texts are upsides down | Flip your smartphone upside down |
| The image distortion in my remote site looks awkward | Press the gear button and scan the QR code printed on the bottom of the remote sight |
FCC WARNING
Caution: Any changes or modifications to this device not explicitly approved by the manufacturer could void your authority to operate this equipment.
This device complies with part 15 of the FCC Rules. Operation is subject to the following two conditions:
(1) This device may not cause harmful interference, and
(2) this device must accept any interference received, including interference that may cause undesired operation.
The device has been evaluated to meet general RF exposure requirements.
This equipment complies with FCC radiation exposure limits set forth for an uncontrolled environment.
This equipment should be installed and operated with a minimum distance of 20cm between the radiator & your body.


