Osmond KRF-819L Toaster Oven
Introduction
Thanks for purchasing with Osmond. Please read all these instructions carefully before use and save them. We reserve the right to make technical and optical changes without prior notice. Pictures and accessories /functions may vary depending on model. Some accessories / functions are optional. To use of attachments or accessories which are not supplied with the appliance is not recommended. This could result in electrical shock or injury or permanent damage to the appliance. This product This product is for household use only.
READ THESE INSTRUCTIONS CAREFULLY BEFORE USING THE APPLIANCE. SAVE THIS MANUAL FOR FUTURE REFERENCE.
THIS APPLIANCE IS FOR HOUSEHOLD USE ONLY.
Description
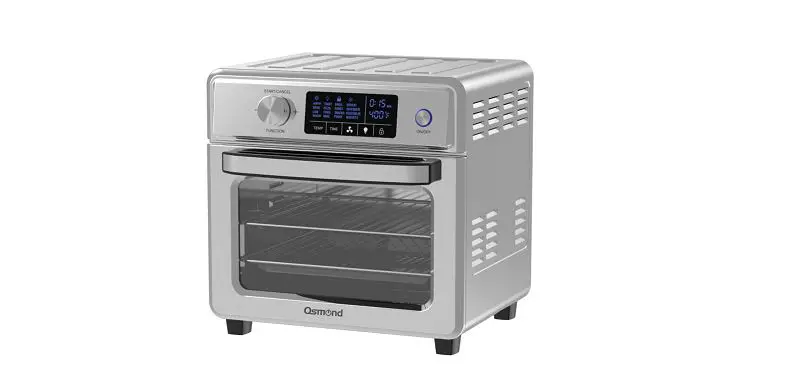
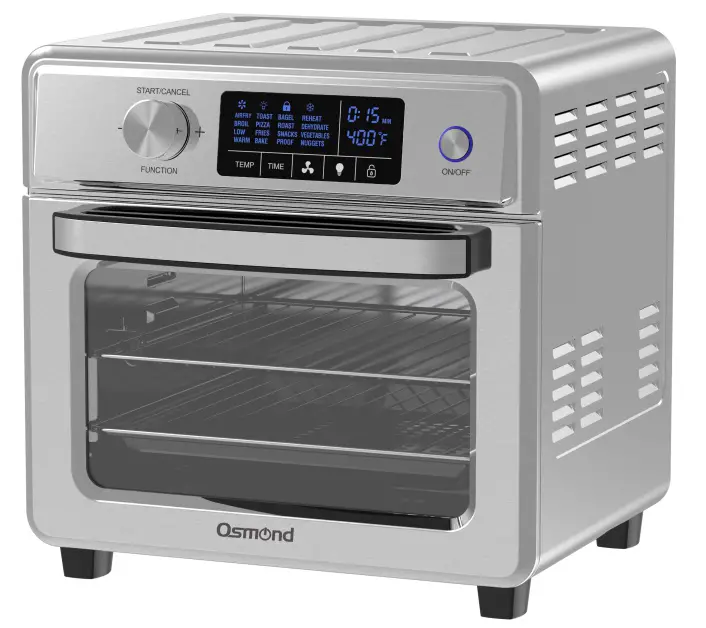
Air fryer toaster oven: 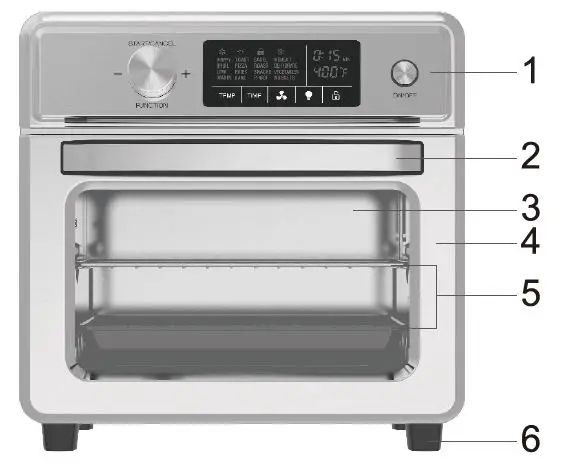
- Control panel
- Cool touch Qhandle
- Glass window
- Pull-down door
- Accessories (availability subject to specific model)
- Anti-slip feet
Accessories in the package
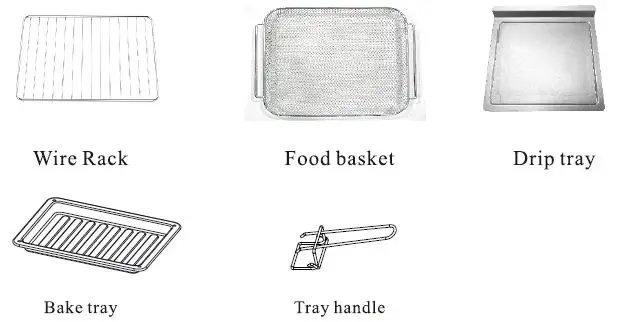
- Wire Rack
- Food basket
- Drip tray
- Bake tray
- Tray handle
Control panel

A. Function knob
B. LCD screen
C On/off button
LCD screen
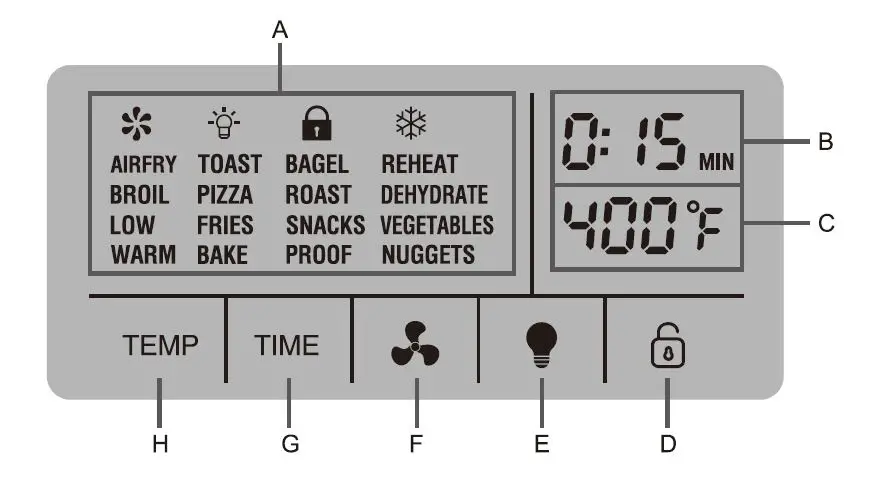
A. Menu
B. Time
C. Temperature
D. Child Lock button
E. Lamp button
F. Air convection button
G. Time setting button
H. Temperature setting button
important
WARNING
- NEVER immerse the main body of the appliance in water or any other liquid. NEVER rinse it under the tap.
- Do not let any water or other liquid enter the main body of the appliance to prevent electric shock.
- Do not let ingredients be in contact with the heating elements.
- Do not cover the air inlets and air exhaust openings while the appliance is operating.
- Do not fill the tray with oil as this may cause a fire hazard.
- Never touch the inside of the appliance while it is operating.
- Check whether the voltage indicated on the appliance corresponds to the local mains voltage in your country before connecting the appliance to mains socket.
- Do not use the appliance if the plug, the power cord or the appliance itself is damaged.
- If the power cord is damaged, you must have it replaced at an authorised service centre or by a similarly qualified electrician in order to avoid a hazard.
- This appliance is not suitable for children or for people who are either physically or mentally handicapped or who lack experience and knowledge. Should you want anyone else to use the appliance, that person should be properly guided on its use.
- Keep the appliance and its power cord out of the reach of children when the appliance is switched on or is cooling down.
- Keep the power cord away from hot surfaces.
- Do not plug/ unplug the appliance or operate the touch screen with wet hands.
- Only connect the appliance to an earthed wall socket. Always make sure that the plug is inserted into the wall socket properly.
- Never connect the appliance to an external timer switch.
- Do not place the appliance on or near combustible materials such as a tablecloth or curtains.
- Do not place the appliance against a wall or against other appliances. Leave at least 10cm free space at the back and sides and 10cm free space above the appliance. Do not cover the appliance. Do not place anything on top of the appliance.
- Do not use the appliance for any purpose other than described in this manual.
- Do not let the appliance operate unattended.
- During cooking, steam and hot air are released through the air outlet. Keep your hands and face at a safe distance from the steam and hot air and from the air outlet.
- Be careful of steam and hot air when opening the door of the appliance.
- The surface below the appliance may become hot during use.
- Immediately unplug the appliance if you see dark smoke coming out of the appliance. Wait for the smoke emission to stop before opening the door of the appliance.
CAUTION
- Place the appliance on a horizontal, level and stable surface.
- This appliance is intended for normal household use only. It is not intended for use in environments such as staff kitchens, offices, farms or other work environments. Nor is it intended to be used by clients in hotels or other similar environments.
- If the appliance is used improperly, or if it is not used according to the instructions in this manual, the warranty becomes invalid and refuses any liability for any damage that may be caused.
- The surface of the appliance may become hot during operation. Do not touch the surface of the appliance except the door handle and the buttons.
- Always unplug the appliance after use.
- Let the appliance cool down completely (over 30 minutes) before cleaning.
- Always remove food residues after each use to prevent smells.
Before first use
- Remove all packing material.
- Remove any stickers or labels from the appliance – other than the rating label.
- Thoroughly clean the accessories (metal rack, basket, rotisserie kit, drip tray, etc) with hot water and some liquid washing soap using a nonabrasive sponge.
Tip: You may clean these parts in the dishwasher. - Wipe the inside and outside of the appliance with a moist cloth.
Preparing for use
- Place the appliance on a stable, horizontal and level surface that is also heat resistant.
- Install the drip tray in the appliance properly.
WARNING: Do not fill the drip tray with oil or any other liquid.
Do not cover the appliance. Do not block the air inlets and air outlets. - Install any necessary accessory (metal rack, basket, rotisserie kit, etc) in the appliance properly.
First use
- During the first use or first two uses, it is normal to smell like burning plastic and metal, and sometimes also to hear small sounds from inside the appliance. This is because the inner components are heated for the first time and materials expand a tiny bit in size.
- To get rid of the smells, turn on the appliance, set temperature at 400° F and operate without food for 30 minutes.
- If there are still small smells, wait till the appliance cools down completely. Then again, turn it on, set temperature at 400° F and operate without food for 30 minutes.
Cooking steps and tips
- Insert the plug into an earthed wall socket.
- Push ON/OFF button to turn on the appliance. LCD screen lights on. The appliance is in standby status.
- Load the ingredients on any necessary accessory (rack, basket, rotisserie kit, etc) and install the accessory in the appliance properly.
- Rotate FUNCTION knob clockwise and anti-clockwise to select a preset cooking program. The selected program will flash. Icons of rotisserie function and/or high/low air convection are on if any of these functions comes with the selected program by default.
TIP: Install the rotisserie kit in the appliance if you would like to cook with rotisserie. Use Rotisserie Remover to install the rotisserie kit more easily. - If you would like to adjust temperature, push TEMP/TIME button to select temperature setting, rotate FUNCTION knob clockwise and anticlockwise to increase and decrease temperature while temperature display is flashing.
- If you would like to adjust time, push TEMP/TIME button to select time setting, rotate FUNCTION knob clockwise and anti-clockwise to increase and decrease time while time display is flashing.
- Push FUNCTION knob to start cooking in the selected program.
TIP: You may adjust temperature and time during cooking. Follow Step 4 and Step 5 if you would like to do so. - Push FUNCTION knob if you would like to stop / pause the cooking. Push FUNCTION knob again if you would like to resume cooking.
- Push LAMP button to turn on / off the interior lamp. The interior lamp will automatically turn off in three minutes.
- When the appliance is working in any program, cooking will pause if the door is opened. Cooking will resume if the door is closed.
- The interior lamp will automatically turn on for one minute if the door is opened. The interior lamp will turn off if the door is closed.
- During cooking, you may push ROTISSERIE button to enable/ disable rotisserie function.
- When cooking in a program which comes with air convection function by default, you may push AIR CONVECTION button to adjust high/ low speed of air convection.
TIP: When cooking in a program in which air convection function is disabled, for example, in BROIL program, AIR CONVECTION button is void. - Cooking will automatically stop when time is up. The appliance will buzz for a few seconds and LCD screen will turn off.
TIP:- When cooking automatically stops, the convection fan will remain working for one minute to cool the ingredients and the appliance.
- The interior lamp will turn on automatically if the door is opened. The interior lamp will turn off if the door is closed.
WARNING: Steam and hot air might escape when the door is opened. Open the door slowly at a small angle to release the steam and hot air before fully op nlng the door. Keep your hands and fcce at a safe distance from the door.
- To turn on the appliance again, push ON/OFF button.
- To turn off the appliance, push and hold ON/OFF button for three seconds.
- After cooking, the interior surface, accessories and ingredients may be hot. Do not touch with hands. Always wear padded gloves to fetch the accessories and ingredients.
TIP: Use Rotisserie Remover to remove the rotisserie kit from the appliance.
Settings
Default settings of 16 preset cooking programs
| Program | Default time (Min) | Adjustable time range(Min) | Default temperature (°F) | Adjustable temperature range(°F) | Rotisserie function | Air convection |
| AIRFRY | 0:15 | 0:01-01:00 | 400 | 200-400 | YES | HIGH |
| TOAST | 0:03 | 0:01-0:09 | 320 | 200-400 | NO | LOW |
| BAGEL | 0:06 | 0:01-0:09 | 320 | 200-400 | NO | LOW |
| BAKE | 0:30 | 0:01-02:00 | 360 | 200-400 | NO | NO |
| BROIL | 0:05 | 0:01-01:00 | 400 | 320-400 | NO | NO |
| DEHYDRATE | 2:00 | 0:30-24:00 | 140 | 100-160 | NO | HIGH |
| PIZZA | 0:16 | 0:01-2:00 | 400 | 320-400 | NO | HIGH |
| ROAST | 0:40 | 0:01-2:00 | 400 | 320-400 | YES | HIGH |
| PROOF | 0:40 | 0:01-02:00 | 70 | 50-80 | NO | NO |
| LOW | 2:00 | 0:01-8:00 | 180 | 100-300 | NO | NO |
| VEGETABLES | 0:15 | 0:01-01:00 | 400 | 360-400 | NO | HIGH |
| FRIES | 0:18 | 0:01-01:00 | 400 | 360-400 | YES | HIGH |
| SNACKS | 0:06 | 0:01-01:00 | 400 | 360-400 | NO | HIGH |
| REHEAT | 0:20 | 0:10-01:00 | 260 | 200-400 | NO | NO |
| WARM | 0:30 | 0:01-2:00 | 130 | 130-220 | NO | NO |
| NUGGETS | 0:10 | 0:01-01:00 | 400 | 360-400 | YES | HIGH |
The appliance comes with 16 preset cooking programs, making it super versatile in preparing a great variety of foods.
AIRFRY
Default setting: 400°F; 15 mins; high speed air convection
Airfry program circulates hot air in high speed around the food, exhaust the moist air and create a crispy outer layer on the food surface. Airfry program can be used to prepare a wide range of food such as fries, potato wedges, whole chicken, chicken wings, drumsticks, nuggets, chicken popcorns, steaks, fish, seafood, etc when you would like to have a fried result on the food. Airfry program can be used at 200-400° F for up to 1 hour.
The airfry chart below is a guide on how to airfry a variety of foods. These are
guidelines only. As ingredients differ in origin, size, shape as well as brand, these
recommendations cannot guarantee the best cooking results for all ingredients. You may personalize the settings for cooking particular ingredients.
Airfry chart
| Food | Min-Max Amount (g) | Time (min) | Temp (OF) | Extra information |
| Thin frozen fries | 300-1000 | 12-20 | 400 | |
| Thick frozen fries | 300-1000 | 12-22 | 400 | |
| Home-made fries (8x8mm) | 300-1200 | 18-25 | 360 | Add1/2 tbsp of oil |
| Home-made potato wedges | 300-1200 | 18-30 | 360 | Add1/2 tbsp of oil |
| Home-made potato cubes | 300-1200 | 12-22 | 400 | Add1/2 tbsp of oil |
| Roesti | 250-800 | 15-25 | 360 | |
| Potato gratin | 500-1000 | 18-25 | 360 | |
| Beef steak | 100-1500 | 8-15 | 360 | |
| Pork chops | 100-1500 | 10-25 | 360 | |
| Hamburger | 100-1000 | 7-20 | 360 | |
| Sausage roll | 100-1000 | 13-22 | 400 | |
| Drumsticks | 100-1500 | 18-30 | 360 | |
| Chicken breast | 100-1500 | 10-25 | 360 | |
| Spring rolls | 100-900 | 8-15 | 400 | Use oven-ready |
| Frozen chicken Nuggets | 100-1000 | 6-18 | 400 | Use oven-ready |
| Frozen fish fingers | 100-900 | 6-15 | 400 | Use oven-ready |
| Frozen bread-crumbed | 100-900 | 10-15 | 400 | Use oven-ready |
| Stuffed vegetables | 100-900 | 10-15 | 360 | Use oven-ready |
TOAST
Default setting: 320° F; 3 mins; low speed air convection
Toast program can competently substitute a toaster. It toasts bread slices evenly and quickly. Place the bread slices on the rack in the centre of the cooking room to get more even toast results. If you prefer a darker toast, toast time can be added (up to 9 minutes).
BAGEL
Default setting: 320° F; 6 mins; low speed air convection
Bagel program is used to toast both sides of bagel halves. To get best results, place the bagels on the rack with the cut sides facing up. toast time can be added (up to 9
minutes).
BAKE
Default setting: 360° F; 30 mins
Bake program can be used at 200-400° F for up to 2 hours. It is recommended for baking cakes, breads, cookies, biscuits, khubz, etc. Bake program can also be used to prepare a wide range of foods that can be done in a conventional oven.
BROIL
Default setting: 400° F; 5 mins
Broil program is used to brown the top surface of food with super high heat (400° F) in a short period of time. It is recommended for preparing rare beef steaks, chicken, fish
(salmon, tuna, etc) as well as casseroles, gratins and alike.
Make sure to monitor the food when broiling as it might get overcooked quickly.
DEHYDRATE
Default setting: 140° F; 2 hours; high speed air convection
Dehydrate program exposes food to low temperatures of heat for a long period of time and remove the moisture from food by high speed air flow. Dehydrating is an ideal way of preserving nutrients and flavours food. Dehydrate program can be used at 100-160° F for up to 24 hours.
Recommended temperatures for dehydrating food
| Type | Temperature |
| Herbs/ Spices/ Nuts/ Seeds | 100-110°F |
| Vegetables | 100-110°F |
| Fruits/ Fruit Rolls | 110-130°F |
| Fresh Pasta | 110-120°F |
| Meat/ Poultry/ Fish | 130-150°F |
The dehydrating chart below is a guide on how to dehydrate a variety of foods. These are guidelines only. The actual duration of drying depends on the temperature and humidity of the room, the drying temperature, the air flow speed, the humidity level of foods, the thickness of cuts, etc.
Dehydrate chart
| Food | Preparation | Condition after drying | Duration of drying (hours) |
| Apricot | Slice it and take out the pit | Soft | 13-28 |
| Orange peel | Cut it to long stripes | Fragile | 8-16 |
| Food | Preparation | Condition after drying | Duration of drying (hours) |
| Pineapple (fresh) | Peel it and slice into pieces or square parts | Hard | 6-36 |
| Pineapple (tinned) | Pour out the juice and dry them | Soft | 6-36 |
| Banana | Peel it and slice to round pieces (3-4 mm thickness) | Crispy | 8-38 |
| Grapes | No need to cut them | Soft | 8-38 |
| Cherry | It is not necessary to take out the pit (you can take it out when cherry is half-dried) | Hard | 8-26 |
| Pear | Peel it and slice | Soft | 8-30 |
| Fig | Slice them | Hard | 6-26 |
| Cranberry | No need to cut | Soft | 6-26 |
| Peach | Cut into 2 pieces and take out the pit when the fruit is half- dried | Soft | 10-34 |
| Date-fruit | Take out the pit and slice | Hard | 6-26 |
| Apple | Peel it, take out the heart, slice it into round pieces or segments | Soft | 5-7 |
| Artichoke | Cut it to stripes (3-4 mm thickness) | Fragile | 5-13 |
| Aubergine | Peel it and slice it into pieces (6-12 mm thickness) | Fragile | 6-18 |
| Broccoli | Peel it and cut it. Steam it for about 3-5 min. | Fragile | 6-20 |
| Mushrooms | Slice it or dry it whole (small mushrooms) | Hard | 6-14 |
| Green beans | Cut it and boil till become transparent | Fragile | 8-26 |
| Vegetables marrows | Slice it into pieces (6 mm thickness) | Fragile | 6-18 |
| Cabbage | Peel it and cut into stripes (3 mm thickness). Take out the heart | Hard | 6-14 |
| Brussels sprouts | Cut the stems into 2 pieces | Crispy | 8-30 |
| Cauliflower | Boil till it becomes soft | Hard | 6-16 |
| Potato | Slice it. Boil for about 8-10 min | Crispy | 8-30 |
| Onion | Slice it into thin round pieces | Crispy | 8-14 |
| Carrot | Boil till becomes soft. Shred it or slice into round pieces | Crispy | 8-14 |
| Cucumber | Peel it and slice into round | Hard | 6-18 |
| Food | Preparation | Condition after drying | Duration of drying (hours) |
| pieces (12 mm thickness) | |||
| Sweet pepper | Cut it to stripes or to round pieces (6 mm thickness). Take out the heart | Crispy | 4-14 |
| Piquant pepper | No need to cut it | Hard | 8-14 |
| Parsley | Put the leafs into sections | Crispy | 2-10 |
| Tomato | Peel it. Cut it into pieces or into round pieces | Hard | 8-24 |
| Rhubarb | Peel it and slice it into pieces (3 mm thickness) | Loss of humidity in a vegetable | 8-38 |
| Beetroot | Boil it, let it cool down, cut off the roots and the tops. Slice it to round pieces | Crispy | 8-26 |
| Celery | Slice it into pieces (6 mm thickness) | Crispy | 6-14 |
| Spring onion | Shred it | Crispy | 6-10 |
| Asparagus | Slice it into pieces (2.5 mm thickness) | Crispy | 6-14 |
| Garlic | Peel it and slice into round pieces | Crispy | 6-16 |
| Spinach | Boil till it becomes fade | Crispy | 6-16 |
| Champignons | Choose the mushrooms with hats which bend inside. Cut into pieces or dry whole | Hard and crispy | 3-10 |
|
Fish | Boil or bake it on a stove before drying. Bake it for about 20 minutes with a temperature 200 degrees or till the fish become friable |
Crispy |
2-8 |
| Poultry/ Pork / Beef | Remove fat, cut into strips, marinate it and boil it before drying | Hard | 4-15 |
PIZZA
Default setting: 400° F; 16 mins; high speed air convection
Pizza program can be used at 320-400° F for up to 2 hours. It can cook fresh or frozen pizza. This appliance can accommodate a 12″ pizza.
ROAST
Default setting: 400° F; 40 mins; high speed air convection
Roast program can be used at 320-400° F for up to 2 hours. It can be used to roast a variety of foods such as meats, poultry, game, vegetables, etc. To roast large-sized food such as a whole chicken, use rotisserie kit to get better roasting results.
PROOF
Default setting: 70° F; 40 mins
Proof program can be used at 50-80° F for up to 2 hours. It is used to proof bread or pizza dough. Typical bread proofing temperature is 56-64° F. Do not use proof program if your room temperature is not lower than the working temperature.
LOW
Default setting: 180° F; 2 hours
Low program is used for low temperature cooking. It can be used at 100-300° F for up to 8 hours. Low temperature cooking is an ideal way of preparing healthy and delicious cuisine. Low temperature cooking ensures an even level of doneness through out the entire dish, retains natural oils, moisture and nutrients of the food. It is perfect for meats with little connective tissue.
REHEAT
Default setting: 260° F; 20 mins
Reheat program can be used at 200-400° F for up to 1 hour. Use this program to reheat leftovers.
WARM
Default setting: 130° F; 30 mins
Warm program can be used at 130-220° F for up to 2 hours. Use this program to keep food warm after the food is cooked.
Quick preset programs of airfry function
Vegetables, fries, snacks and nuggets are preset programs of airfry function. It is a quick and easy way to airfry these foods without guessing.
VEGETABLES
Default setting: 400° F; 15 mins; high speed air convection
Vegetables program can be used at 360-400°C for up to 1 hour. This program is recommended for frying all kinds of vegetables and fungi.
FRIES
Default setting: 400° F; 18 mins; high speed air convection
Fries program can be used at 360-400° F for up to 1 hour. This program is recommended for frying all kinds of potato fries, chips, potato wedges, potato cubes, roesti, etc.
SNACKS
Default setting: 400° F; 6 mins; high speed air convection
Snacks program can be used at 360-400° F for up to 1 hour. This program is recommended for frying all kinds of snack foods such as fish fingers, chicken fingers, stuffed vegetables, spring rolls, chicken popcorns, bread-crumbed cheese snacks, etc.
NUGGETS
Default setting: 400°C; 10 mins; high speed air convection
Nuggets program can be used at 360-400°C for up to 1 hour. This program is recommended for frying chicken nuggets, pork nuggets, beef nuggets, fish nuggets, sausage rolls, etc.
Cleaning and maintenance
Clean the appliance after every use.
- Always unplug the appliance from the wall socket and let it cool down completely before cleaning.
- Wipe the outside of the appliance with a damp cloth.
WARNING:
Never use metal kitchen utensils or abrasive cleaning materials to clean the appliance and accessories as they will damage the finish.
Do not rinse it with tap water or any other liquid.
NEVER immerse the body of the appliance in water or any other liquid. - Clean the interior walls of the appliance with a damp cloth or a sponge with liquid soap. Remove any grease or food residues on the walls to prevent smells.
WARNING:
Never use abrasive or corrosive cleaning products as they will damage the sudace of the walls.
Do not rinse it with tap water or any other liquid.
NEVER immerse the body of the appliance in water or any other liquid. - Clean the accessories with hot water and some washing liquid soap, using a non-abrasive sponge.
WARNING: Never use abrasive or corrosive cleaning products as they will damage the sudace of the accessories.
TIPS:- The accessories are dishwasher safe.
- You may use a degreasing liquid to remove any food residues.
- If food residue sticks to the basket, soak the basket in hot water and some washing liquid soap for approximately 10 minutes.
- When the appliance has cooled completely, clean the heating elements with a damp cloth to remove any grease or food residues.
WARNING: Never use abrasive or corrosive cleaning products as they will damage the coatings of the heating elements and their durability. - Make sure all parts are clean and dry. Store the appliance in a cool dry place. Avoid direct sunlight on the appliance.
- Any other servicing should be performed by an authorised service centre.
Troubleshooting
| Problem/Question | Possible cause | Solution/Answer |
| The appliance doesn’t turn on. | The appliance is not plugged into the mains. | Insert the plug in an earthed wall socket. |
| The door is not closed. | Close the door. | |
| The appliance has finished cooking and turned off automatically. | Push ON/OFF button to turn on the appliance again. |
| Problem/Question | Possible cause | Solution/Answer |
| The appliance is not cooking. | Cooking is not started. | Rotate the FUNCTION knob to select a cooking program. Push the FUNCTION knob to start cooking. |
| Cooking is paused. | Push the FUNCTION knob to resume cooking. | |
| The door is not closed. | Close the door to resume cooking. | |
| Why does the lamp turn off? | The lamp will automatically turn off after a while to save energy. | Push LAMP button to turn on the lamp again. |
| Why does the fan remain working after cooking? | The fan remains working for one minute to cool the ingredients and the appliance . | Wait for one minute. The fan will turn off automatically. |
| Can I change time and temperature during cooking? | Yes. Push TEMP/TIME button to select temperature or time setting. Rotate FUNCTION knob to change temperature or time. | |
| Can I change cooking program during cooking? | No. You need to stop cooking by pushing FUNCTION knob. Then the appliance is back to standby status. Rotate FUNCTION knob to select a new cooking program and push FUNCTION knob to start cooking. | |
| Can I turn on or turn off rotisserie function during cooking? | Yes. Push ROTISSERIE button to turn on or turn off the rotisserie function. | |
| Rotisserie function doesn’t turn on during cooking. | Rotisserie function is off by default in some cooking programs. See “Default settings of 16 preset cooking programs”. | To turn on rotisserie function, push ROTISSERIE button during cooking. |
| Air convection fan doesn’t turn on during cooking. | Air convection is off by default in some cooking programs. See “Default settings of 16 preset cooking programs”. | Select a cooking program with air convection if you would like to cook with air convection fan on. |
| Can I change air convection speed during cooking? | Yes. When cooking in a program with air convection, you may push AIR CONVECTION button to change between high and low speed. |
| Problem/Question | Possible cause | Solution/Answer |
| AIR CONVECTION button doesn’t work. | Air convection is off by default in some cooking programs. See “Default settings of 16 preset cooking programs”. When cooking in a program without air convection, the AIR CONVECTION button is void. | Select a cooking program with air convection if you would like to cook with air convection fan on. |
| The ingredients are undercooked. | The amount of the ingredients is too much. | Cook a smaller amount of ingredients at a time. Smaller amounts are cooked more evenly. |
| The cooking temperature is too low. | Set a higher temperature. | |
| The cooking time is too short. | Set a longer cooking time. | |
| The ingredients are cooked unevenly. | The amount of the ingredients is too much. | Cook a smaller amount of ingredients at a time. Smaller amounts are cooked more evenly. |
| Fried ingredients are not crispy. | You have used a type of ingredients meant to be prepared in a traditional deep fryer. | Use oven-ready ingredients. |
| You haven’t cooked in an airfry program. | Cook the ingredients in one of the airfry programs (airfry, vegetables, fries, snacks, nuggets). | |
| Some ingredients may require additional oil. | Brush some oil evenly on the ingredients. | |
| Some ingredients may require additional cooking time. | Cook the ingredients for additional time till they are crispy enough. | |
| The ingredients are not evenly placed and overlap. | Place the ingredients evenly on the accessories . | |
| White smoke comes out of the appliance | You are preparing greasy ingredients . | Pay attention that the temperature is well-controlled to be under 180°C when you fry greasy ingredients in the appliance. Do not prepare extremely greasy ingredients in the appliance. |
| Problem/Question | Possible cause | Solution/Answer |
| There are greasy residues from previous use on the interior walls, heating elements or accessories of the appliance. | White smoke is caused by grease heated up. Make sure you clean the interior and accessories properly after each use. | |
| The ingredients prepared smells like burning metal and plastic. | You have not cleaned or used the appliance properly in the first time. | Clean the appliance thoroughly. Turn on the appliance, set temperature at 400°F and operate without food for 30 minutes. If |
| there are still small smells, wait till the appliance cools down completely. Then again, turn it on, set temperature at 400°F and operate without food for 30 minutes. (See sections “Before first use” and “First use”) | ||
| The LCD screen shows “E3”. | The appliance overheats. | Turn off the appliance. Wait for it to cool down for at least 30 minutes. Open the door and it will cool faster. Then turn on the appliance to cook again. |
Product: Toaster Oven
Model: KRF-819L
120Volts 60Hz 1700Watts
CAUTION – HOT SURFACE
ATTENTION-SURFACE TRES CHAUDE DO NOT IMMERSE IN WATER
NE PAS PLONGER DANS L’EAU HOUSEHOLD USE ONLY
USAGE DOMESTIQUE SEULEMENT CAUTION: RISK OF ELECTRIC SHOCK. COOK ONLY IN REMOVABLE CONTAINER. ATTENTION: Risque de choc electrique. Cuire
seulement dans
Check us out and follow us:
Website: www.OsmondLife.com
Customer Service: [email protected]


