![]()
FLEX+ Conical Fermenter
User Guide
Congrats on securing your new Spike
Flex Fermenter!
If this is your first one, say goodbye to your buckets and carboys and enjoy the benefits of a pro-style fermenter in your home. If you already have one, thanks for choosing Spike again to grow your output. In this guide, we will walk through how to properly set up and use your new Flex as it comes out of the box.
Assembly
Ready to get your FLEX fermenter filled with beer? This guide will show you how to
assemble the FLEX with step-by-step instructions and key visuals.
Warnings
Body Assembly
Lid Assembly
 WARNING
- Never exceed 2psi (15psi with the FLEX+)
- Always use a pressure relief valve that is rated for 15psi. Never place a valve before your pressure release valve as this renders the PRV ineffective
- Always fully tighten the fermenter lid band clamp before adding any pressure. Fully tight is about .25” between the two ends of the clamp
- Never tighten or loosen any clamps while the fermenter is pressurized
- Do not modify the lid or fermenter in any way or use it as it is not intended
- Only use Spike products to pressurize your fermenter
FAILURE TO FOLLOW THESE INSTRUCTIONS CAN CAUSE THE LID TO DISLODGE RESULTING IN INJURY OR DEATH
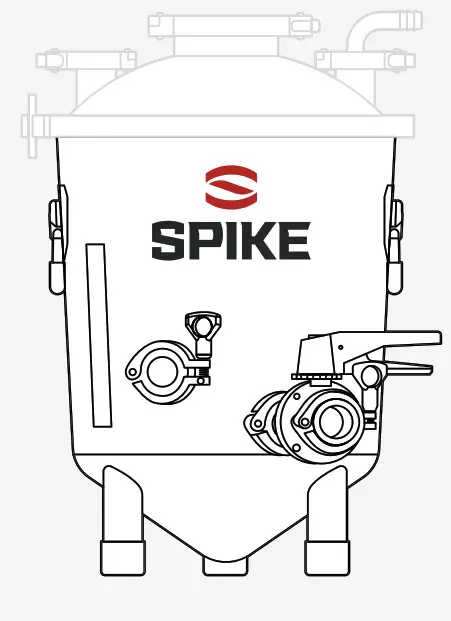
Assembly FLEX Body 

| ITEM | DESCRIPTION | QTY |
| A | FLEX Body | 1 |
| B | Stick on Thermometer | 1 |
| C | 1.5” TC Clamp | 2 |
| D | 1.5” TC Cap | 1 |
| E | 1.5” Gasket | 2 |
| F | Racking Arm | 1 |
| G | 1.5” TC x 1/2 NPT Adapter | 1 |
| H | 3pc Valve | 1 |
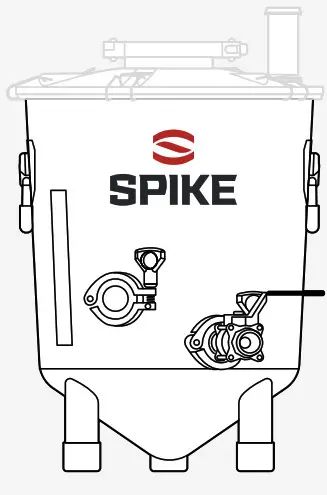
Assembly FLEX+ Body
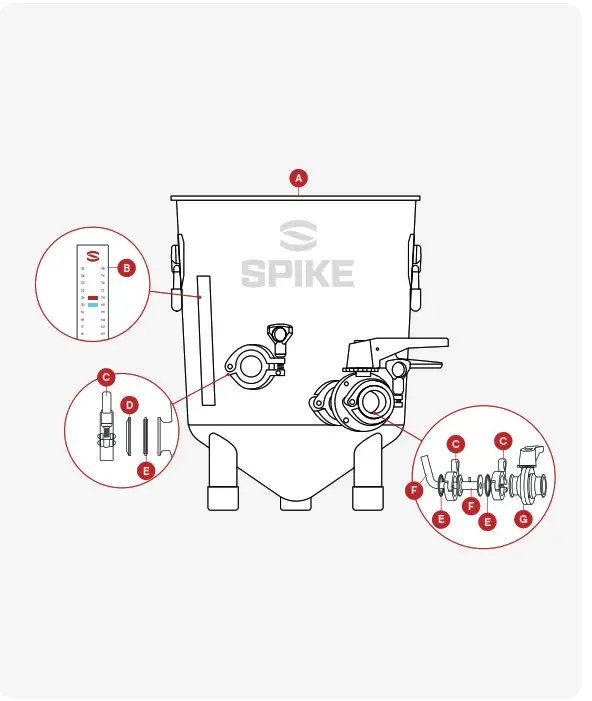
| ITEM | DESCRIPTION | QTY |
| A | FLEX+ Body | 1 |
| B | Stick on Thermometer | 1 |
| C | 1.5” Clamp | 3 |
| D | 1.5” TC Cap | 1 |
| E | 1.5” Gasket | 3 |
| F | TC Racking Arm | 1 |
| G | 1.5” Butterfly Valve | 1 |
Assembly FLEX Lid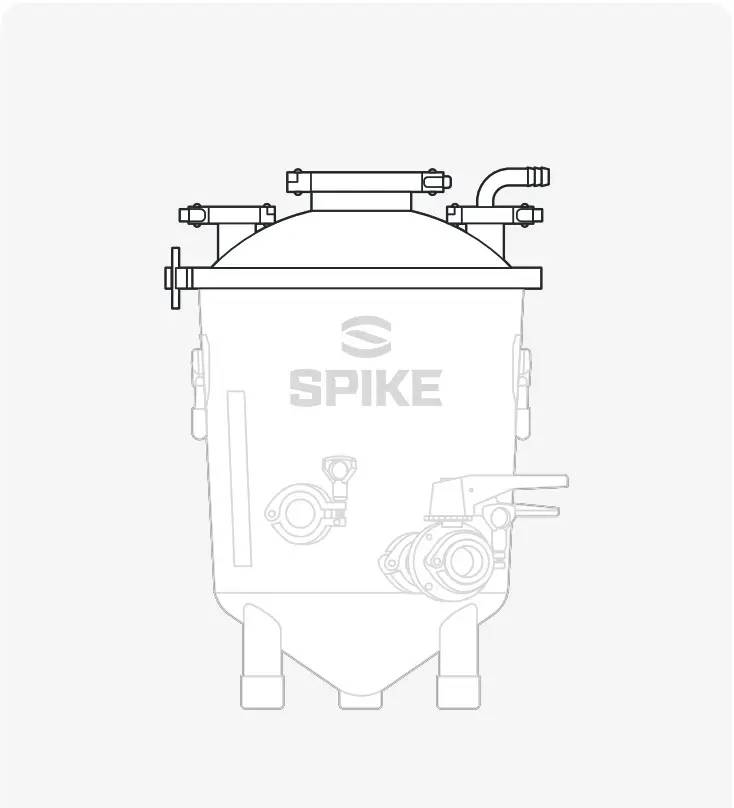
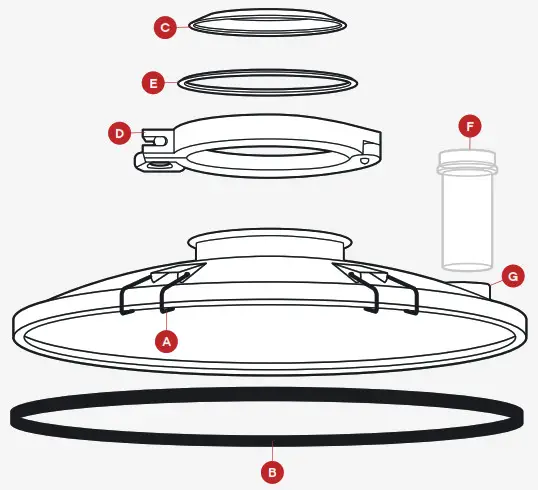
| ITEM | DESCRIPTION | QTY |
| A | 5 Clip Lid | 1 |
| B | Lid Gasket | 1 |
| C | 4” TC Cap | 1 |
| D | 4” TC Clamp | 1 |
| E | 4” TC Gasket | 1 |
| F | Airlock | 1 |
| G | Airlock Bung | 1 |
Assembly FLEX Lid
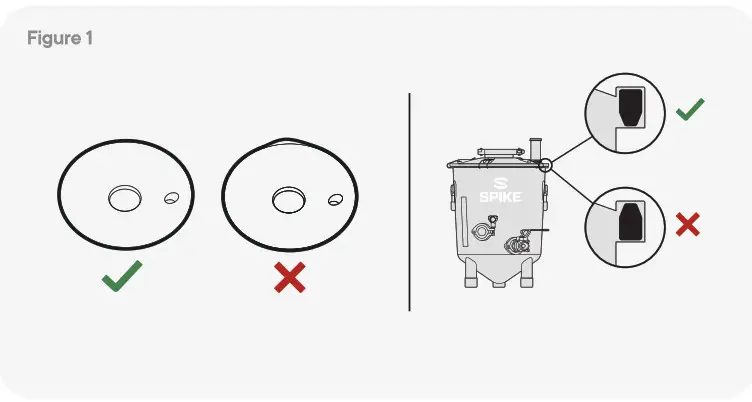
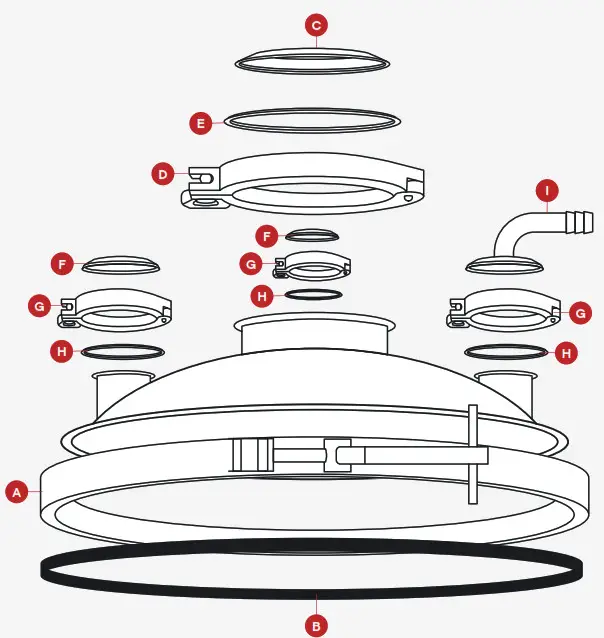
Gasket Installation
- With the lid in front of you, take the gasket (flat side down – pointed side up) and push the gasket into the rim at the furthest side from you (12 o’clock). (see Figure 1)
- Push the gasket into the rim directly in front of you (6 o’clock).
- Push the gasket into the rim on the right side (3 o’clock), then the left side (9 o’clock).
- Push the gasket in all the way around so it is fully seated.

Clamp Installation
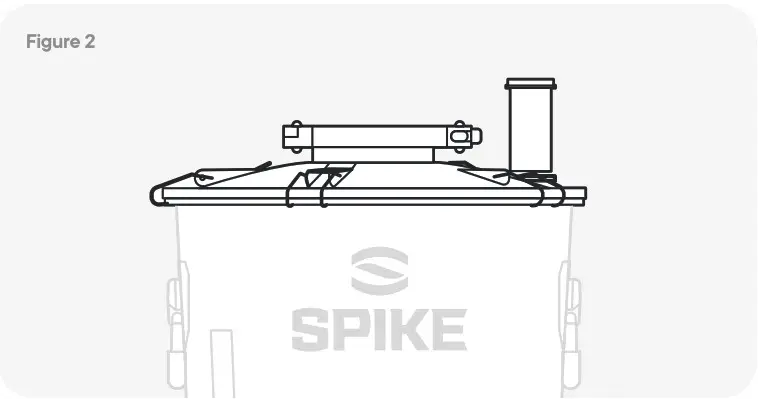
- Center the FLEX lid on the FLEX body. We recommend running your fingers around the FLEX to make sure it’s sitting perfectly centered. (see Figure 2)
- Clip all five lid clips to the Flex body to secure it in place.

| ITEM | DESCRIPTION | QTY |
| A | Lid Clamp | 1 |
| B | Lid Gasket | 1 |
| C | 4” TC Cap | 1 |
| D | 4” TC Clamp | 1 |
| E | 4” TC Gasket | 1 |
| F | 1.5” TC Cap | 2 |
| G | 1.5” TC Clamp | 3 |
| H | 1.5” TC Gasket | 3 |
| I | 1.5” TC x 5/8” Barb (90°) | 1 |
Assembly FLEX+ Lid
Gasket Installation
- With the lid in front of you, take the gasket (flat side down – pointed side up) and push the gasket into the rim at the furthest side from you (12 o’clock). (see Figure 3)
- Push the gasket into the rim directly in front of you (6 o’clock).
- Push the gasket into the rim on the right side (3 o’clock), then the left side (9 o’clock).
- Push the gasket in all the way around so it is fully seated.

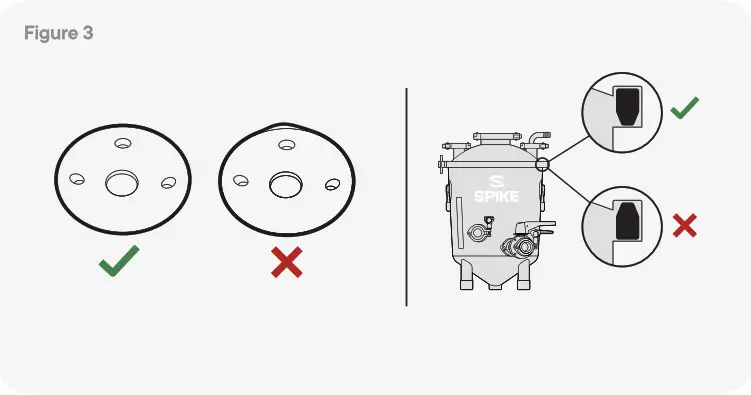
Clamp Installation
- Center the FLEX+ lid on the FLEX+ body. We recommend running your fingers around the FLEX+ to make sure it’s sitting perfectly centered. (see Figure 4)
- Wrap the FLEX+ lid clamp around the fermenter, with the T joint in the front of the fermenter.
- Tighten the lid clamp until there is about ¼” gap or less between the two joining ends of the clamp.

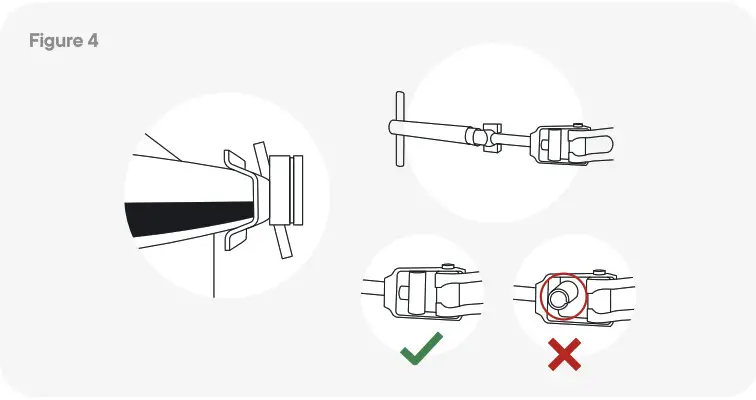
PRO TIP: If you have trouble tightening down to 1/4” gap or less, or the clamp makes a grinding sound when tightening, we recommend adding anti-seize to the lid clamp threads. We install anti-seize on every clamp when it leaves Spike however it can wear out or dry up over time. This can be picked up at any local hardware store.
Fermentation Guide
Now that your FLEX/FLEX+ Fermenter is fully assembled, it’s time to fill it up with beer! Follow the steps in this user guide for a simple and easy fermentation experience
First Cleaning and Sanitizing
How to Fill & Pitch Yeast
Monitor activity and gravity
Racking
Post Brew Cleaning
Fermentation First Cleaning & Sanitizing
- We recommend cleaning all your parts with hot water and dish soap to break down any manufacturing residue.
- On brew day, sanitize your equipment according to your sanitizer’s directions. Once your stainless is sanitized, we need to avoid any bacteria from getting in contact with our beer!
Fermentation Filling Your FLEX and Pitching Yeast
The simplest way to fill the fermenter is to place it under your boil kettle.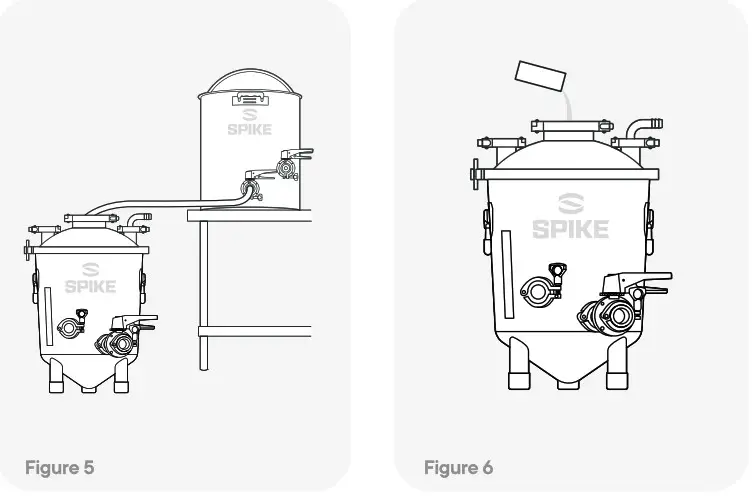
- Attach tubing from your kettle outlet and into one of the ports on the FLEX lid. Be sure that the end of the tube is above the final volume of wort in the FLEX. If not, the transfer will stop when the tube is submerged. (see Figure 5)
- Once your kettle has stopped draining, remove the tubing and close the lid port.
PRO TIP: if you have a pump, you can pump your wort from your BK and into the dump or racking ports. - Add your yeast through the 4” port once the temp of your wort is between the recommended temperature range for your yeast. (see Figure 6)
Fermentation Monitor Activity and Beer Gravity

- You should notice CO2 bubbles coming out of your blow-off tube within 24-48 hours. However, CO2 bubble activity is not always the most accurate way to judge your fermentation’s progress.
- Instead, we recommend taking a sample from the Flex and filling a hydrometer with a sample to check gravity as fermentation moves along. (see Figure 7)
- When your gravity is the same on 2 consecutive days that means fermentation is complete and you can package your beer.
Fermentation Racking (transferring)
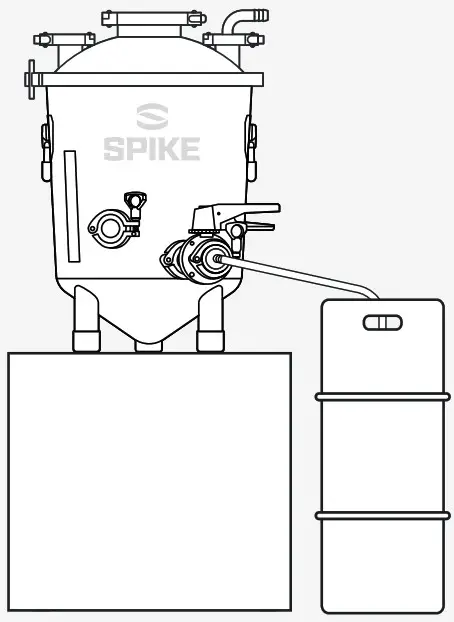
- When transferring, remove the blow-off tube from the fermenter. Not doing this will cause you to suck sanitizer into the beer.
- Attach tubing from your racking port to your keg. Be sure that the bottom of the tubing only goes to the top of the keg, otherwise, the flow will stop when the beer is higher in the keg than the tubing. (see Figure 8)
- After your keg is full, purge it with CO2
Fermentation Post Brew Cleaning
- Clean your fermenter ASAP to make it easy
- Rinse it out with hot water. Then partially fill the fermenter with more water and add a caustic cleaner like Alkaline Brewery Wash. Use a rag to clean all parts of the body with the caustic solution. Use a brush to scrub any areas with debris such as the ring of krausen up top.
- Empty the liquid into a bucket.
- Rinse off the caustic from the body with hot water
- Disassemble the fermenter and soak the smaller parts in the caustic solution then rinse them off with water.


 User Guide")


