PRECAUTIONS
- Refer service to qualified technicians only.
- Do not disassemble or modify the transceiver for any reason.
- Do not expose the transceiver under direct sunlight long time or to extremely hot conditions.
- Do not place the transceiver on the unstable surface.
- Keep the transceiver out of the dust, moisture, and water.
- Do not operate the transceiver or charge the battery pack under explosive conditions.
UNPACKING AND CHECKING EQUIPMENT
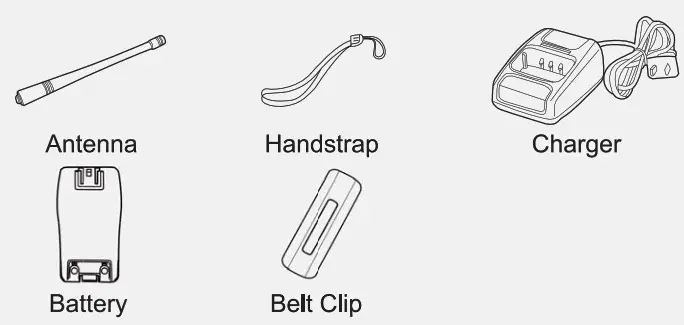
Carefully unpack the transceiver. We recommend that you identify the items listed in the following table before discarding the packing material. If any items are missing or have been damaged during shipment, please contact the dealers immediately.
SUPPLIED ACCESSORIES
| Item Name | Quantity |
| Antenna | 1 |
| Handstrap | 1 |
| Charger | 1 |
| Battery | 1 |
| Belt Clip | 1 |
| Users Manual | 1 |
CHARGING INSTRUCTIONS
Please charge the new battery pack before using it.
The new or stored (more than two months) battery pack, which can not reach its full capacity for the first charging. After 2 or 3 times charging and discharging, it can reach full charge.
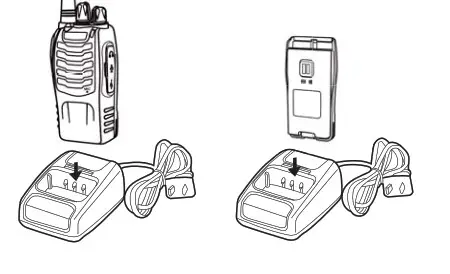
CHARGING WITH THE CHARGER
- Plug the adapter into an electric socket.
- Insert the transceiver or battery into the drop-in charging tray.
- Ensure that the battery’s contacts connect with the drop-in charging tray properly, while the charging is taking place, the light will glow red.
- After 3 hours of charging, the LED indicator will light green which means the full charge. Now remove the battery or the transceiver from the drop-in charging tray.
CHARGING WITH THE TYPE-C PORT
-Plug the Type-C connector of the cable into the Type-C port in the right of the radio, plug the USB connector of the cable into any usable USB port, like a power-on computer.
-If you have a portable power bank with a Type-C connector, you can plug the Type-C connector into a Type-C port in the right of the radio.
NOTE: Do not recharge the battery pack if it is fully charged. Doing so may cause the life of the battery pack to shorten or the battery pack may be damaged.
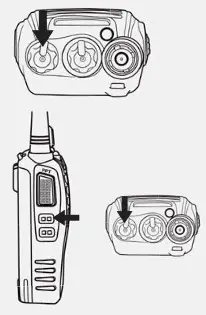
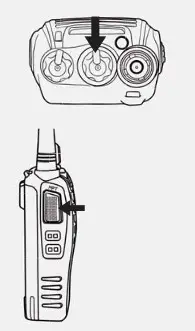
INSTALLING/REMOVING THE BATTERY PACK
The usage time of BL-5 Battery Pack is about 8 hours, which is based upon 5% transmit/5% receive/90% standby (standard duty cycle). See the following images:
CAUTION:
- Do not short-circuit the terminals of the battery or throw the battery into the fire.
- Do not disassemble the battery pack yourself.

INSTALLING THE ANTENNA
Screw the antenna into the connector on the top of the transceiver by holding the antenna at its base and turning it clockwise until secure.
NOTE: The antenna is neither a handle, a key ring retainer, nor a speaker, microphone attachment point. Using the antenna in these ways may damage the antenna and degrade your transceiver’s performance.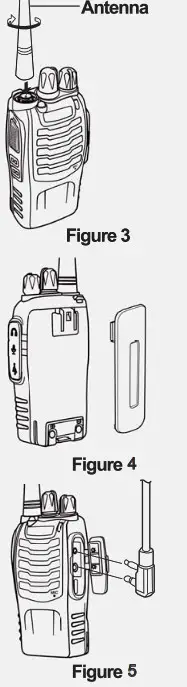
INSTALLING BELT CLIP
If the belt clip is not installed, its mounting location may get hot during continuous transmission or under a heated environment.
INSTALLING THE (OPTIONAL) SPEAKER/MICROPHONE
Insert the speaker/microphone plugs into the speaker/microphone jacks of the transceiver. NOTE: The transceiver is not fully water-resistant when using a speaker/microphone.
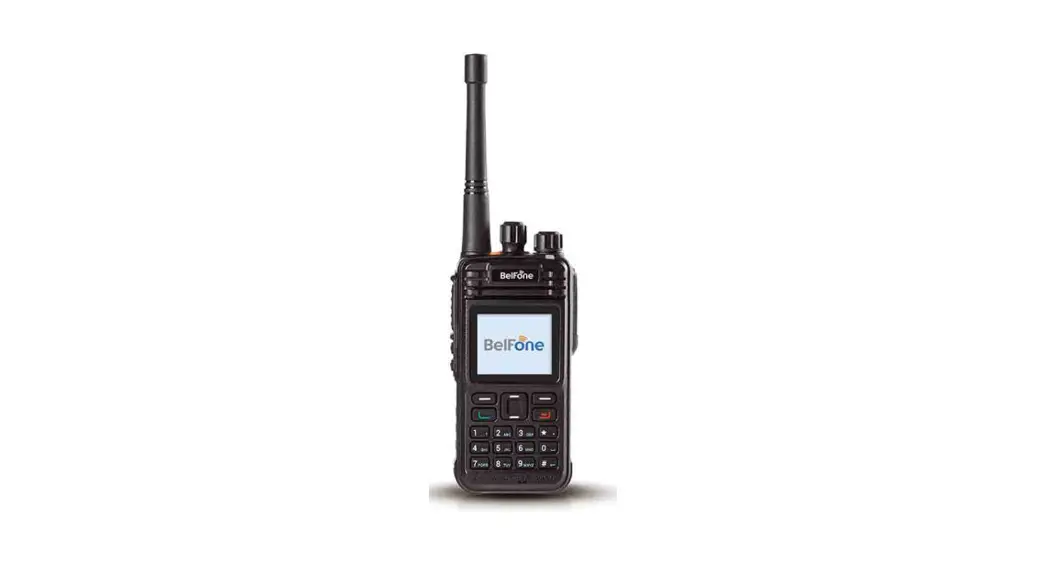
GETTING AC QUAINTED

A. Led Indicator— The LED indicator lights continuously red when transmitting. And lights green when in reception condition. B. Channel Switch—Rotate it to select the channel. No.16 channel is a scanning channel.
C. POWER SWITCHNOLUME CONTROL
Turn clockwise to switch ON the transceiver. Turn counterclockwise fully to switch OFF the transceiver. Rotate to adjust the volume.
D. PTT (PUSH-TO-TALK) BUTTON
Press this button, then speak into the microphone to call a station. Release to receive a call.
E. MONITOR BUTTON Short press MONI button to hear the background noise (Squelch OFF); short press MONI button again to return to normal operation.
F. FUNCTION KEY—Short press to activate the flashlight.
G.SPEAKER/MICROPHONE JACKS AND TYPE-C PORT
OPERATION
SWITCHING POWER ON/OFF
Turn the power switch/volume control clockwise. You will hear a beep and speech, indicating the transceiver is ON.
ADJUSTING THE VOLUME
Hold Monitor button down to listen to audio level while rotating the Power switch volume control. Rotate clockwise to increase and counterclockwise to decrease volume.
SELECTING THE CHANNEL
Turn the channel switch to select your desired channel. NO.16 is Scanning Channel.
TRANSMITTING
To transmit, press, and hold [ PTT ] and speak into the microphone in your normal tone of voice. The LED indicator lights continuously red when transmitting. To maximize sound clarity at the receiving station, hold the transceiver 2 to 3 inches from the mouth and talk in a normal tone of voice.
ADDITIONAL FUNCTIONS
SQUELCH LEVEL
The purpose of squelch is to mute the speaker when no signals are present. With the squelch level correctly set, you will hear sound only while actually receiving signals (Squelch ON). The squelch level can be adjusted via programming software.
TIME-OUT TIMER (TOT)
The purpose of the lime-out Timer is to prevent any caller from using a channel for an extended period of time which will cause thermal damage. The built-in Time-out Timer limits each transmission time to a certain time. When the transmission time extends the certain time you set, an alert tone will sound.
SCAN
The scan is a useful function for hands-off monitoring of your favorite frequencies. When the transceiver is set as SCAN via software, turn the channel selector to channel 16, the transceiver will automatically detect the activities of the scanning channel from 1 to 15 (A different channel can be set).
- The transceiver stops scanning at the frequency (or memory channel) where a signal is detected. It then continues or stops scanning.
- If there are fewer than 2 channels, it can not scan.
- On channel 16, press PTT and MONI key, it will turn on the SCAN, or turn off the SCAN.
FLASHLIGHT
Short press the FUNCTION key to turn ON the flashlight;
short press the FUNCTION key again to enter blinking status;
short press the FUNCTION key another time to turn OFF the flashlight.
VOICE PROMPT
- Turn the channel selector to Channel 10 and push the PTT button and MONI button at the same time, then turn the Power on. Then you can turn OFF/ON the voice prompt.
- Tum the channel selector to Channel 15 and push the PTT button and MONI button at the same time, then turn the Power on. Then you can choose different voice prompt languages.
VOX(Voice Operated Transmission)
VOX eliminates the necessity of manually switching to the transmission Mode each time you want to transmit. The transceiver automatically switches to Transmission Mode when the VOX circuitry senses that you have begun speaking into the microphone.
- When operating the VOX function, be sure to set the VOX Gain level which allows the transceiver to recognize the sound levels. You can adjust the VOX Gain level by the programming software.
- If the microphone is too sensitive, the transceiver will begin transmitting when there is noise in the background.
- If it is not sensitive enough, it will not pick up your voice when you begin speaking. Be sure to adjust the VOX Gain level to an appropriate sensitivity to allow smooth transmission.
Turn the channel selector to Channel 1 and push the PTT button and MONI button at the same time, then turn the Power on. Then you can turn the ON/OFF the VOX function.
EMERGENCY ALARM
Long press the MONI button for 3 seconds to turn ON the emergency alarm. Short press the MONI button again to turn OFF the emergency alarm. When the emergency alarm is turned on, the radio can only make an alarm in itself, but it can not make an alarm to another radio.
BATTERY SAVER
The battery saver function will decrease the amount of power used when a signal is not being received and no operations are being performed(no keys are being pressed, and no switches are being turned).
While the channel is not busy and no operation is performed for more than 10 seconds, Battery Saver turns ON.
When a signal is received or an operation is performed, Battery Saver turns OFF.
BATTERY LOW ALERT
Battery Low Alert reminds you of recharging.
When the battery power is very low, an alert tone will sound and the LED indicator will blink red. Please recharge or replace the battery pack.
MONITOR
When you are receiving and no signals are present, the squelch function can mute the speaker, so you can not hear the background noise. If you want to switch the squelch function OFF, short press the MONI button. It is very helpful when you want to adjust the volume and receive weak signals. Short press the MONI button again to return to normal operation.
BUSY CHANNEL LOCK-OUT (BCL)
Busy Channel Lock-out function can be turned ON/OFF with the programming software on each channel.
When activated, BCL prevents you from interfering with other parties who may be using the same channel that you selected Pressing the PTT switch while the channel is in use will cause your transceiver to emit an alert tone and transmission will be inhibited (you cannot transmit). Release the PTT switch to stop the tone and return to receive mode.
CTCSS/DCS
CTCSS (Continuous Tone Coded Squelch System)/ (Digital Coded Squelch)
You may sometimes want to hear calls from only specific persons or groups. In this case, use the selective call which allows you to ignore unwanted calls from other persons who are using the same frequency.
CTCSS or DCS is a sub-audible tone and is selectable from among the 50 or 210 tone frequencies.
You can program CTCSS or DCS on each channel with the programming software. If the radio is set with CTCSS/DCS on the channel, it can only communicate with another radio which is set with the same frequency and the same CTCSS/DCS.
NOTE:
CTCSS and DCS do not cause your conversation to be private and scrambled. It only relieves you from listening to unwanted conversations.
JUMP CODE
You can enable jump code by the programming software. When jump code is enabled for the radio’s current channel, the radio can’t communicate with another radio which is using the same frequency and the same CTCSS/DCS. If a radio is using a channel on which jump code is enabled, it can only communicate with another radio which is using the same frequency, and the same CTCSS/DCS and jump code must also be enabled on the current channel of the other radio.
REPROGRAMMING PASSWORD
In the radio’s default setting, no reprogramming password is set. There is a reprogramming password setting option in the programming software. To set a reprogramming password for your radio, tick the New Password option in the programming software, and enter your password, then click “Write data to device’.
After you set your radio with a reprogramming password, you need to enter your reprogramming password next time you program the radio.
SPECIFICATIONS
| Frequency Range | 400-470MHz |
| RF Rated Power | ≤2W |
| Channel Capacity | 16 |
| Operated Voltage | 3. 7V |
| Dimensions | 115rrin X 60nin X 33nm |
| Weight | 150g |
NOTE: All specifications are subject to change without notice.
TROUBLESHOOTING GUIDE
| TROUBLES | GUIDE |
| No Power | Check battery installation and/or replace batteries. Voltage Capadty DuddyGoOut. The battery life is over. replace a new one. |
| Couldn’t I communicate with other group members. | First, please verify that the channel frequency and CTCSS/DCS you are using are the same as those of your group members. If the channel frequency and CTCSS/DCS are the same, please verify that your group members are within the radio coverage. |
| Hear the voice from other groups. | Please change your channel frequency or CTCSS/DCS. At the same time, you also need to set the same channel frequency and CTCSS/DCS for all the radios in your group. |
| Why can I hear the voices clearly from another group, sometimes, my voice is intermittent. | Please check whether the MIC is blocked by something. Sometimes, your frequency Is the same as the frequency of other groups. |
| Can’t turn on the radio and even it is turned on, it often shuts off automatically. | Please check the battery contacts on the radio. |
CTCSS TABLE
| N° | Tone(Hz) | N° | Tone(Hz) | N° | Tone(11z) | N° | Tone(Hz) | N° | Tone(Hz) |
| I | 67.0 | II | 95. | 21 | 132. | 31 | 171. | 41 | 2033 |
| 2 | 69. | 12 | 97. | 22 | 137. | 32 | 174. | 42 | 217. |
| 3 | 72. | 13 | 100.0 | 23 | 141. | 33 | 177. | 43 | 211. |
| 4 | 74. | 14 | 1033 | 24 | 146. | 34 | 180. | 44 | 218. |
| 5 | 77.0 | 15 | 107. | 25 | 151. | 35 | 184. | 45 | 226. |
| 6 | 80. | 16 | 111. | 26 | 157. | 36 | 186. | 46 | 229. |
| 7 | 83. | 17 | 115. | 27 | 160. | 37 | 190. | 47 | 234. |
| 8 | 844 | 18 | 119. | 28 | 162. | 38 | 193. | 48 | 2414 |
| 9 | 89. | 19 | 123.0 | 29 | 166. | 39 | 197. | 49 | 2503 |
| 10 | 913 | 20 | 127. | 30 | 168. | 40 | 1993 | 50 | 254. |
DCS TABLE
| PP | Code | N° | Code | N° | Code | N° | Code | N° | Code |
| I | D023N | 14 | D072N | 27 | DI52N | 40 | D244N | 53 | D3 I IN |
| 2 | D025N | 15 | D073N | 28 | DIS5N | 41 | D245N | 54 | D3 I 5N |
| 3 | 0026N | 16 | 0074N | 29 | DI56N | 42 | D246N | 55 | D325N |
| 4 | D03IN | 17 | DII4N | 30 | D162N | 43 | D2SIN | 56 | 0331N |
| 5 | 0032N | 18 | 0115N | 31 | DI 65N | 44 | 0252N | 57 | 32261 |
| 6 | 0036N | 19 | DI I6N | 32 | 0172N | 45 | D255N | 58 | 34314 |
| 7 | 0043N | 20 | 12214 | 33 | 0174N | 46 | 0261N | 59 | 0346N |
| 8 | 0047N | 21 | 1:1125N | 34 | D205N | 47 | D263N | 60 | 35114 |
| 9 | 0051N | 22 | 13114 | 35 | 0212N | 48 | D265N | 61 | D356N |
| 10 | D053N | 23 | D132N | 36 | 0223N | 49 | D266N | 62 | 0364N |
| II | 0054N | 24 | 0134N | 37 | D225N | 50 | 27114 | 63 | 0365N |
| 12 | 0065N | 25 | 0143N | 38 | 0226N | 51 | D274N | 64 | 0371N |
| 13 | 0071N | 26 | 0145N | 39 | 0243N | 52 | 0306N | 65 | 41114 |
| N° | Code | N° | Code | N° | Code | N° | Code | N° | Code |
| 66 | D4 I 2N | 95 | 0654N | 124 | 1161 | 153 | D2651 | 182 | D4641 |
| 67 | D4 I 3N | 96 | 0662N | 125 | D1221 | 154 | D2661 | 183 | D4651 |
| 68 | 0423N | 97 | D664N | 126 | 1251 | 155 | D2711 | 184 | 4661 |
| 69 | D43 IN | 98 | D703N | 127 | 013 I 1 | 156 | 2741 | 185 | 5031 |
| 70 | D432N | 99 | 0712N | 128 | 1321 | 157 | 3061 | 186 | 5061 |
| 71 | D445N | 100 | 0723N | 129 | 1341 | 158 | D3111 | 187 | 5161 |
| 72 | D446N | 101 | 0731N | 130 | DI431 | 159 | D3151 | 188 | 5231 |
| 73 | D452N | 102 | 0732N | 131 | 1451 | 160 | D3251 | 189 | 5261 |
| 74 | D454N | 103 | 0734N | 132 | 1521 | 161 | D3311 | 190 | 5321 |
| 75 | D455N | 104 | 0743N | 133 | 1551 | 162 | 3221 | 191 | 5461 |
| 76 | D462N | 105 | 1. | 134 | D1561 | 163 | 3431 | 192 | 5651 |
| 77 | D464N | 106 | 231 | 135 | 1621 | 164 | 3461 | 193 | 6061 |
| 78 | D465N | 107 | D0251 | 136 | 1651 | 165 | 3511 | 194 | 6121 |
| 79 | D446N | 108 | 261 | 137 | 1721 | 166 | 3561 | 195 | 6241 |
| 80 | D503N | 109 | 311 | 138 | 1741 | 167 | 3641 | 196 | 6271 |
| 81 | D506N | 110 | D0321 | 139 | D2051 | 168 | D3651 | 197 | 6311 |
| 82 | D516N | III | D0361 | 140 | 2121 | 169 | D3711 | 198 | 6321 |
| 83 | D523N | 112 | 431 | 141 | 2231 | 170 | 4111 | 199 | 6451 |
| 84 | D526N | 113 | D0471 | 142 | D2251 | 171 | 4121 | 200 | D6541 |
| 85 | D532N | 114 | 511 | 143 | 2261 | 172 | 4131 | 201 | D6621 |
| 86 | D516N | 115 | 531 | 144 | 2431 | 173 | 4231 | 202 | 6641 |
| 87 | D565N | 116 | 541 | 145 | 2441 | 174 | 4311 | 203 | D7031 |
| 88 | 0606N | 117 | D0651 | 146 | 2451 | 175 | D4321 | 204 | 7121 |
| 89 | D612N | 118 | 711 | 147 | 2461 | 176 | D4451 | 205 | 7231 |
| 90 | D624N | 119 | 721 | 148 | D2511 | 177 | 1)4461 | 206 | D7311 |
| 91 | D627N | 120 | D0731 | 149 | 2521 | 178 | 1521 | 207 | D7321 |
| 92 | D631N | 121 | 741 | 150 | 2551 | 179 | D4541 | 208 | 7341 |
| 93 | D632N | 122 | 1141 | 151 | 2611 | 180 | 4551 | 209 | 7431 |
| 94 | 6455 | 123 | 1151 | 152 | 2631 | 181 | 4621 | 210 | 7541 |
FCC STATEMENTS WARNING AND COMPLIANCE STATEMENT:
Attention:
This radio complies with IEEE and ICNIRP exposure limits for General Population/controlled Environments RF exposure environment at operating duty factors of up to 50% and is authorized by the FCC for General Population use only. An appropriate warning ! able is affixed to all units. In order to comply with RF exposure requirements, a minimum distance of 2.5 cm must be maintained when held-to-face and body-worn operations are restricted to the approved original accessories (belt clip), a minimum distance of 0 cm. Do not use this device when the antenna shows obvious damages.
This product is in compliance to FCC RF Exposure requirements and refers to the FCC website https://apps.fcc.gov/oetcf/eas/reports/GenericSearch.cfm search for FCC ID: 2ARTCARAR to gain further information including SAR Values.
WARNING: MODIFICATION OF THIS DEVICE TO RECEIVE CELLULAR RADIOTELEPHONE SERVICE SIGNALS IS PROHIBITED UNDER FCC RULES AND FEDERAL LAW.
This device complies with Part 15 of the FCC Rules.
Operation is subject to the following two conditions:
- This device may not cause harmful interference.
- This device must accept any interference received, including interference that may cause undesired operation.
This device complies with Part 15 of the FCC Rules. Operation is subject to the condition that this device does not cause harmful interference.
Our radio generators RF electromagnetic energy during transmit mode. This radio is designed for and classified as” Occupational Use Only “, meaning it must be used only during the course of employment by individuals aware of the hazards, and the ways To Minimize Such hazards.
This radio is NOT intended for use by the” General Population” in an uncontrolled environment. This radio has been tested and complies with the FCC RF exposure limits for “Occupational Use Only” .
In addition, our radio complies with the following Standards and Guidelines with regard to RF energy and electromagnetic energy levels and evaluation of such levels for exposure to humans:
—IEEE Std. 1528:2013 and KDB447498, Evaluating Compliance with FCC Guidelines for Human Exposure to Radio Frequency Electromagnetic Fields.
—American National Standards Institute (C95.1-1992), IEEE Standard for Safety Levels with Respect to Human Exposure to Radio Frequency Electromagnetic Fields, 3 kHz to 300 GHz.
—American National Standards Institute (C95.3-1992), IEEE Recommended Practice for the Measurement of Potentially Hazardous Electromagnetic Fields-RF and Microwave.
The information listed above provides the user with the information needed to make him or her aware of RF exposure, and what to do to as-sure that this radio operates with the FCC RF exposure limits of this radio.
Electromagnetic Interference/Compatibility
During transmissions, The radio generates RF energy that can possibly cause interference with other devices or systems. To avoid such interference, turn off the radio in areas where signs are posted to do so.
DO NOT operate the transmitter in areas that are sensitive to electromagnetic radiation such as hospitals, aircraft, and blasting sites.
Occupational/Controlled Use
The radio transmitter is used in situations in which persons are exposed as a consequence of their employment provided those persons are fully aware of the potential for exposure and can exercise control over their exposure.
FCC PART 15.21 WARNING STATEMENT
This equipment has been tested and found to comply with the limits for a Class B digital device, pursuant to Part 15 of FCC Rules. These limits are designed to provide reasonable protection against harmful interference in a residential installation. This equipment generates and can radiate radio frequency energy. If not installed and used in accordance with the instructions, it may cause harmful interference to radio communications. However, there is no guarantee that interference will not occur in a particular installation. Verification of harmful interference by this equipment to radio or television reception can be determined by turning it off and then on. The user is encouraged to try to correct the interference by one or more of the following measures: – Reorient or relocate the receiving antenna.
– Increase the separation between the equipment and receiver.
– Connect the equipment into an outlet on a circuit different from that to which the receiver is connected.
– Consult the dealer or an experienced radio/TV technician for help.
Changes or modifications not expressly approved by the party responsible for compliance could void the user’s authority to operate the equipment. This device complies with Part 15 of the FCC Rules.
Licensing Information
Use of the radio in the USA is subject to the rules & regulations of the FCC. Changes or modifications not expressly approved by our may void the user authority granted by the FCC to operate this radio and should not be made. To comply with FCC requirements, transmitter adjustments should be made only by or under the supervision of a person certified as technically qualified to perform transmitter maintenance and repairs in the private land mobile and fixed services as certified by an organization representative of the user of those services. Replacement of any transmitter component (crystal, semiconductor, etc) not authorized by the FCC equipment authorization for this radio could violate FCC rules.
Note: The use of this radio outside the country where it was intended to be distributed is subject to government regulations and may be prohibited.
Important: Any changes or modifications not expressly approved by the party responsible for compliance could void the user’s authority to operate this device. Your radio is set up to transmit a regulated signal at an assigned frequency. It is against the law to alter or adjust the settings inside the radio to exceed those limitations. Any adjustments to your radio must be made by qualified technicians.


