![]()
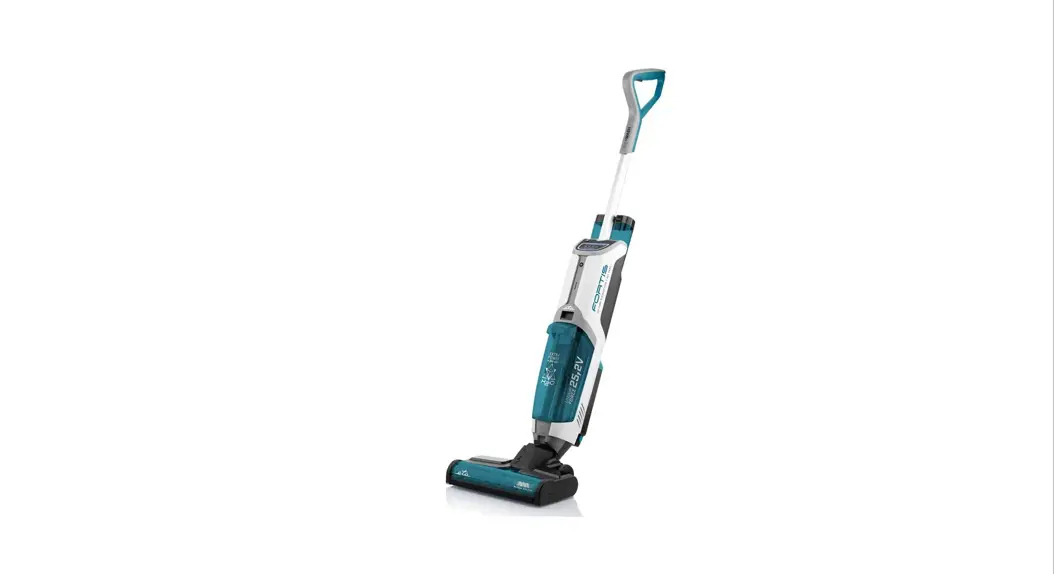
Vacuum cleaner and hard floor washer 4 in 1
INSTRUCTIONS FOR USE
FORTIS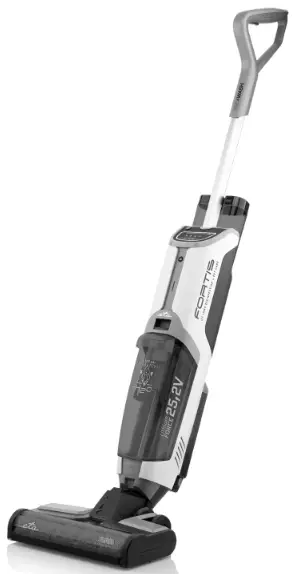
7/1/2022
 |  |  |
The pictures are only illustrative, the supplied accessory and cleaner may differ.
Vacuum cleaner and hard floor washer 4 in 1
eta 7224
INSTRUCTIONS FOR USE
Dear customer, thank you for purchasing our product. Please read the operating instructions carefully before putting the appliance into operation and keep these instructions including the warranty, the receipt and, if possible, the box with the internal packing.
SAFETY WARNING
GENERAL PROVISIONS:
- Consider the instructions for use as a part of the appliance and pass them on to any other user of the appliance.
- Check whether the data on the type label corresponds with the voltage in your socket.
The power cord plug may only be connected to the electrical socket complying with the applicable standards. - This appliance may only be used by children aged 8 years or older, and persons with reduced physical, sensory or mental capabilities or lack of experience and knowledge if they have been given supervision or instruction concerning use of the appliance in a safe way and understand the hazards involved. Children shall not play with the appliance. Cleaning and user maintenance shall not be made by children without supervision. Children younger than 8 years must be kept out of reach of the appliance and its power cord.
- If a vacuum cleaner can be equipped with a handheld accessory with rotating parts a warning has to be given concerning entrapment.
- Never use the appliance if its adaptor or plug is damaged, if it does not work properly if it fell down and was damaged. In this case take the appliance to a special service to check its safety and proper function.
- Never immerse the charger, the battery and the motor part of the vacuum cleaner into water (even partially) and protect them against humidity!
- Turn off the appliance first before filling up container B or emptying container C, or prior to maintenance.
- Never leave the product unattended when in operation!
- Do not charge the battery if the electrolyte is leaking from it.
- The appliance must be disconnected from the power adapter when removing the battery.
- Do not through the battery into fire. There is a risk of explosion!
- Do not let the motorized brush move over the main cords of other appliances or other cables as this may cause a hazard.
- Never use (switch on) the vacuum cleaner if it is placed in the charging stand and it is being charged!
- In order to ensure the safety and proper function of the appliance, use only original spare parts and accessories approved by the manufacturer.
- Only use this appliance for the purpose it was designed for, as specified in this manual. Never use the appliance for any other purpose.
- When you handle batteries, make sure that your hands, the product and the batteries are dry.
- If the appliance becomes abnormally hot, gives off an abnormal smell, changes color or if charging takes much longer than usual, stop using and charging the appliance and contact your local elektro shop chain.
- The manufacturer is not responsible for damage caused by improper use of the appliance and the accessories and its warranty for the appliance does not apply in situations when the safety warnings above are not complied with. Failure to replace or maintain all filters regularly according to the instructions in Chapter IV., V., VI and also using non–original filters, the properties of which resulted in failure or damage of the vacuum cleaner, is also understood to be improper use of the appliance.
USE OF THE APPLIANCE:
- The product is intended for home use and similar (in shops, offices and similar workplaces, in hotels, motels and other residential environments, in facilities providing accommodation with breakfast). It is not intended for commercial use!
- In order to prevent overexposure to ultraviolet light, people and domestic animals must stay at a distance of at least 30 cm from the small turbo brush when the UV lamp is on. Never look directly into UV light, and avoid being too close with your face or skin to UV lamp when the light is turned on. UV light may cause burns to the eyes and skin.
- When handing the appliance, avoid contact (with loose clothing, hair, fingers, jewelry, bracelets etc.) with the rotating brush.
- Do not leave the floor nozzle with the rotation brush on in one place for too long! It could cause damage to the surface vacuumed!
- Before use, ALWAYS fill container B with clean water or with water and detergent. Vacuum ONLY with water (water and detergent). Never use the appliance with a dry container!
- Use only foamless detergents designed for cleaning hard floors.
- When the floor is made of parts or contains wooden parts, it has to be completely sealed against water leaks. The cleaned surface has to be resistant to spilled water.
- The Manufacturer is not liable for any damages caused by water leaking into the floor and shall not participate in any compensation for such damages.
- Never use the appliance or touch the adapter with wet hands or feet!
- Always turn the appliance off before charging the battery and after use.
- In case the openings/parts for airflow get clogged, turn off the appliance and completely eliminate the cause of clogging.
- Do not vacuum sharp objects (such as broken glass), hot, flammable, explosive objects (such as ashes, burning cigarette ends, petrol, solvents and aerosol vapors), corrosive agents (such as acids, solvents). Vacuuming such objects may damage the appliance.
- Install the charging stand, the vacuum cleaner and the appliance within sufficient distance from flammable objects (e.g. curtains, drapes, wood, etc.), heat sources
(e.g. oven, stove, etc.), and wet surfaces (e.g. sinks, washbasin, etc.). - Do not use the appliance for vacuuming impurities produced during/after construction work, such as gypsum dust, fine sand, cement, construction dust, parts of plaster etc. Penetration of the aggregate with such impurities / loose construction substances / lose construction materials creates the risk of damage and decommissioning of the appliance. This type of defect is not covered by the guarantee.
- As a result of factory tests, the internal content may be dewy. This is not to be considered a defect.
ADAPTER:
- If the adaptor of the appliance is corrupted, it has to be replaced by the manufacturer, its service technician or a similarly qualified person so as to prevent dangerous situations.
- WARNING: To charge the battery, use only the network adapter supplied with this appliance.
- To power the appliance, only apply a safe small voltage in accordance with the type plate.
- Do not use the appliance when charging.
- Use the charger in a room only.
- The adaptor supplied with this appliance is intended for this appliance only, do not use it for other purposes.
- The power cord must not be damaged by sharp or hot objects, open fire, it must not be sunk into water or bent over sharp edges.
 | For trouble-free operation of the vacuum cleaner, please use tested micro-filters recommended by the producer. |
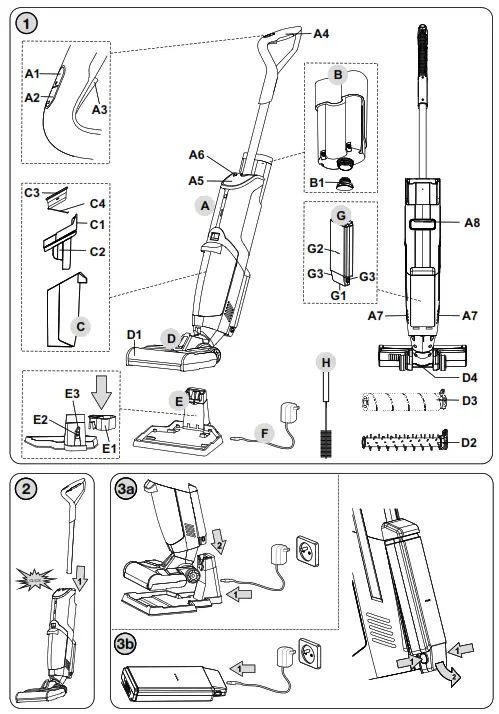
EQUIPMENT AND ACCESSORIES (Fig. 1)
A – drive unit
A1 – ON/OFF button![]()
A2 – button to set the suction power and brush rotation speed
A3 – water (cleaning solution) application button
A4 – handle
A5 – display – operation signal lights and charging lights
A6 – SELF CLEAN button
A7 – air flow outlet part
A8 – handle
B – water (cleaning solution) container
B1 – cap with filter
C – dirty water container
C1 – water container arrester button
C2 – separator
C3 – HEPA filter
C4 – filter
D – floor nozzle with rotation brush
D1 – brush area cover
D2 – spiral brush
D3 – microfiber brush
D4 – UV lamp
E – charging stand
E1 – power supply socket
E2 – storage base
E3 – power connector rubber cap
F – adapter
G – battery
G1 – power supply socket
G2 – charging signal lights
G3 – battery lock button
H – Cleaning brush
APPLIANCE PREPARATION
Remove all packing material, take out the appliance and the accessories. Remove all possible adhesion foils, stick-on labels or paper from the appliance.
APPLIANCE ASSEMBLY
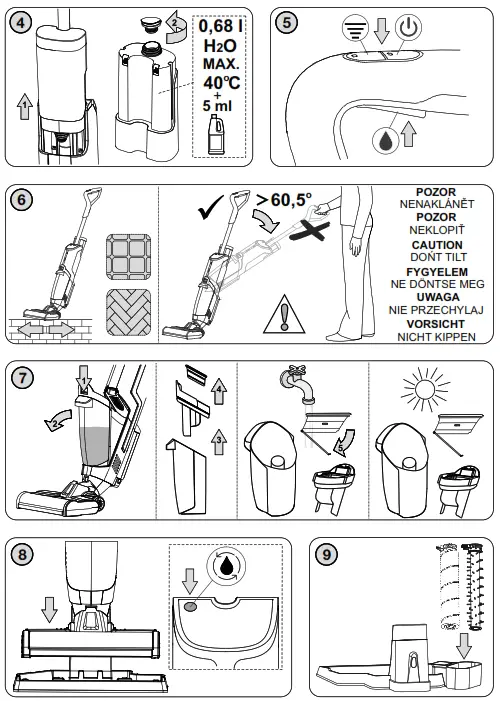
When assembling the appliance, follow the procedure indicated in Fig. 2, 4, 7. For disassembly, proceed the other way round and release the locks.
Battery charging
Turn the vacuum cleaner off prior to charging! According to Fig. 3a, place the vacuum cleaner on the charging stand E. Before the first use, the battery has to be charged for at
least 12 hours and fully discharge the battery before second charge to increase the battery life. Connect the stand to mains, using adapter F. The battery charging is indicated by the light indicator A5. The battery becomes fully charged after approximately 4 to 6 hours of charging, allowing up to 45 minutes of operation. The appliance is fitted with an automatic battery overcharge protection (after the maximum charge level is achieved, the charging will switch off).
Display
Symbol | Description of signal / Meaning of signal |
| The indicator will light up white when the cleaner is in ECO Mode, Working in low brush speed |
| The indicator will light up white when the cleaner is in Max Mode. Working in high brush speed |
| It shows the working time from “Switch on” to “now”. |
| The indicator will light up white when UV lamp is working. |
| The indicator will flash RED slowly when the clean water container is short of water, please fill up with clean water |
| The indicator will flash RED slowly when dirty water container is full, please empty the dirty water container in time. |
| Press the Self-Cleaning Button, the indicator will flash white slowly, and Flomo will enter the self-cleaning mode. |
| Battery – the indicator red light on = Battery is low / will flash white slowly when charging, it will stop flashing after fully charged. |
Battery G | lights go out = Battery is fully charged / permanent light = Battery is discharging / One the diode flashed = Battery is low / lights come on = Battery is charging |


CAUTION
- The vacuum cleaner can be charged if it is placed in the charging base E (fig. 3a) or remove the battery pack G from the drive unit and charge it directly (fig. 3b).
- Let the vacuum cleaner recharge as soon as its suction performance is weaker.
- When the voltage is too low, to protect the battery, the vacuum will automatically turn off.
- If you charge the battery for the first time or after long storage, about 60 % of its total capacity is charged. After repeated discharge and repeated recharge the battery is charged to 100 %.
- If the appliance is used daily, do not unplug the power cord from the socket so that the appliance is fully charged at all times. Battery overcharge is prevented. If you are going to be absent for a longer time (more than one day), unplug the power cord from the socket so as to optimize the battery life.y.
- After completing hard work or in hot environment, the battery may be too hot for charging. Let the battery cool down before charging.
- For ensuring longer life of the battery we recommend full discharge and then full recharge of the battery four times a year.
- When storing the appliance for more than a month (without usage or charging), make sure that the battery is charged to at least 50 %. Storing the appliance with an empty battery may lead to irreversible damage to the battery.
OPERATING TIMES
| Set power | Running Time * |
| ECO | ≥ 45 minutes |
| MAX | ≥ 35 minutes |
| * Note: The stated operating times are based on ETA‘s internal testing and only apply to a new and fully charged battery. Depending on the age and wear of the battery, the operating time decreases. | |
UV sterilize
Together with all the other filtration steps of this vacuum cleaner UV lamp helps to eliminate different kinds of bacteria and viruses. UV light can eliminate up to 99,9 % of bacteria which might otherwise cause trouble.
USE OF APPLIANCE
Let the appliance charge sufficiently prior to using.
OPERATION (Fig. 5)
- Vacuum cleaner switching on/off
– The vacuum cleaner may be switched on/off by A1 switch. - suction power setting
– The suction power is adjustable by A2 button. Two suction power levels are available (high-MAX, the brush rotates at a high speed / low-ECO = economic mode, the brush rotates at a lower speed).
Notes
– The vacuum cleaner is set to ECO suction power when switched on.
Water (cleaning solution) application button (A3)
Press and hold the button down to spray water (cleaning solution) on the floor under the nozzle from container B.
Advice
- ALWAYS fill vessel B with clean water or water with the cleaning agent, thus avoiding damage to the pump.
- As this appliance uses water to clean, the floor may remain wet and slippery for a while.
Advice
- When there is fluid in containers B and C, refrain from tilting the appliance (below angle <65° from the floor) and turning the appliance upside down with nozzle D lifted
up. The fluid could leak into the internal parts and subsequently damage the appliance. - When you are using the floor nozzle D and the rotary brush will get blocked Error code FF:10, (e.g. due to sucking in large foreign objects, due to winding carpet piles, threads or hair on them etc.) turn off the vacuum cleaner by switch A1. Then remove the cause of blocking or clean the rotation brush if necessary (see par. VI. MAINTENANCE).
APPLICATION (Fig. 4, 5, 6)
- Select a suitable brush according to the purpose of use (D2 or D3).
- Pour clean water into container B (hot or cold). You can also add foamless detergent suitable for cleaning hard floors.
- Turn the appliance on.
- Using slow and smooth motions, move over the contaminated floor. Apply water (cleaning solution) using button A3 according to the amount of water on the surface so
that the floor is not cleaned dry. - When the level of water in dust container C reaches the MAX, turn off the appliance. Discard the contents of the container and reinsert the empty container. Continue cleaning.
- When finished, turn off the appliance and place on charging stand E.
Notes
- When the cleaning is almost tone, do not apply cleaning water onto the floor at least
1 minute prior to turning off the appliance. Only vacuum the water that is on the floor.
That will prevent water from dripping from the appliance when moving it. - If there are any larger impurities on the floor (bits of soil, rocks etc.), remove them first.
Then, you can start using the appliance. - Spiral brush D2 is designed to remove coarse or dry impurities.
- Microfiber brush D3 is designed for finer cleaning and it is also suitable for more sensitive floor materials.
- To prevent damage, never put wax, ethereal oils or similar substances in the container B. Do not use liquids that are not transparent or even milky floor maintenance products or liquid floor cleaners that are not water-dilutable in the water tank.
- As soon as the water (cleaning solution) in container B is used up, empty dirt water container C.
- Before lifting floor nozzle D above the surface to be cleaned, ALWAYS turn off the appliance first.
- If water starts dripping from airflow outlet A7, turn off the appliance and empty container C. You can continue working after that.
- The dust container is equipped with a safety system that appliance off in case the level in the container reaches the limit. That prevents water penetration to the motor part.
- It is recommended to press button A3 when moving forward; do not add water when moving backward. The vacuum cleaner vacuums water off the floor when moved
backward. Please, avoid continuously holding down button A3 which would lead to continuous application of water. Such water amount is unnecessary and the water container would get emptied fast.
REMOVING CONTAINERS
REMOVING WATER (CLEANING SOLUTION) CONTAINER
When removing container B, proceed according to Fig. 4. Discard the remaining water or cleaning solution from the container. Reinsert the clean container into the appliance.
REMOVING DIRT WATER CONTAINER
When removing container C, proceed according to Fig. 7. Discard the vacuumed impurities into sewage. Reinsert the clean container into the appliance.
CLEANING AND MAINTENANCE
Self-Cleaning (Fig. 8)
The cleaner can clean the roller brush and pipeline automatically on Self-Cleaning Base:
Please make sure there is enough clean water in the clean water tank B, empty dirty water container before self-cleaning. Place cleaner on the charging station E, plug in the
power supply F well. Press the Self-Cleaning button A6, the indicator will be white and flash slowly, and the cleaner will spray the clean water, clean the roller brush and pipeline
automatically, meanwhile, it will vacuum the dirty water into the dirty water tank C. Please unplug the power supply and clean the dirty water tank once the self-cleaning mode
finished to avoid getting stinky.
Notes
- Self-Cleaning can only be applied when charging on the charging station.
- For hygienic reasons, we recommend emptying and cleaning the containers (B, C) after each use. Do not leave water in any of the containers.
Clean the appliance and adapter surface with a soft wet cloth. Do not use any rough and aggressive detergents!
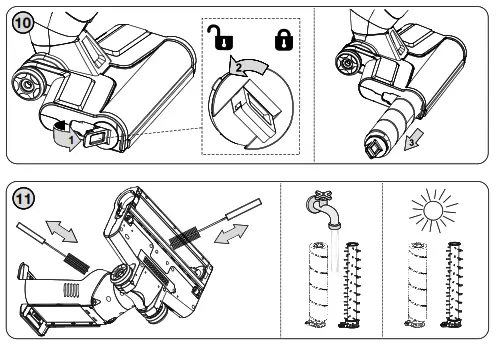
Floor nozzle with a rotary brush
Remove any dirt (especially hair, animal hairs, etc.) stuck to the brush. To make cleaning easier, the brush can be removed (Fig. 10). Clean the space with a suitable tool (e.g.
cleaning brush H or tweezers), Fig. 11. Warning: Do not water the floor nozzle in running water directly, it will damage the motor and PCB. After the maintenance, apply a reverse procedure to install the brush in the nozzle and secure it. Wipe the UV light cover with a damp cloth. The UV lamp has a long service life. However, if it stops working or gets damaged, please contact an authorized service center for replacement.
Containers
Clean the surface of container B with a damp cloth, rinse the inside with water. Rinse container C with water and detergent.
CAUTION
The containers (B, D) is not resistant to cleaning in a dishwasher.
HEPA filter C3, filter C4, separator C2 (Fig. 7)
Rinse the filter under running water in the top-down direction. The filter can be removed from the separator for more thorough cleaning or replacement. Then, take filter C3 out and clean it thoroughly, or replace it.
Clean all other parts (i.e. separator C2, filter C4) in running lukewarm water, e.g. using a cloth or a soft brush and let it dry completely. Re-assemble individual parts in the opposite direction.
After maintenance, let everything dry and then reinsert the containers and put the appliance away. Drying out prevents the formation of unpleasant odours.
CAUTION
- The maximum suction effect will be reached with a clean filter and an empty container.
- Do not use any aggressive washing or cleaning agents or hot water to clean the filter.
- The filter is not intended for washing in a dishwasher.
- Cleaning the filter will not restore its original color, but it will restore its filtration properties.
- In order to maintain the filtering parameters of the HEPA filter, we recommend that you use a dry method of cleaning.
- If you clean the HEPA filter with water, its filtration properties will deteriorate. The filter cannot be washed more than three times. After that, a new filter needs to be purchased.
- Neglecting filter cleaning may lead to the breakdown of the vacuum cleaner!
- Make sure that the contact surfaces and sealing elements are functional.
- We recommend replacing the filter once a year or when it cannot be cleaned properly or if it is damaged. You can buy a replacement st filter in the elektro shop chain.
Storage
The cleaner must be placed on a flat surface where there is no danger of knocking over.
Insert of the accessories D2, D3 into storage base E2 (Fig. 9).
Replacement parts can be purchased under order numbers: ETA722400010 – battery, ETA722400040 – spiral brush, ETA722400050 – microfiber brush, ETA722400070 –
HEPA filter, ETA722400130 – cleaning brush.
TROUBLESHOOTING
| Problem | Cause | Solution |
|
Motor won‘t start | The battery is discharged. | Recharge the battery |
| The “ | Press the “ | |
| The handle doesn’t connect well | Please re-install the handle | |
| The vacuum cleaner is not charging | No power in the electrical socket | Check if the circuit breakers are on |
| The charging adapter or its cord is damaged | Contact the authorized service center | |
|
The cleaner doesn’t work | The water container B is not installed | Please empty the water container |
| The dirty water container C is full | Please check and install the dirty water container | |
| The roller brush D2, D3 is not installed | Please check and install the roller brush |
| Problem | Cause | Solution |
| The indicator display of clean water container B is incorrect | Uncalibrated | Take off the Clean Water container, then start to clean and spray, turn cleaner off until draining the pipe. Then press the A1 and A2 button for 5 seconds until the digital display flash two times, then check again |
| No water comes out when spraying | The clean water container B is empty | Please fill up the clean water container |
| The clean water container B is not | Please re-install the water container | |
| The cleaner doesn’t work in self-cleaning mode | The cleaner isn’t connected with Cleaner doesn’t work in the power supply | Please check and connect with the power supply well |
| The dirty water C container is full | Please empty the dirty water container | |
| Lack of water | Please fill up the clean water container | |
| There are water drops at air outlet | The HEPA filter isn’t installed | Please check and install the HEPA filter |
| The cleaner was tilted hard | Use the machine correctly <65° | |
| Cleaner vacuums the foam liquid | Empty the dirty water container in time | |
| The suction performance is not sufficient | Regulation in the position of ECO | Set the regulation to MAX |
| Clogged HEPA filter, filter | Clean or replace the filters | |
| The accessories are blocked | Remove the blocking objects | |
| The battery is discharged | Recharge the battery | |
| The appliance does not move smoothly across the floor when I am cleaning | You selected a too high suction power MAX | Please check and re-install the Roller Brush Reduce the suction power ECO |
| The brush does not function properly | The brush is clogged with hair or dirt | Clean the brush with a pair of scissors or by hand |
| The roller brush is blocked by fabric or surfaces during cleaning | Keep the brush aligned with the surface and do not push the brush into soft surfaces |
| Error Code | Cause | Solution |
| FF:01 | Charging overvoltage | Replace the adapter |
| FF:02 | Charging overcurrent | Replace the adapter |
| FF:03 | NTC open/short circuit | Replace the battery pack |
| FF:04 | Internal disconnection of the battery pack | Replace the battery pack |
| FF:05 | Rechargeable battery voltage is too low | Replace the battery pack |
| FF:06 | The rechargeable battery voltage difference is too large | Replace the battery pack |
| FF:07 | High discharging temperature | The battery pack temperature is high, please assure battery pack temperature returns to normal before reuse |
| FF:08 | High charging temperature | The battery pack temperature is high, please assure the battery pack temperature returns to normal before charging |
| FF:09 | Low charging temperature | The battery pack temperature is low, please assure the battery pack temperature returns to normal before charging |
| FF:10 | Roller brush overcurrent | Check if there is any dirt (like pet hair) at the roller brush to be cleaned, then make it clean |
| FF:12 | No dirty water containers installed | Install dirty water container |
ENVIRONMENTAL PROTECTION 
If the dimensions allow, there are labels of materials used for the production of packing, components, and accessories as well as their recycling on all parts. The symbols specified on the product or in the accompanying documentation means that the used electrical or electronic products must not be disposed of together with municipal waste. For proper disposal of the product, hand it over at special collection places where it will be received free of charge. Suitable disposal of the product can help to maintain valuable natural resources and to prevent possible negative impacts on the environment and human health, which could be the possible consequences of improper waste disposal. Fines can be imposed for improper disposal of this type of waste in agreement with the national regulations. The appliance is equipped with a Li-Ion battery with long life. For environmental protection, it is necessary to remove the battery from the appliance after its service life and the battery and the appliance must be disposed of safely using special collection networks. Ask for more details at the local authority or at the local waste collection site.
Insertion and removal the battery
Remove the batteries from the appliance only when they are fully discharged (i.e. let the vacuum cleaner run until its motor stops). The vacuum cleaner must be switched off and
disconnected from mains. Press lock button G3 and then remove the battery G from the vacuum cleaner (Fig. 3). Hold the new battery pack and put down the battery pack along the guide groove and press the battery pack down firmly. When you hear a „click“ sound, the battery pack is locked.
TECHNICAL DATA
| Protection class (charging adapter / vacuum cleaner) | II. / III. |
| Accumulator | 25,2 V Li-Ion |
| Adapter | 100-240 V (AC) / 30 V (DC) |
| Weight (kg) approx. | 4.4 |
| Size of the product (mm) Acoustic noise level of 75 dB(A) re 1pW | 290 x 275 x 1140 |
Charging adapter | |
| Manufacturer’s name or trademark, business registration number, and address | ETA |
| Model identifier | CZH024300080EUWM |
| Input voltage | 100-240 V (AC) |
| Input frequency | 50/60 Hz |
| Output voltage | 30.0 V (DC) |
| Output current | 0.8 A |
| Output power | 24.00 W |
| Average efficiency in active mode | 86.20 % |
| Low load efficiency (10%) | 78.12 % |
| Power consumption without load | ≤ 0.1 W |
| Appliance protection class | II. |
The manufacturer reserves the right to change the technical specifications and accessories for the respective models.
A guarantee of 24 months does not apply to a decrease in the accumulator’s effective capacity caused by its use or age. Effective capacity gradually decreases depending on the method of use of the accumulator.
Replacement of parts that require intervention in the electric part of the appliance must be carried out by a specialized service! Failure to comply with the instructions of the manufacturer will lead to the expiration of the right to guarantee repair!
WARNINGS AND SYMBOLS USED ON THE APPLIANCE, PACKAGING OR IN THE INSTRUCTIONS MANUAL:![]() HOUSEHOLD USE ONLY; DO NOT IMMERSE IN WATER OR OTHER LIQUIDS;
HOUSEHOLD USE ONLY; DO NOT IMMERSE IN WATER OR OTHER LIQUIDS;
TO AVOID THE DANGER OF SUFFOCATION, KEEP THIS PLASTIC BAG AWAY FROM BABIES AND CHILDREN. DO NOT USE THIS BAG IN CRIBS, BEDS, CARRIAGES OR PLAYPENS. THIS BAG IS NOT A TOY.
The![]() symbol indicates
symbol indicates![]() WARNING.
WARNING.
– Please read the instructions manual![]() – Removable power supply unit. WARNING: To charge the battery, use only the network adapter supplied with this appliance.
– Removable power supply unit. WARNING: To charge the battery, use only the network adapter supplied with this appliance.![]() Warning UV-C emitted from this product. Avoid eye and skin exposure to unshielded products. Follow installation instructions and user manual.
Warning UV-C emitted from this product. Avoid eye and skin exposure to unshielded products. Follow installation instructions and user manual.
© DATE 22/2/2021


