![]() Allora 3 Shelton Technologies and Resources
Allora 3 Shelton Technologies and Resources
Instruction Manual
Allora 3 Shelton Technologies and Resources
© Copyright Jabbla
All rights reserved. No part of this publication may be reproduced, transmitted, transcribed, stored in an automated retrieval system or translated into any language or computer language in any form or by any means, either electronically, mechanically, optically, chemically, manually or in any other way without the prior written consent from Jabbla.
This document is a translation of the original Dutch user manual.
Version 20221129
Introduction
- Introduction
 CAUTION
Read this user manual carefully and retain it for later use.
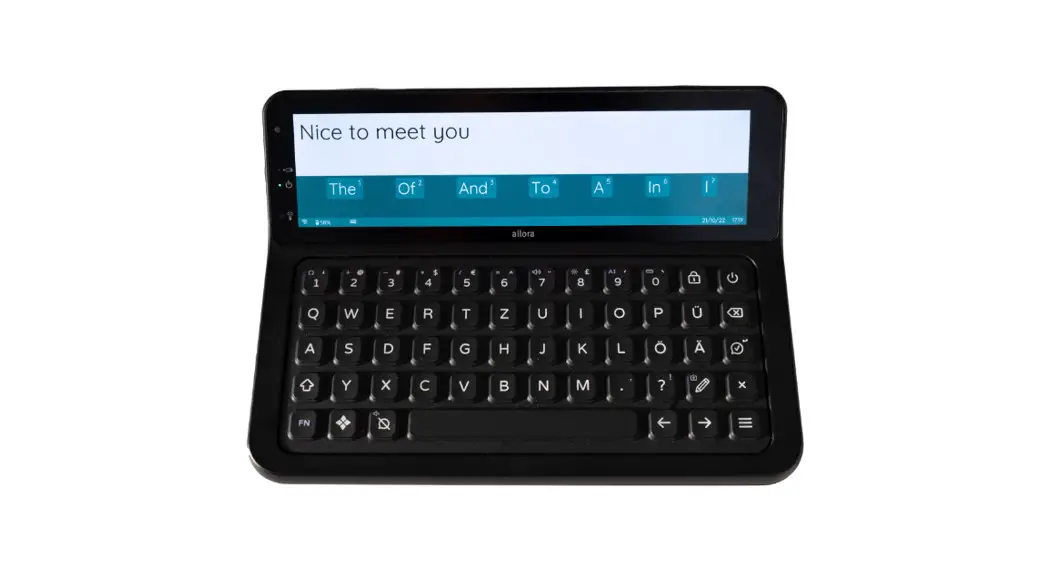
The Allora 3 is a portable communication device with which spoken messages can easily be generated. The Allora 3 uses text-to-speech technology. This technology ensures that any text message that is drafted on the keyboard of the Allora 3, is read out by a high-quality voice.
The person listening to the drafted message can also read along on the device’s partner display.
The Allora 3 is portable but you can also mount it to a wheelchair. To facilitate portability, it is equipped with a carry case.
The Allora 3 is easy to operate and has extensive functions to support communication. - Intended use
The device has a communication support function. This device is intended for general use in everyday life for people with a communication impairment (who are not able to speak or cannot speak clearly). Users must have adequate motor and cognitive abilities to use the device.
The device is designed for use indoors and outdoors. - Prohibited use
The device may not be used for clinical, therapeutic or diagnostic purposes.
The device may not be used for purposes other than those specified in its intended use.
No modifications may be made to the device without consulting with and gaining permission from Jabbla. Making modifications to the device can have consequences for safety, the warranty and compliance with regulations. - Service life
The expected service life of the device is 5 years. The quality and service life of the battery depend on use. - The Allora 3 type plate
You will find the label with the serial number of the device on the rear panel of the device.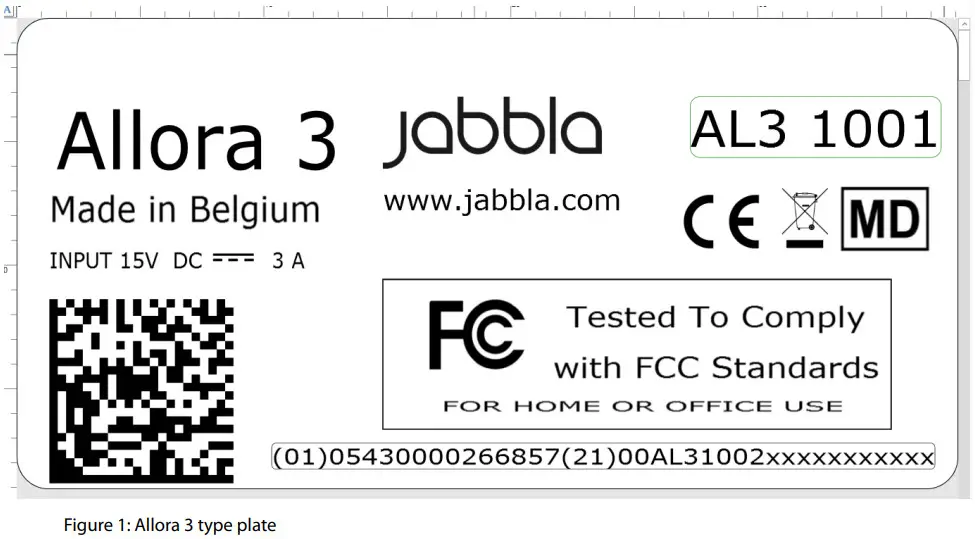 www.jabbla.com
 - Technical data
Technical data Allora 3Specification Explanation Touchscreen • 8.8 inch touchscreen
• Resolution: 1,920 x 480 pixelsPartner display • 4 inch
• white OLEDKeyboard Rubberized backlit keyboard. Switching the backlight on and off is controlled by the light sensor. USB 1 x USB-C Battery LI-ION 7.6 V – 3,870 mAh Battery capacity 1 day with normal use and standard settings
Battery capacity varies considerably according to the settings, usage and other factors.Weight 1,100 g (2.4 lbs) Dimensions • Height: 2 to 8 cm (0.8 – 3.1 inches)
• Width: 25 cm (9.8 inches)
• Depth: 20 cm (7.9 inches)Mounting Optional:
• REHADAPT
• DAESSYConnectivity • Wi-Fi 802.11
• Bluetooth BT 5.0Audio • 1 integrated microphone
• 2 integrated speakersPower supply adapter USB-C charger
5 V – 15 W
Description and operation
- Introducing the Allora 3
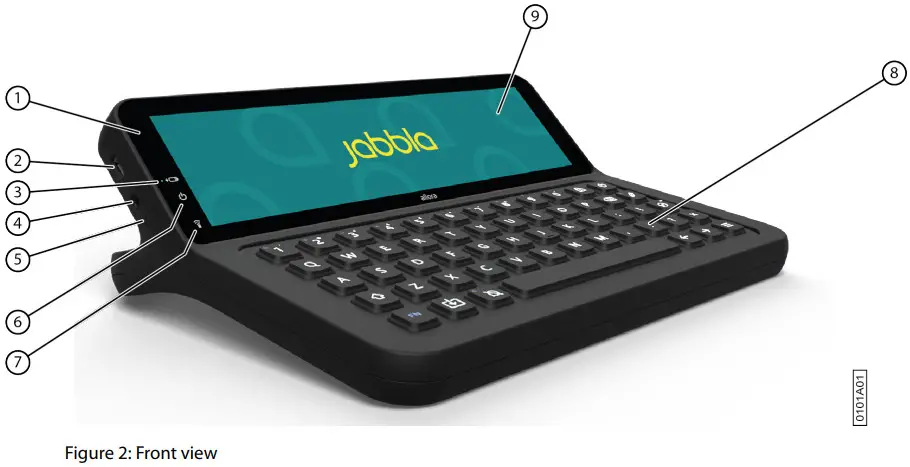 Figure 2: Front view
No. Identification Explanation 1 Light sensor The light sensor measures the ambient light intensity and on this basis illuminates the keyboard. 2 USB-C You can charge the device using this port. 3 Battery charge indicator The battery charge indicator lights up as soon as the device is connected to the mains through the supplied power adapter. The indicator is amber while charging. The indicator changes to green as soon as the battery is charged. 4 Jack for headphones This output is for connecting headphones to the device. The speakers are automatically disabled when
you connect the headphones.5 Microphone opening This is the microphone opening which is used for sound to reach the device’s internal microphone
when recording. The device has 1 integrated microphone.6 On/off indicator The on/off indicator lights up when the device is on with the following colors:
• Green, when the battery is more than halfcharged.
• Orange, when the battery is less than halfcharged, but the device still does not need to be recharged.
• Red, when the battery needs to be recharged.7 Infrared receiver With the infrared receiver you can teach the device infrared codes. 8 Keyboard Rubberized backlit keyboard. Switching the backlight on and off is controlled by the light sensor. 9 Touchscreen The device has a capacitive touchscreen. See Screen on page 9. 10 Fastening holes for a strap The supplied strap can be fastened here to allow you to conveniently carry the device. 11 Handle / tray stand Sturdy handle with opening for attaching a strap. The handle is also designed to be a stand. It is designed so that the device can be ergonomically placed on a tray. 12 Speakers The device has a number of powerful speakers. 13 Partner display The Allora 3 is equipped with a partner display on which text can be displayed. 14 Infrared transmitter With the infrared transmitter you can transmit infrared signals to other devices, such as: sound systems,
television.Figure 3: Rear view
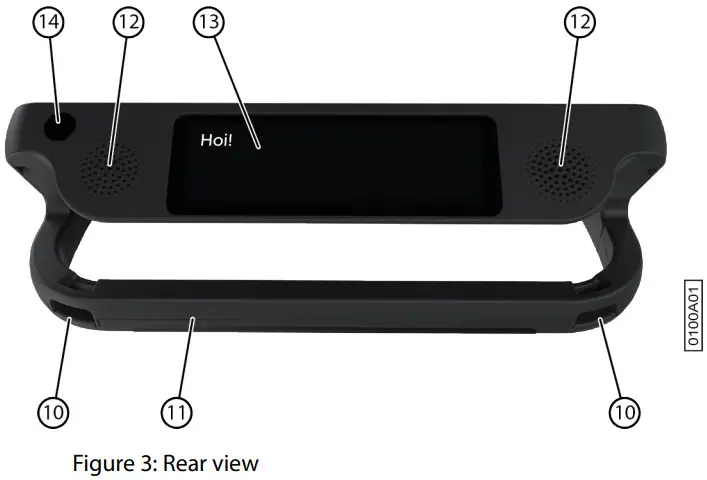 Optionally, a mounting plate for the REHADAPT mounting system or the DAESSY mounting system can be provided.
 - Options
• The Allora 3 can be supplied with an optional REHADAPT mounting system or a DAESSY mounting system.
• The Allora 3 comes as standard with one language. As an option, the Allora 3 can be loaded with multiple languages. - Operation
Using the keyboard and/or the touchscreen of the Allora 3, the user can draft a message, which is read out with a highquality voice utilizing text-to-speech technology.
The person listening to the drafted message can also read along on the device’s partner display. - Screen
The capacitative touchscreen can be controlled in the following ways:
• With your fingers
• With a (capacitative) stylus that simulates your fingers (available from your specialist dealer or webstores)
Safety
- Safety CAUTION
When mounting the device to a wheelchair, ensure that the device is securely fastened and additionally locked, so that it cannot accidentally fall at the slightest shock or impact. ENVIRONMENT
The device uses a battery. Ensure the device is safely disposed of. Observe the waste regulations that apply in your region. NOTE
NOTE
If you are not using the device for a lengthy period of time, always store it with the battery fully charged. Make sure that the device is switched off. CAUTION
Avoid heat sources close to the device or areas that may become particularly hot. For example, in summer it can become very hot in a car. Temperatures that are too high may adversely affect the battery life performance. CAUTION
The device is not watertight. Always try and avoid situations that could cause moisture or dirt to get into the device through the openings. Also take precautions when cleaning the device and follow the cleaning instructions.
The device is equipped with Wi-Fi and Bluetooth. Please observe the following safety precautions: CAUTION
Do not use the device on a plane. Switch off the device. CAUTION
Do not use the device in hospital in the vicinity of electronic medical devices. The transmitted radio waves may affect the equipment. CAUTION
Do not use the device in an environment where flammable gases are present (such as gas stations).
Getting started
- What’s in the Allora 3 box?
The Allora 3 is supplied with the following parts:
• Power adapter with plug and cable
• Carry case
• Strap
• Keyguard (1) and clips (2)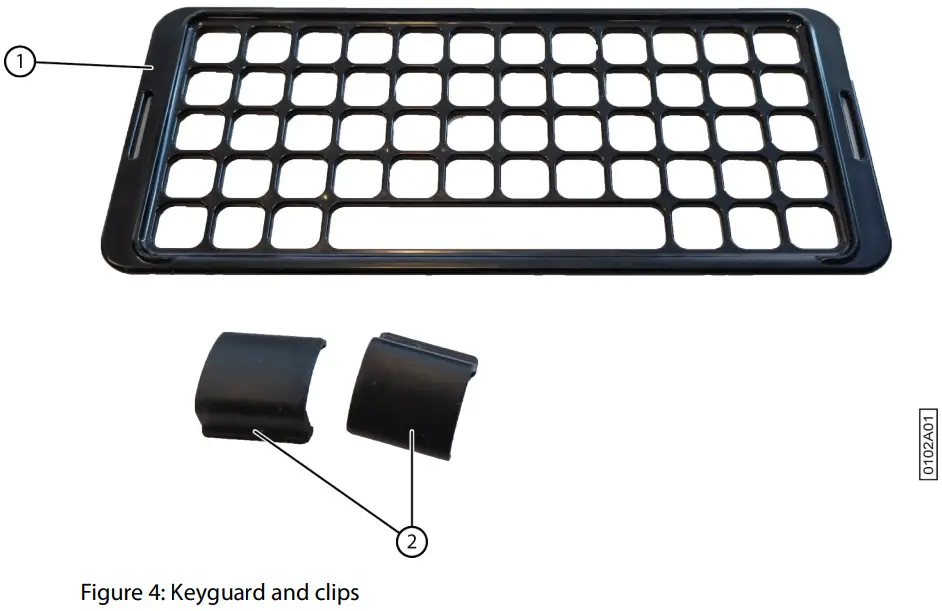
- First use
The device is adequately charged on delivery. A charge status between 40 % and 90 % increases the service life of the battery. - Fitting the keyguard
The keyguard ensures that the user can only press one key at a time.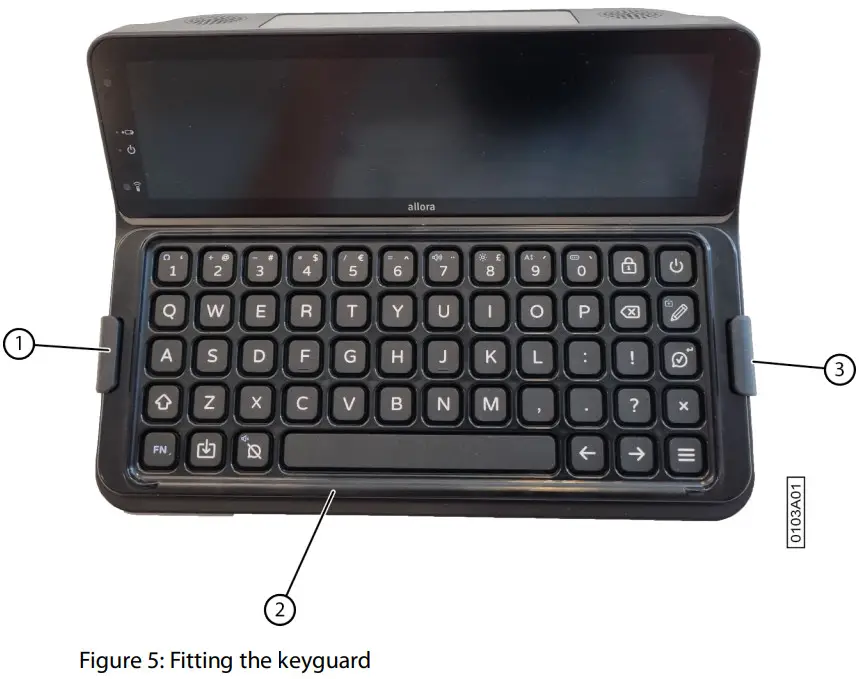 1. Lay the keyguard (2) on the keyboard at the desired height setting.
Rotate the keyguard if you prefer another height setting.
2. Fit the clips (1) (3) to secure the keyguard to the keyboard. - Switch on the device
Press the key until the on/off indicator lights up.
The device first displays the start-up screen with the Jabbla slogan We all have a voice. When the cursor flashes, the device is ready for use.
The device starts up immediately from sleep mode. - Switch off the device completely
You usually put the device into sleep mode so that you can subsequently start to use it quickly. You can switch off the device completely if, for example, you want to store if for an extended period.
1. Press .
.
2. Select General >
  Shutdown.
 - Enter text and have it read out
1. Enter your text by typing it and add words and sentences using word prediction and sentence prediction. Press to type in digits and on
  +
+  to enter special characters.
 TIP
TIP
You can use digits without Num Lock being active by pressing and holding the numeric key. NOTE
Press to clear text letter by letter or
  to clear all text.
2. Press .
.
The displayed text is read out. - Keyboard shortcuts
Keyboard shortcuts Function 
Go to the message history. 
Save the text on your screen as a note. 
Save the text on your screen as a quickfire message. 
Enter a special character. 
Set the volume. 
Set the brightness of the touchscreen. 
Set the size of the letters on your screen. 
Hide the text on the partner display or display it again. 
Mute the sound or switch it back on. 
Have the time read out. 
Have the date read out. 
Go to the beginning of your text. 
Go to the end of your text. 
Go to previous sentence. 
Go to next sentence. 
Enter a  (Enter).
Save the text on your screen as a word or sentence prediction. 
Go to translation mode. Your text is first translated into the set language. You can subsequently change it and then have it read out. 
Delete the word or sentence prediction with the associated number. - Use word and sentence prediction
When word and/or sentence prediction are enabled, you can automatically select words and/or sentences that have been learned or added yourself while you are typing. You can set whether you want to do this only using the touchscreen or also using the keyboard.
1. Start to type the word or sentence.
The predicted words/sentences are displayed at the bottom of the screen.
2. Select one of the following options:
• Using the touchscreen: tap on the word or sentence.
• Using the keyboard: press the digit stated next to the word or sentence. NOTE
Press and
and  to show another series of predictions.
 - Add a word or sentence prediction yourself
You can add words and sentences to the word prediction list yourself.
You can also find this procedure on the device itself via > Prediction >
 How to….
1. Type the word or the sentence.
2. Press .
. - No longer predict a word or sentence
You can remove words and sentences that are predicted so that they are no longer predicted.
1. Do one of the following:
• Press and hold the prediction on the touchscreen.
• Press + <prediction number>.
2. Confirm with. - Enter special characters
In addition to the normal letters, digits and symbols that you can enter with (Shift), you can also enter special characters, which are not on your keyboard.
1. Press + .
2. Select the character. - Save a note
You can keep a text or a series of messages as a note.
1. Enter your text by typing it and add words and sentences using word prediction.
2. Press.
3. Confirm with. - Open a note
1. Press .
.
A list of previously saved notes appears on the screen.
2. Do one of the following:
• Tap on the note.
• Use the arrow keys to select the note. - Save a quickfire message
A quickfire message is a message that you can have read out often and quickly. A quickfire message is not included in the text or message that you are drafting.
1. Do one of the following:
• Quickly save a text as a quickfire message:
1. Press.
2. Confirm with.
• Save one or more new sentences as a quickfire message:
1. Press .
.
2. Press or select +.
3. Type a message.
4. Confirm with.
The message is added to the list of quickfire messages.
2. Repeat the previous step to add any more quickfire messages.
3. Choose to return to the order. - Read out a quickfire message
You can very quickly have a text that you have saved as a quickfire message read out.
1. Press.
2. Do one of the following:
• Tap on the quickfire message.
• Press the number of the quickfire message.
• Use the arrow keys to select a quickfire message. Confirm with. - Play a sound effect
You can play specified sound effects. For example, applause, a laugh, a kiss, etc.
Such a sound effect is also called a vocal emoji.
1. Press twice on.
2. Select .
.
A list of sounds appears.
3. Do one of the following:
• Tap the sound.
• Press the number of the sound.
• Use the arrow keys to select a sound. Confirm with. - Change the order of the list of quickfire messages
1. Press.
2. Select the quickfire message that you want to move using the arrow keys.
3. Press the space bar.
Arrows appear in the cells.
4. Use the arrow keys on the keyboard to move the quickfire messages. - Delete a quickfire message
1. Press.
2. Do one of the following:
• Via the touchscreen:
1. Check and hold down the quickfire message until the Delete quickfire message dialog box opens.
2. Confirm with.
• Using the input panel:
1. Select the quickfire message.
2. Press.
The Delete quickfire message dialog box opens.
3. Confirm with. - Retrieve the message history
You can also configure whether or not you wish to maintain recent messages and how much you want to maintain.
Press. - Automatically translate the text that has been entered and have it read out
You can automatically translate the text that has been entered and have it read out if translation mode is enabled.
1. Switch on translation mode. Press.
2. Draft the sentence you want to translate.
3. Press.
The sentence is translated. Where applicable, you can enter any further changes.
4. Press again.
The sentence is read out and displayed on the partner display. If the voice for this language is not available on the
device, then the translated sentence will still be displayed on the partner display. - Store the device for an extended period
1. Charge the device to approximately 50 %.
2. Shut down the device. NOTE
The device must not be in sleep mode!
3. Keep the device in a dry place at room temperature (20 °C).
4. Charge the battery every 3 months to approximately 50 %.
If you drain the battery, the device will no longer start.
Control
- Put the device manually into sleep mode
Sleep mode is an energy-saving mode that allows you to quickly wake up the device again. You can also set whether and when the device automatically switches to sleep mode.
Briefly press. - Wake the device from sleep mode
The device is in sleep mode when the screen is off and the on/off indicator lights up. If the indicator is not illuminated, the device is completely off.
Briefly press.
The screen will immediately light up. - Charge the device
The amount of time for which you can use the device without needing to charge it depends greatly on how you use the device and on:
• The volume
• The time set before it switches to sleep mode
• The use of Bluetooth and Wi-Fi
If the device is used a lot, it is recommended that you recharge the device every day. To do this, use only the supplied power adapter. The device can still be used while it is being charged.
It is preferable to charge the device at room temperature (about 20 °C / 68 °F). Temperatures lower than 5 °C (41 °F) and higher than 45 °C (113 °F) may adversely affect the battery.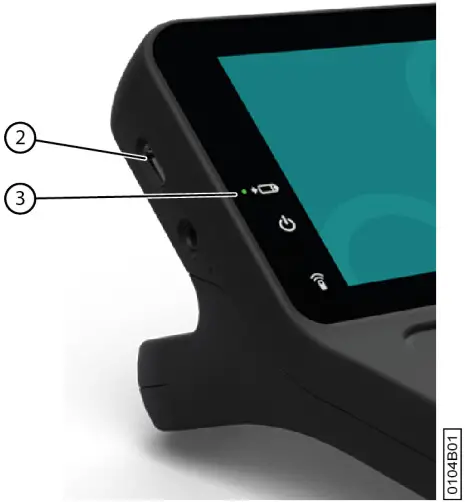 Figure 6: Connection for charging the device
1. Check the power status. See Viewing the power status on page 17.
2. Connect the supplied power adapter between the device USB-C port (2) and the power supply.
When the battery charge indicator LED (3) lights up green, the device is fully charged. - Viewing the power status
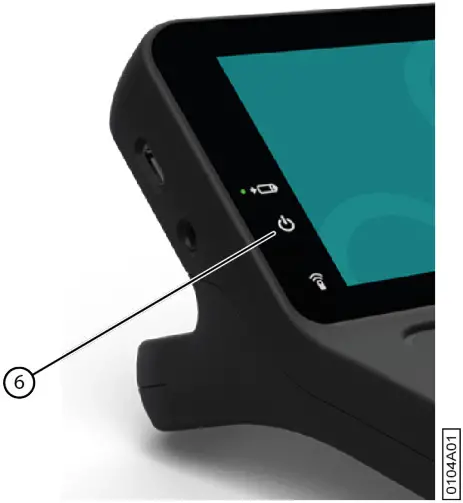 Figure 7: Viewing the power status
View the on/off indicator (6).
• Green, when the battery is more than half-charged.
• Orange, when the battery is less than half-charged, but the device still does not need to be recharged.
• Red, when the battery needs to be recharged. - Control options
5.1 Keyboard control
The Allora 3 can be fully operated using the keyboard.
• Use the keyboard to draft some text or a message. To type a capital letter, you first press the Shift and then the letter.
You do not have to keep the Shift depressed.
• You can select predictions by entering the corresponding number on the keyboard. If you want to enter a number, then you first need to press the Num Lock.
• You can configure acceptance and delay times to personalize the responsive behavior of the keyboard to your preferences.
• Press the speech button to have a drafted message read out.
• The menu and various parameter settings can also be operated using the keyboard. Use the arrow keys to navigate within the menu and press the speech button to confirm options.
5.2 Touchscreen control CAUTION
Do not use sharp tools, to prevent scratching the touchscreen. NOTE
Tap with your finger, not with your fingernail! CAUTION
Make sure the touchscreen does not come into contact with water.
You can operate the device using the touchscreen:
• You can choose word predictions and sentence predictions by touching your chosen option on the screen.
• If you want to have a message spoken aloud, then you can do so by touching the message.
• The menu and the different parameter settings can be controlled using the touchscreen.
Settings
1. General settings
1.1 Set the menu language
- Press .
- Select .
- Select
 .
. - Select the language.
- Confirm with .
1.2 Set when the device switches to sleep mode
- Press .
- Select General > Standby after.
- Select after how many minutes the device switches to sleep mode. You can also select that it is never allowed to switch to sleep mode.
- Confirm with .
1.3 Set the message history size
You can retrieve the message history via ![]() .
.
- Press .
- Select General >
 History size.
 - Use the slider to choose how many messages have to be kept. You can also set that no messages have to be kept.
- Confirm with .
1.5 No longer automatically replace an abbreviation
- Press .
- Select General >
 Abbreviations.
 - Select the letter combination that you no longer wish to replace automatically.
- Select .
1.6 Show system information
In your dealings with the support department, you will be asked to supply the version number of the software on your device.
The system information contains:
- The version of the software
- The device serial number
- Press .
- Select General > System info.
1.7 Change the date
If the device is connected to the Internet via Wi-Fi, then the date and the time are automatically set and you cannot change the date and time.
- Press .
- Select General >
 Date / time.
 - Select Change date.
- Enter the current date in the correct format.
- Confirm with .
1.8 Change the date format
- Press .
- Select General > Date / time.
- Select Change date notation.
- Select the desired date format.
- Confirm with .
1.9 Change the time
If the device is connected to the Internet via Wi-Fi, then the date and the time are automatically set and you cannot change the date and time.
- Press .
- Select General > Date / time.
- Select Change time.
- Enter the current time.
- Confirm with .
1.10 Change the time zone
You always need to manually and correctly set the time zone, even when the device is connected to the Internet via Wi-Fi.
- Press .
- Select General > Date / time.
- Select
 Change timezone.
 - Type the name of the city and the list of time zones is filtered accordingly.
- Select the time zone.
- Confirm with .
1.11 Change the time format
- Press .
- Select General > Date / time.
- Select
 Change time notation.
 - Select the desired time format.
- Confirm with .
2. Speech settings
2.1 Set the voice and language
- Press .
- Select
 Speech > Voice.
 - Select a voice in your language
- Confirm with .
2.2 Setting the language for translation
- Press.
- Select Speech >
 Translator language.
In this menu you can also enable translation mode. This is how you can translate the text that has been entered and have it read out. - Select the language for translation.
This is only if the language in question is available on the device. - Confirm with .
2.3 Enable or disable automatic text translation
You can automatically translate the text that has been entered if you enable translation mode. If you just want to have the text that has been entered read out without translating it, then you need to disable translation mode.
Press ![]() to enable or disable translation mode.
to enable or disable translation mode.
2.4 Set the speed of the voice
- Press .
- Select Speech >
 Speed.
 - Use the slider to set the desired speed of the voice to between 10% and 100%.
- Confirm with .
2.5 Setting the volume
You can also change the volume via ![]() or mute the sound with
or mute the sound with ![]() .
.
- Press .
- Select Speech >
 Volume.
 - Use the slider to set the desired volume to between 0% and 100%.
- Confirm with .
2.6 Mute or switch on the sound
Press ![]() .
.
2.7 Changing the pronunciation of a word
You can change the pronunciation of a word by adding it to the pronunciation dictionary and choosing a substitute word.
- Press .
- Select Speech >
 Pronunciation dictionary.
 - Select +.
- Enter the word you want pronounced differently for Type the word you want to replace.
- Under Type a replacement, enter the word as it ought to sound.NOTE
Select to test the pronunciation. - Confirm with .
2.8 Delete a word from the pronunciation dictionary
1. Press ![]() .
.
2. Select ![]() Speech >
Speech > ![]() Pronunciation dictionary.
Pronunciation dictionary.
3. Do one of the following:
• Via the touchscreen:
- Check and hold the word until the Delete pronunciation dialog box opens.
- Confirm with .
• Using the input panel:
- Select the word.
- Press .
The Delete prediction dialog box opens. - Confirm with .
2.9 Immediately have each word that you enter read out
If Word echo is enabled, a word that you have typed in or added via word prediction is immediately read out.
- Press .
- Select
 Word echo.
• : each word is immediately read out after you have entered it.
• : a word is not immediately read out after you have entered it.
3. Word and sentence prediction settings
The device can predict words and sentences as you type. See Use word and sentence prediction on page 13
| You can … | Related settings |
| Select the predicted words or sentences using the touchscreen or, where applicable, using the numeric keys on your keyboard. | Enable or disable word and sentence prediction using numeric keys on page 23 |
| Enable or disable word and sentence prediction and set the letter font size. | Enable or disable and set up word prediction on page 23 Enable or disable and set up sentence prediction on page 23 |
| Enable or disable word and sentence learning by the device itself. | Enable or disable word learning on page 23 Enable or disable sentence learning on page 24 |
| Add words or sentences yourself that the device must predict or subsequently delete them. | Show how to add or remove a word or sentence for prediction on page 24 |
3.1 Enable or disable and set up word prediction
- Press .
- Select Prediction >
 Word prediction.
 - Select one of the following options:
• None: to show no word prediction
• Small: to display the predicted words in small format
• Medium: to display the predicted words in medium format
• Large: to display the predicted words in large format - Confirm with .
3.2 Enable or disable and set up sentence prediction
- Press .
- Select
 Prediction >
  Sentence prediction.
 - Select one of the following options:
• None: to show no sentence prediction
• Small: to display the predicted sentences in small format
• Medium: to display the predicted sentences in medium format
• Large: to display the predicted sentences in large format - Confirm with .
3.3 Enable or disable word and sentence prediction using numeric keys
If word or sentence prediction is enabled using numeric keys, then press ![]() to be able to type digits.
to be able to type digits.
- Press .
- Select Prediction >
 Show number shortcuts.
•: you can select words and sentences using both the numeric keys and the touchscreen
•: you can only select words and sentences using the touchscreen
3.4 Enable or disable word learning
When word learning is enabled, there is an increased probability that a word will be predicted the more your use it.
- Press .
- Select Prediction >
 Learn words while typing.
•: you can teach the device new words. TIP
Select Prediction > Prediction >  How to… to find out how to do this.
• : the device will not learn any new words for word prediction
3.5 Enable or disable sentence learning
- Press .
- Select Prediction > Learn sentences while typing.
•: you can teach the device new sentences. TIP
Select Prediction > Prediction > How to… to find out how to do this.
• : the device will not learn any new sentences for word prediction
3.6 Show how to add or remove a word or sentence for prediction
- Press .
- Select Prediction > How to….
4. Keyboard settings
4.1 Set how long you have to press a key for
To prevent you from unwittingly pressing a key, for example because your hands are shaking, you can set how long you have to press each key for before the keystroke is accepted.
- Press .
- Select
 Keyboard >
  Acceptance delay.
 - Use the slider to choose how long you have to press a key for before it is accepted as a keystroke.
- Confirm with .
4.2 Set how much time is required between keystrokes
To prevent you from unwittingly pressing a key too quickly in succession, for example because your hands are shaking, you can set the minimum amount of time there must be between consecutive keystrokes.
- Press .
- Select Keyboard > Post selection delay.
- Use the slider to choose how much time there must be between two keystrokes until the second one is accepted.
- Confirm with .
4.3 Set the keyboard layout
You can set the keyboard layout for your local variant of the device, for example Qwerty (Canada).
- Press .
- Select Keyboard >
 Keyboard layout.
 - Select your keyboard layout.
- Confirm with .
4.4 Adjusting the keyboard lighting
The keyboard lighting and touchscreen lighting both depend on how much light there is. The quantity of light is measured using the built-in light sensor. The Allora 3 has 2 lighting modes:
- Light
- Dark
If you adjust the keyboard lighting then you adjust it to one of these modes. You can therefore adjust the keyboard lighting to light mode or dark mode.
- Press .
- Select Keyboard >
 Lighting.
 - Use the slider to set the desired brightness.
- Confirm with .
4.5 Show the meaning of keyboard shortcuts
- Press .
- Select Keyboard >
 Keyboard shortcuts.
 - Select > and < to browse.
5. Touchscreensettings
5.1 Set the brightness of the touchscreen
- Do one of the following:
• Press.
• Press and select  Display > Change brightness.
 - Use the slider to set the desired brightness.
- Confirm with .
5.2 Set the font size the touchscreen
You can adjust the font size of the entered text.![]() NOTE
NOTE
You can also adjust the size of the word and sentence prediction. See Enable or disable and set up word prediction on page 23 and Enable or disable and set up sentence prediction on page 23
- Do one of the following:
• Press.
• Press and select Display >  Editor font size.
 - Use the slider to set the desired font size.
- Confirm with .
5.3 Show all capitals on the touchscreen
Press ![]() and select
and select ![]() Display >
Display > AA All capitals.
- : everything is displayed in capitals.
- : lowercase letters are not changed to capitals.
5.4 Automatic enabling or disabling of capital letters
You can configure is so that when typing, the first letter of a sentence is automatically converted to a capital letter.
Press![]() and select
and select![]() Display >
Display > ![]() Automatic capitals.
Automatic capitals.
- : The first letter of a sentence is automatically converted to a capital letter.
- : The first letter of a sentence is not automatically converted to a capital letter.
5.5 Set the status bar
You can set the size of the status bar or not display it.
- Press and select Display >
 Status bar.
 - Select how big you wish to display the status bar or select None if you do not wish to display it.
- Confirm with.
5.6 Set the color theme
To improve legibility, you can opt for a higher-contrast color theme.
- Press and select Display >
 Color theme.
 - Select the color theme that you want to display.
- Confirm with.
6. Partner displaysettings
6.1 Enable or disable the partner display
Press![]() and select
and select![]() Partner display >
Partner display >![]() .
.
- : the partner display is switched on.
- : the partner display is off.
6.2 Set the brightness of the partner display
- Press and select
 Partner display > Change brightness.
 - Use the slider to set the desired brightness.
- Confirm with.
6.3 Set the number of text lines on the partner display
- Press and select Partner display >
 Number of lines.
 - Select the number of lines of text that you want to show.
- Confirm with.
6.4 Show all capitals on the partner display
Press![]() and select
and select ![]() Partner display >
Partner display >AA All capitals.
- : everything is displayed in capitals.
- : lowercase letters are not changed to capitals.
6.5 Show or hide text on the partner display while typing
- Do one of the following:
• Press and select Partner display > Number of lines.
• Press . - Select one of the following options:
• Don’t show text: the partner display displays nothing while you are typing. The text is displayed only when you have it read out.
• Show ‘…’: the partner display displays … while you are in the process of typing.
• Show every typed character: the partner display displays each character that you are typing. - Confirm with.
6.6 Clear the partner display after speech
You can set how long a message has to remain visible on the partner display.
- Press.
- Select Partner display.
- Select Clear after speech.
- Set the time.
7. Backup and restore
7.1 Create a backup
You can keep a backup and keep it locally on the device or externally using USB.
- If you do not wish to keep the backup on the device, you must connect the storage medium to the device via USB.
- Press.
- Select General >
 Backup and restore.
 - Select
+. - Select the location where the backup has to be saved:
• Backup to Allora
• Backup to USB drive NOTE
This message will only appear if a storage medium is connected via USB. - Confirm with.
- Enter the name of the backup. NOTE
Choose a meaningful name. You will no longer be able to change the name of the backup! - Confirm with.
7.2 Restore a backup
You can restore a backup that is saved locally or externally via USB.
- If you want to restore an external backup, then you have to connect the storage medium to the device via USB.
- Press.
- Select General > Backup and restore.
- Select a backup from the list.
You can identify the location by icon alongside the name of the backup:
• Local
• Via USB
- Confirm with.
7.3 Restore factory settings
- Press.
- Select General > Backup and restore.
- Select
 Reset Allora to factory settings.
 - Confirm with.
8. Set up a Wi-Fi connection
- Press and select
 Connectivity >
  Configure Wifi.
 - Select a Wi-Fi network and follow the instructions on the screen.
- Confirm with.
Maintenance and troubleshooting
1. Maintenance
1.1 Repairs
In the event of damage to the device, please contact the distributor of the device.
Do not attempt to carry out any repairs yourself. This could damage the device and invalidate your warranty.
1.2 Cleaning the device
Clean the device regularly so you do not give bacteria the chance to spread.
It is best to remove dust with a dry, soft cloth. For minor stains on the casing, use a damp cloth. Do not use a product containing alcohol, ammonia or abrasive agents. Make sure no moisture can enter through the openings (such as: the microphone openings or the connectors). Any dirt near the connectors can be removed with a cotton bud.
To clean the screens, also use a dry cloth; do not use kitchen paper as this may cause tiny scratches. To remove grease or stains from the screens, it is recommended that you use cleaning agents specifically designed for cleaning screens (aerosol or wipes). Do not press too hard on the screens when cleaning.
Clean the keyboard with cleaning agents specifically intended for this purpose. Always use a damp cloth for this.
Clean the carry case with a dry or slightly damp cloth, or a soft hand brush.
2. Troubleshooting
2.1 Finding the Allora 3 serial number
In your dealings with the support department, you will be asked to supply the serial number of your device.
You will find the label with the serial number of the device on the rear panel of the device.
Example: AL3 1002
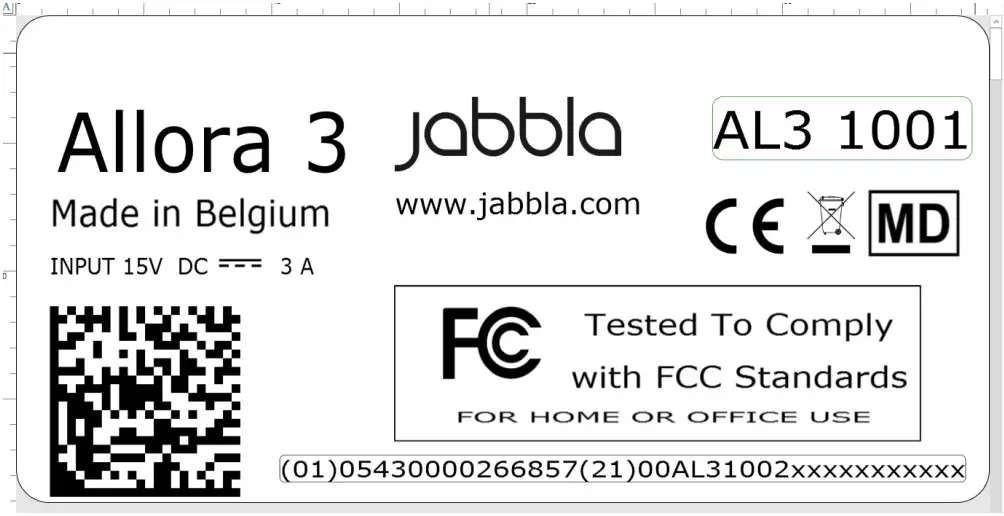 Figure 8: Allora 3 type plate
�01054300002668572100AL31001xxxxxxxxxxx
2.2 Troubleshooting
| Problem | Solution |
| The touchscreen is slow or is not working properly. | • Restart the device to correct any software errors. • Clean the touchscreen. See Cleaning the device on page 29. |
| The device is getting hot. | The device may become hot with long and intensive use. This is normal and has no effect on the life or performance of the device. |
| No Bluetooth devices found. | • Make sure that Bluetooth is enabled on the device you want to connect to. • Make sure your device and the other appliance are within the maximum range of 10 meters. • If necessary, remove any objects between the device and the other appliance. • The other appliance may not be compatible with your device. |
| The device cannot be switched on. | The battery has insufficient charge for starting the device. Connect the power supply and switch the device on. |
| The battery is not charging properly. | If the battery can no longer be charged to 90%, please contact the support department of the distributor where you purchased the device. |
Decommissioning and disposal
1. Decommissioning
- Shut down the Allora 3. See Switch off the device completely on page 12.
- Remove the Allora 3 from the mounting (if applicable).
- Take the Allora 3 out of the carry case (if applicable).
- Remove the charger.
2. Disposal
Do not dispose of the device with the household waste!
Use specific collection systems to reduce the ecological impact. At the end of its service life, the device must be disassembled and disposed of in an environmentally friendly manner. Follow the current local legal requirements and contact the local authorities if in doubt.
The device has a non-changeable rechargeable battery. This battery may only be removed by a qualified professional.
Used batteries are considered to be chemical waste. In accordance with local legislation, it is forbidden to dispose of batteries together with other industrial or household waste.![]() A crossed-out trash can is shown on the device label to encourage users:
A crossed-out trash can is shown on the device label to encourage users:
- not to discard the product as residual household waste.
- to recycle the product and its components wherever possible.
- to dispose of the product at a licensed collection point.
Correct disposal of these products contributes to human health and the environment!
If you have any questions about how to dispose of the product, please contact:
- the distributor of the device
- the local authorities where you live
- the waste treatment authority


