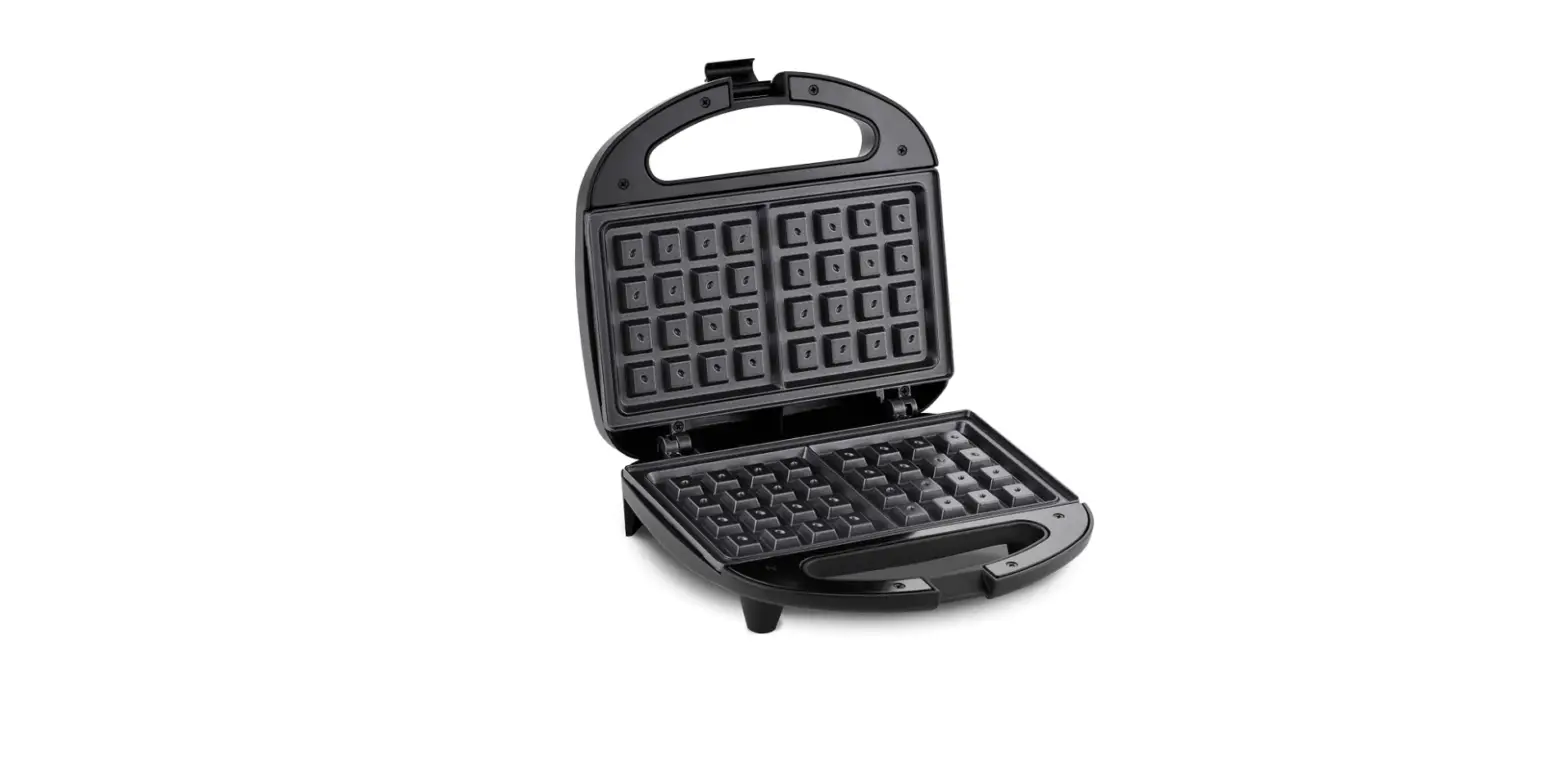
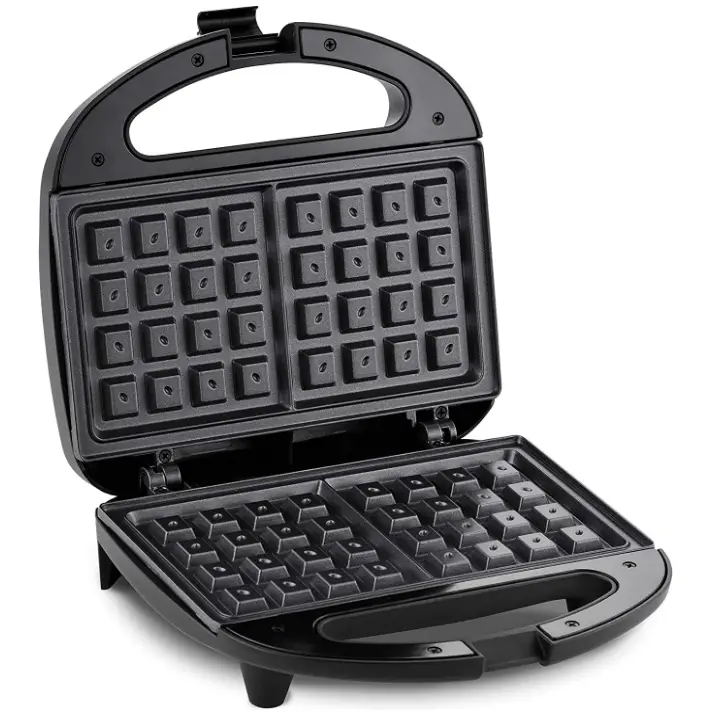
Elite Gourmet EWM-2207# Electric Non-Stick Belgian Waffle Maker
IMPORTANT SAFEGUARDS
The Elite Brand takes consumer safety very seriously. Products are designed and manufactured with our valued consumers’ safety in mind. Additionally, we ask that you exercise a level of caution when using any electrical appliance by following all instructions and important safeguards.
READ ALL INSTRUCTIONS BEFORE USE AND SAVE FOR FUTURE REFERENCE.
WARNING: When using electrical appliances, basic safety precautions should always be followed as below:
- READ ALL INSTRUCTIONS CAREFULLY BEFORE USE.
- Do not touch hot surfaces. Use handles only.
- To protect against risk of electric shock, do not immerse or partially immerse the cord, plugs, or the entire unit in water or any other liquid.
- Close supervision is necessary when any appliance is used by or near children.
- Unplug from wall outlet when not in use and before cleaning. Allow to cool before cleaning or storing this appliance.
- Do not operate any appliance with a damaged cord or plug or after the appliance malfunctions, or has been damaged in any manner. Return the appliance to the nearest authorized service facility for examination, repair or adjustment.
- The accessible surfaces may be hot when the appliance is operating.
- Appliances are not intended to be operated by means of an external timer or separate remote-control system.
- The use of accessories attachments not recommended by the appliance manufacturer may cause fire, electrical shock or injuries.
- Do not use outdoors. This is for household only.
- Do not use while standing in damp area.
- Do not let the electrical cord hang over the edge of the table or counter, or touch hot surfaces.
- Do not place on or near a hot gas or electric burner or in a heated oven.
- To disconnect, remove plug from outlet. Never pull on the cord.
- This appliance is not intended for use by persons (including children) with reduced physical, sensory or mental capabilities, or lack of experience and knowledge, unless they have been given supervision or instruction concerning use of the appliance by a person responsible for their safety.
- Children should be supervised to ensure that they do not play with the appliance.
- Do not use appliance for other than intended use.
- Do not use abrasive cleaners or oven cleaners when cleaning this appliance.
- Do not attempt to repair the unit by yourself. Send any revisions, maintenance, and repair to authorized service personnel.
SHORT CORD PURPOSE
Note: A short power cord is provided to reduce the risk of personal injury resulting from becoming entangled in or tripping over a long cord.
Longer power-supply cords or extension cords are available and may be used if care is exercised in their use.
If an extension cord is used: (1) the marked electrical rating of the exten-sion cord should be at least as great as the electrical rating of the product; (2) the extension cord should be arranged so that it will not drape over the counter top or tabletop where it can unintentionally be pulled on or tripped over by children or pets.
POLARIZED PLUG
If this appliance is equipped with a polarized plug (one blade is wider than the other), please follow the below instructions:
To reduce the risk of electrical shock, this plug is intended to fit into a polarized outlet only one way. If you are unable to fit the plug into the electrical outlet, try reversing the plug.
If the plug still does not fit, contact a qualified electrician. Never use the plug with an extension cord unless the plug can be fully inserted into the extension cord. Do not alter the plug of the product or any extension cord being used with this product. Do not attempt to defeat the safety purpose of the polarized plug.
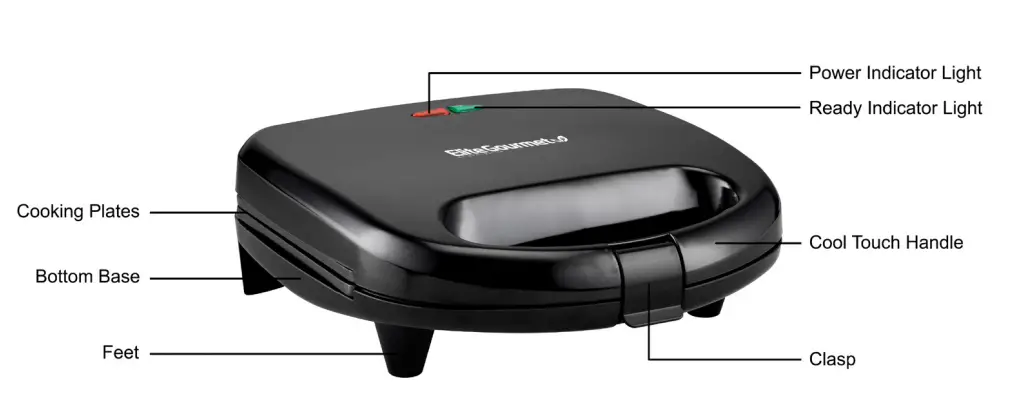
PARTS IDENTIFICATION
BEFORE FIRST USE
- Read all instructions and important safeguards.
- Carefully unpack the Belgian Waffle Maker and remove all packaging and materials.
- Clean the baking plates with a damp cloth or sponge.
- Slightly grease the baking plates with a little cooking oil.
- CAUTION: Take care to prevent water from running into the appliance. NEVER IMMERSE THE HEATING BODY OF THE BELGIAN WAFFLE MAKER IN WATER OR ANY OTHER LIQUIDS!
HOW TO USE
Close the waffle maker and plug it into the wall outlet; the red power light will go on. It will take about 5 to 8 minutes to reach baking temperature. When the Green Ready Light turns on, the waffle maker is ready to cook!
- Before baking the first batch of waffles, lightly coat the top and bottom waffle grids with melted butter, vegetable oil, or non-stick cooking spray.
- When the proper baking temperature is reached, the red light will turn on. Once heated, cycle times will be quicker.
- Pour batter onto the bottom grids of waffle maker. Ladle just enough batter to fill the lower grids so that the peak area of the grid is covered. If necessary, use a spatula to spread the batter into the corners of the grids.
- Close cover. Do not force shut. Steam will release from between the waffle iron so please ensure that fingers do not come into contact with the steam.
- Cover will rise slightly as waffles begin to bake. Do not open cover while steam is escaping. Most waffle recipes bake in approximately 3 minutes.
- When waffles are done, remove with a non-metallic utensil so as not to scratch the non-stick finish.
- Unplug power cord from wall outlet.
NOTE
When your waffle maker is heated for the first time, it may emit slight smoke or odor. This is normal and does not affect the safety of your appliance. However, it may affect the flavor of the first set of waffles prepared in your waffle maker, and it is recommended to discard these.
The green light will turn on and off while cooking. This indicates the thermostat is maintaining its temperature.
WAFFLE BAKING TIPS
- Do not over mix the batter or waffles will be tough. Stir batter only until large lumps of dry ingredients disappear.
- The optimal amount of batter to produce a full-shaped waffle, without overflowing, will vary with different waffle batters. Pouring batter from a measuring cup will help you gauge how much batter to use each time. Fill bottom grid of waffle maker with enough batter to cover peak areas of the grid about ¾ to 1 cup.
- For more evenly shaped waffles, spread thick batters to outer edge of grid, using a heat proof rubber spatula or other non-metallic utensil before closing the lid.
- Cake-based waffles, such as Chocolate Waffles, are more tender than regular waffles and may require more care when removing from waffle maker. You may want to break these waffles into halves or quarters before removing. Use a spatula to help lift waffles when removing from the waffle maker.
- To retain crispness, move baked waffles to a wire cooling rack to prevent steam from building up underneath.
- When serving several waffles at one time, keep waffles hot and crisp by placing on a rack in a preheated 200°F oven until ready to serve.
- Already cooled waffles can be re-warmed and re-crisped individually by returning to hot waffle maker. Place waffle on grids so grooves match up; close lid and heat for 1 to 2 minutes; watch carefully to prevent burning.
- Baked waffles freeze well. Cool completely on wire rack. Store in plastic freezer bag or in covered container, separating waffles with wax paper. Reheat frozen waffles in toaster oven, oven, or toaster until hot and crisp.
CLEANING & MAINTENANCE
- Always unplug waffle maker and allow it to cool before cleaning. There is no need to disassemble the waffle maker for cleaning. Never immerse the waffle maker in water or place in dishwasher.
- Brush away loose crumbs from the grooves. Wipe grids clean with a paper towel, absorbing any oil or butter that may have accumulated in the grooves of the grid. You can also wipe grids with a damp cloth. Do not use anything abrasive that can scratch or damage the non-stick coating.
- Wipe the outside of the waffle maker with a damp cloth only. Do not immerse in water or any other liquid. Do not place in the dishwasher.
- Should any batter become baked onto the grids, pour a little cooking oil onto the hardened batter. Let sit for 5 minutes to soften batter, then wipe off with a paper towel or soft cloth.
- Do not use metal utensils to remove your waffles; they can damage the non-stick surface.
- Store in closed position. Unit stands on end for convenient storage. Use cord wrap on the bottom of unit for cord storage.
CAUTION
Unplug from electric outlet and allow waffle maker to cool thoroughly before cleaning.
RECIPES
WAFFLE MAKER FRENCH TOAST
- 4 slices bread, crusts removed
- 2 eggs
- 1/3 cup lowfat milk
- 1 tbsp. maple syrup
- 1 tsp. powdered sugar
- ½ tsp. cinnamon
- Mix powdered sugar and cinnamon together and set aside.
- Preheat your waffle maker.
- In a shallow bowl whisk together eggs, milk and syrup.
- When waffle maker is ready, dip a piece of bread in the egg mixture.
- Flip it over and make sure the entire piece is coated.
- Spray your waffle maker and place slice of bread directly on maker.
- Cook each slice on waffle maker until brown and crispy.
- Sprinkle with powdered sugar mixture and serve.
WAFFLE MAKER CINNAMON ROLLS
- 1 can of cinnamon rolls
- Heat up your waffle maker and grease it with a bit of non-stick spray.
- Separate your rolls then place them into the waffle maker. Close the lid and press down slightly.
- Remove from Waffle maker and place on a warmed plate. Repeat until all rolls are baked.
- Once they are all done, place them on a platter and drizzle the included icing pack over top.
WAFFLE MAKER PIZZA POCKETS
1 can of refrigerated biscuits pepperoni mozzarella cheese marinara sauce for dipping
- Pull the biscuit apart in small pieces. Put pepperoni and mozzarella on the bottom half, place a small piece of biscuit on top.
- Place them in the waffle maker and cook like you would waffles for about 3-5 min.
- Remove them carefully and enjoy.
CHOCOLATE WAFFLE BROWNIES
6 oz bittersweet/semisweet chocolate (or 1 cup chocolate chips)
- ½ cup butter
1 cup sugar
2 large eggs - 1 tsp vanilla
- 2 cups flour
- 2 tbsp. cocoa powder
- 1 tsp espresso powder (optional) ¼ tsp. salt
- In a small saucepan, melt the chocolate and butter over medium-low heat; pour into a bowl and set aside to cool.
- Stir in the sugar, eggs, and vanilla.
- Add the flour, cocoa, espresso and salt and stir just until combined; the batter will be thick.
- Preheat your waffle maker and spray it with nonstick spray.
- Spoon the batter into your waffle maker. Close the lid and cook for 3-5 minutes, or until cooked through. Open the lid and let cool slightly before flipping out by inverting the waffle maker (carefully!) onto a flat surface. (The brownies are fragile while they’re still hot, be careful as you get them!)
- Makes 6-8 Belgian-style waffles, each breaking into 4 wedges (about 2 dozen total).
CHOCOLATE WAFFLES
- 1 ½ cups all-purpose flour
- 1 cup granulated sugar
- 1 ½ tsp. baking powder
- 1 tsp. vanilla extract
- ½ tsp. salt
- 2 large eggs
- ½ cup (1 stick) unsalted butter
- ¾ cup milk
- 2 ounces unsweetened chocolate, cut into chunks
- Sift together flour, baking powder and salt to blend thoroughly; set aside.
- In large microwave-safe bowl, microwave butter and chocolate on HIGH 1 minute or until butter is melted. Stir chocolate until completely melted.
- Whisk in sugar and vanilla (Be sure mixture is not hot enough to cook eggs when added; cool slightly, if necessary).
- Beat in eggs, 1 at a time.
- Add flour mixture, in 3 parts, alternately with milk, in 2 parts (Batter will thicken as chocolate cools.)
- Pour or spoon batter onto hot, greased waffle maker and bake.
- Serve with sweetened, quartered strawberries and whipped cream. For a special treat, top waffles with ice cream, caramel or fudge sauce, whipped cream and toasted nuts.
- Makes about 3 cups batter
- For Double Chocolate Waffles:
- Stir 1⁄3 cup mini chocolate morsels into prepared batter; bake as directed.
CLASSIC WAFFLES
- 1 ½ cups all-purpose flour
- 3 large eggs, separated
- ½ cup cornstarch
- 2 tbsp. granulated sugar
- 2 tbsp. cornmeal (optional)
- In large bowl, sift or whisk together flour, cornstarch, cornmeal, baking powder and salt to blend thoroughly; set aside.
- In mixer bowl, beat egg whites until soft peaks form.
- Add sugar; continue beating just until stiff peaks form; set aside.
- Whisk together egg yolks, milk and vanilla.
- Using rubber spatula, stir milk mixture into flour mixture, blending just until dry ingredients are moistened. (There should still be small lumps; do not over mix). Stir in melted butter. Fold in beaten egg whites until combined. Pour batter onto hot, greased waffle maker and bake.
- Makes about 5 ½ cups batter
- Tip: Cornstarch makes the waffles crisper. If you don’t have cornstarch, you could still make great waffles by increasing flour to 2 cups. Bake as directed.
- Toasted Pecan & Cranberry Waffles:
- Sprinkle chopped pecans onto bottom grid of hot, greased waffle maker. Pour batter over pecans. Sprinkle dried cranberries over batter. Close waffle maker and bake as directed.
OLD WORLD BELGIAN WAFFLES (YEAST-LEAVENED)
- 2 ½ cups all-purpose flour
- 3 large eggs
- 3 tbsp. granulated sugar
- 1/3 cup unsalted butter, melted
- 1 ½ tsp. active dry yeast
- 1 tbsp. honey (optional)
- 1 tsp. baking powder
- 2 tbsp. unsalted butter, melted ¼ tsp. salt
- In large bowl, whisk together flour, sugar, yeast and salt to blend.
- In medium bowl, whisk together milk, eggs, butter and vanilla; add to dry ingredients, mixing until large lumps are moistened.
- Cover; let rise in a warm, draft-free place 1 hour or until light and bubbly (or cover and refrigerate overnight.)
- Stir down batter; pour onto hot, greased waffle maker and bake.
- Makes about 4 ½ cups batter
CLASSIC BUTTERMILK WAFFLES
1 ½ cups all-purpose flour 3 large eggs, separated ½ cup cornstarch 3 tbsp. granulated sugar 2 tbsp. cornmeal (optional) 1 ¾ cups buttermilk
- 1 tbsp. baking powder
- ½ tsp. pure vanilla extract
- ¾ tsp. baking soda
- ½ cup (1 stick) unsalted butter, melted 1 tsp. salt
- In large bowl, sift or whisk together flour, cornstarch, cornmeal, baking powder, baking soda and salt to blend thoroughly; set aside.
- In mixer bowl, beat egg whites until soft peaks form.
- Add sugar; continue beating just until stiff peaks form. Set aside.
- Whisk together egg yolks, buttermilk and vanilla to blend.
- Using rubber spatula, stir buttermilk mixture into flour mixture, blending until dry ingredients are moistened. (There should still be small lumps; do not over mix.)
- Stir in melted butter.
- Fold in beaten egg whites until combined.
- Pour batter onto hot, greased waffle maker and bake.
- Makes about 5 ½ cups batter
- Tip: Cornstarch makes the waffles crisper. If you don’t have cornstarch, you could still make great waffles by increasing flour to 2 cups. Bake as directed.
Buttermilk Blueberry Waffles
Pour batter onto bottom grid of waffle maker; sprinkle batter with fresh (or defrosted frozen) blueberries. Close waffle maker and bake as directed.
WHOLE WHEAT WAFFLES
- ¾ cup whole wheat flour
- 1 egg, separated
- ¼ cup wheat bran
- ¾ cup skim or nonfat milk
- 2 tbsp. wheat germ
- 1 tbsp. honey (optional)
- 1 tsp. baking powder
- 2 tbsp. unsalted butter, melted ¼ tsp. salt
- In medium bowl, whisk together whole wheat flour, wheat bran, wheat germ, baking powder and salt to blend thoroughly; set aside.
- In mixer bowl, beat egg white just until stiff peaks form; set aside.
- Whisk together egg yolk, milk and honey.
- Using rubber spatula, stir milk mixture into flour mixture, blending just until dry ingredi-ents are moistened. (There should still be small lumps; do not over mix.)
- Stir in melted butter.
- Fold in beaten egg white until combined.
- Pour batter onto hot, greased waffle maker and bake.
- Makes about 2 cups batter.
LIMITED WARRANTY* ONE (1) YEAR
WARRANTY IS ONLY VALID WITH A DATED PROOF OF PURCHASE
PLEASE DO NOT RETURN TO STORE OF PURCHASE.
If you have any problems with this unit, contact Customer Service for support.
- Your small kitchen appliance is warranted to the original purchaser to be free from any manufacturing defects under normal use and conditions for one (1) year, cord excluded. This Warranty applies only to the original purchaser of this product.
- Retail stores/merchants selling this product do not have the right to alter, modify, or in any way revise the terms and conditions of the warranty.
- If you use your appliance for household use and according to instructions, it should give you years of satisfactory service.
- At its sole discretion, Maxi-Matic USA will either repair or replace the product found to be defective during the warranty period.
- The repaired or replacement product will be in warranty for the remaining balance of the one-year warranty period and an additional one-month period.
- Consumer’s remorse is not an acceptable reason to return a product to our Service Center.
- This limited warranty covers appliances purchased and used within the 50 U.S. states plus the District of Columbia and does NOT cover normal wear of parts or:
- Damages caused by unreasonable use, neglect, normal wear and tear, commercial use, improper assembly or installation of product.
- Damages caused in shipping.
- Damages caused by replacement or resetting of house fuses or circuit breakers.
- Defects other than manufacturing defects.
- Breakage caused by misuse, abuse, accident, alteration, lack of proper care and maintenance, or incorrect current or voltage.
- Lost or missing parts of the product. Parts will need to be purchased separately.
- Damages of parts that are not electrical; i.e. cracked or broken plastic/glass, scratched/dented inner pots.
- Damage from service or repair by unauthorized personnel.
- Extended warranties purchased via a separate company or reseller.
- Acts of nature such as fire, floods, hurricanes, tornadoes, etc.
- This warranty does not apply to re-manufactured merchandise.
Maxi-Matic, USA shall not be liable for any incidental or consequential damages caused by the breach of any express or implied warranty. Apart from the extent prohibited by applicable law, any implied warranty of merchantability or fitness for a particular purpose is limited in time to the duration of the warranty.
One Year Limited Warranty valid only in the 50 U.S. states plus the District of Columbia, excluding Puerto Rico and the Virgin Islands.
This warranty is effective only if the product is purchased and operated in the USA; product us-age which is in violation of the written instructions provided with the unit will void this warranty. For international warranty, please contact the local distributor.
This warranty gives you special legal rights and you may also have other rights to which you are entitled which may vary by state, province, and/or jurisdiction.
Any instruction or policy included in this manual may be subject to change at any time.
MAXI-MATIC, USA
18401 E. Arenth Ave. City of Industry, CA 91748
Customer Support Hours of Operation MON-FRI 8:30 AM – 5:00 PM PST
(800) 365-6133 Ext: 120/107/105; (626) 912-9877 Ext: 120/107/105
Visit: www.maxi-matic.com for Live Chat Support and Contact Us Form
RETURN INSTRUCTIONS
RETURNS:
Any return of defective merchandise to the manufacturer must be processed accordingly by first contacting customer service (info@ maxi-matic.com) to obtain an RA # (Return Authorization Number). We will not accept any returns of merchandise without an applicable RA #.
IMPORTANT RETURN INSTRUCTIONS. Your Warranty depends on your following these instructions if you are returning the unit to Maxi-Matic, USA:
- Carefully pack the item in its original carton or other suitable box with sufficient cushioning to avoid damage in shipping.
- Before packing your unit for return, be sure to enclose:
- Your name, full address with zip code, daytime telephone number, and RA#,
- A dated sales receipt or PROOF OF PURCHASE,
- The model number of the unit and the problem you
- are having (Enclose in an envelope and tape directly to the unit before the box is sealed,) and
- Any parts or accessories related to the problem.
- Maxi-Matic, USA recommends that you ship the package via UPS ground service for tracking purposes. We cannot assume responsibility for lost or damaged products returned to us during incoming shipment. For your protection, always carefully package the product for shipment and insure it with the carrier.
- O.D shipments cannot be accepted.
- All return shipping charges must be prepaid by you.
- Once your return has been received by our warehouse, Maxi-Matic, USA will repair or replace the product if it is defective in material or workmanship, subject to the conditions in paragraph B.
- Maxi-Matic will pay the shipping charges to ship the repaired or replacement product back to you.
Elite Customer Service Center
Maxi-Matic, USA
18401 E. Arenth Ave
City of Industry, CA
91748-1227
Phone
800-365-6133 ext. 120/105
Website
Visit our website for Live Chat Support & Contact Us Form
Register your product online
Frequently Asked Questions
It has rounded prongs, and not EU, I believe. They are flat in this.
110
Sandwich was too thick, breaking the handle; not worth the money.
This device has an electric motor and a power cord, so yes.
Make a paste with with hydrogen peroxide and baking soda (it may bubble slightly). If the device seems oily or sticky, coat the grid surfaces with a piece of paper towel or a pastry brush. Give the paste an hour or more to dry on the surfaces.
You shouldn’t encounter any issues if you make it a practice to clean it as soon as it cools down. Before cleaning the waffle maker, let it cool. Crumbs and excess oil droplets on the grid plates can be cleaned up with a dry paper towel or a moist cloth. Clean the outside with a moist towel.
For traditional waffles or Belgian waffles, pour 14 to 1 cup of batter onto the center of a warm waffle iron; the irons don’t need to be greased. Referring to the instruction handbook for your waffle iron, close the lid and continue cooking until the indicator light indicates that they are done.
Remove the removable plates from waffle irons and put them in the sink or a container of warm water. Use a gentle brush or sponge to gently wash the plates. (Remember: If the surface is nonstick, avoid using soap.)
A waffle that is golden brown and ready to be served can be made in less than 10 minutes. It only takes a few simple steps: plug the waffle maker in, watch for the ready light, add batter, and close the lid. Cooked waffles are simple to remove from the waffle plates thanks to the.
Belgian waffles are prepared with a waffle iron that has deeper grids, making them thicker and frequently larger than conventional waffles. Perfect for storing luscious pools of syrup.


