buidera CRACKMON 4020A Crack Monitor Installation Guide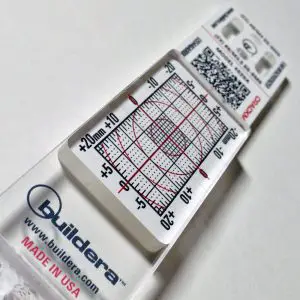
SCAN QR CODE WITH MOBILE PHONE FOR LATEST ONLINE DOCUMENTATION AND ORDERING INFORMATION
CRACKMON® 4020A Crack Monitor
Professional Crack Monitor for Geotechnical Evaluations and Structural Forensics.
Structural Epoxy (Method 1)
- If surface is damp, allow to dry or use Method 2.
- Remove and clean loose debris from crack using stiff bristle or wire brush.
- Thoroughly mix Buildera STRUPOXY™ thixotropic epoxy adhesive (Aboweld™ 8101-5) following package directions.
- Apply thick 3-4 mm layer of epoxy to backside of both CRACKMON mounting tabs in the vicinity of holes (2×3 cm area). Rough or uneven mounting surfaces may require a thicker application.
- Center red crosshair on grid and over crack. Press CRACKMON firmly into place across crack at 1-m (3-ft) typical unit-to-unit spacing. Epoxy should fill holes. Level and adjust to ensure accurate grid alignment prior to initial setup. Hold in place for approximately five (5) minutes until initial bond sets.
- Secure CRACKMON in place with duct tape (or similar) for 24 hours until epoxy fully cures. After cure, remove duct tape. Score clear tape on top and bottom edges with a sharp knife or razor blade.
Remove residual clear tape from CRACKMON to allow free motion between each plate. - Note X-Y start position on TRACARD® 3D and/or crack-progress sheet. Inspect movement periodically. Document with phone/camera and CRACKMON 224R Crack Comparator (ACI compliant).
Anchor & Fastener (Method 2)
- Remove and clean loose debris from crack using stiff bristle or wire brush.
- Adhere CRACKMON 4020-TMP drilling template over crack (template is included with available mounting kit UPC 816291010242, sold separately).
- Using a 3/16” (ø5 mm) hammer-drill bit, bore four 1-1/2” (4 cm) deep holes with a cordless hammer drill equipped with an OSHA-compliant vacuum dust collection system (VDCS). Wear eye protection and respirator for added safety. Do not inhale silica dust.
- Insert one 3/16” (ø5 mm) A5 Toggler® Alligator® anchor into each hole. Tap flush with a hammer. For best results, use only Buildera-approved anchors.
- Fasten CRACKMON with four #6 or #8 x 1-1/2” stainless-steel sheet-metal screws and lock washers. Tighten last turns by hand. Over-torquing screws may inadvertently damage the gauge or shear off the screw head.
- Score clear tape on top and bottom edges with a sharp knife or razor blade. Remove residual clear tape from CRACKMON to allow free motion.
- Note X-Y start position on TRACARD® 3D or crack-progress sheet. Inspect movement periodically. Document with phone/camera and CRACKMON® 224R Crack Comparator (ACI compliant).
- Mount with tamper-resistant screws and epoxy for best results and security.
Ordering Information
| Model (Qty) | UPC |
| CRACKMON® 4020A (1) | 816291010259 |
| CRACKMON® 4020A (3-Kit) | 816291010006 |
| CRACKMON® 4020A (18-Kit) | 816291010013 |
| CRACKMON® Mounting Kit | 816291010242 |
| STRUPOXY™ 8101-5 Epoxy | 816291010099 |
| TRACARD® 3D ProPak Kit (50) | 816291010078 |
| TRACARD® 3D Refills (50) | 816291010082 |
| Model (Qty) | UPC |
| CRACKMON® 224R (1) | 816291010112 |
| CRACKMON® 224R (50) Bulk | 816291010167 |
| CRACKMON® 5020AV (1) | 816291010389 |
| CRACKMON® XL 15040A (1) | 816291010440 |
| CRACKPOINT™ 90ti (10) | 816291010310 |
| CRACKPOINT™ TR50ti (Kit) | 816291010334 |
Engineering Specifications
| Parameter | Specification |
| Gauge Dimensions | 152 mm x 30 mm x 9 mm |
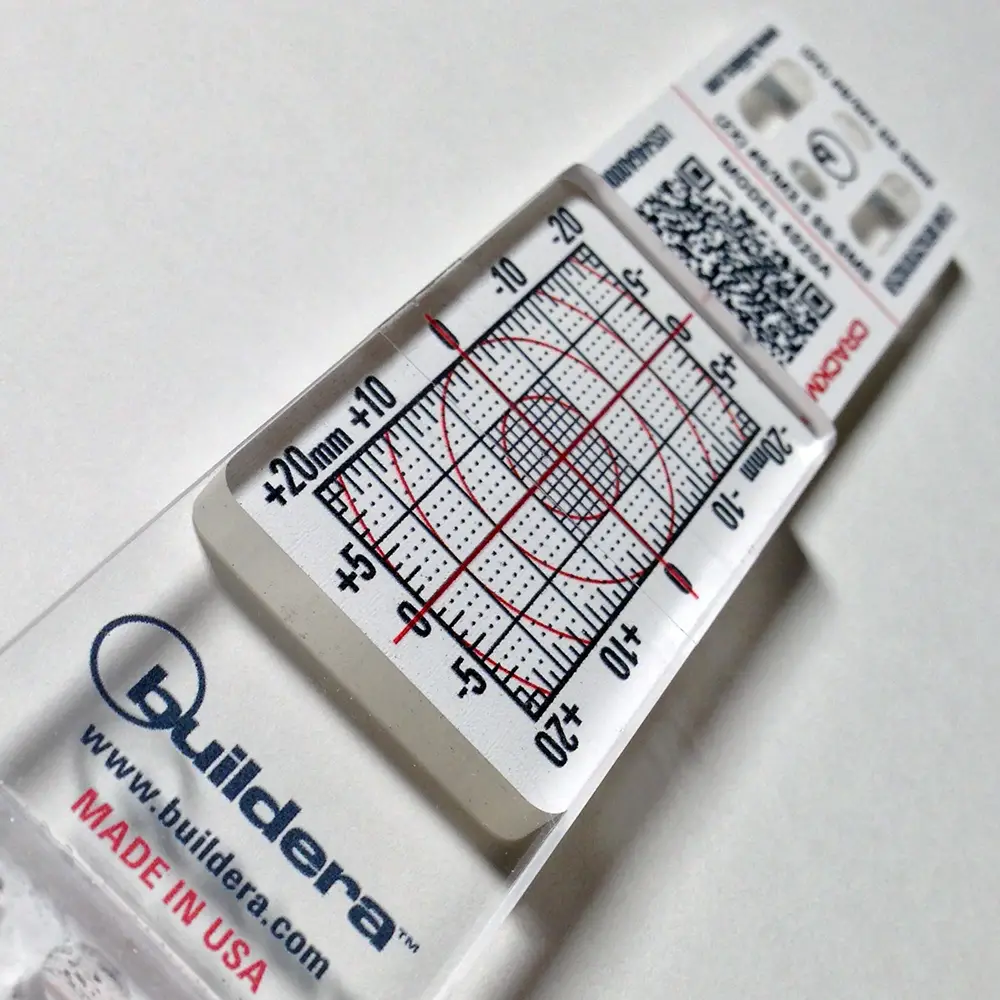
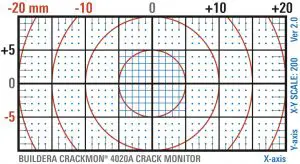
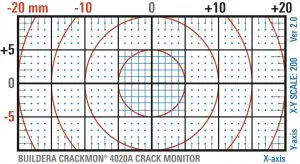
| Measurement Span | ±20 mm (X), ±10 mm (Y) |
| Discrimination | ±0.5 mm (visual) |
| Material | Proprietary clear acrylic |
| Temperature Range | -30ºC/+80ºC (-22ºF/+175ºF) |
| CoE (ASTM D696) | 54 µm/m-°C, -30ºC to +30ºC |
| Mounting Holes | 4 per side (2 vert, 2 horiz) |
| Hole Diameters | 4 mm (0.16”) / 5 mm (0.20”) |
| Fastener Sizes | M3.5/#6 or M4/#8 SS-SMS |
| Drill Dia / Depth | 5 mm (3/16”) / 4 cm (1-1/2”) |
| Approved Adhesive | Buildera STRUPOXY™ |
| Markings (Ink) | Heavy-duty UV-cured |
| Traceability | Unique 15-digit serial no. |
| Country of Origin | Made in USA |
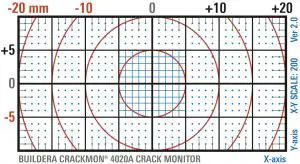
CRACKMON® 4020A CRACK-PROGRESS SHEET
CLIENT / PROJECT NAME: ___________________________________
EMAIL: _____________________________
PHONE: ____________________________
STREET ADDRESS: _______________________________________________________________________________________________
CITY: ____________________________________________________
STATE / POSTAL: __________________
COUNTRY: ________________________
COMPANY: _______________________________________________
ENGINEER / LICENSE NO: _________________________________
CRACK CLASSIFICATION SYSTEM (CCS): _________________________
SCAN QR CODE FOR CRACK CLASSIFICATION RESOURCES OR VISIT: www.buildera.com/ccs
COMMENTS: ______________________________________________________________________________________________________________________________________________________
- SCALE: 200%
- © 2014 – 2017 BUILDERA™
- ALL RIGHTS RESERVED
- www.buildera.com/charts
| CHART LEGEND | ||
| Crack Location ID: __________ | CCS: __________ | Serial # ____________ |
| (YY/MM/DD) ____________ | X-axis __________ | Y-axis __________ |
| (YY/MM/DD) ____________ | X-axis __________ | Y-axis __________ |
| (YY/MM/DD) ____________ | X-axis __________ | Y-axis __________ |
| (YY/MM/DD) ____________ | X-axis __________ | Y-axis __________ |
| (YY/MM/DD) ____________ | X-axis __________ | Y-axis __________ |
| (YY/MM/DD) ____________ | X-axis __________ | Y-axis __________ |
| (YY/MM/DD) ____________ | X-axis __________ | Y-axis __________ |
| (YY/MM/DD) ____________ | X-axis __________ | Y-axis __________ |
| (YY/MM/DD) ____________ | X-axis __________ | Y-axis __________ |
| (YY/MM/DD) ____________ | X-axis __________ | Y-axis __________ |
BUILDERA
- 570 EL CAMINO REAL STE 150-415
- REDWOOD CITY, CA 94063-1262
- USA
- WWW.BUILDERA.COM
- US TOLL-FREE (888) 888-3111
- US/INTERNATIONAL +1 (650) 587-6738
LIT NO: CM-IG-90200-10259EN VER 2.0 REV JUL 31, 2017


