USER’S MANUAL FOR ETA SMART APPLICATION
![]()


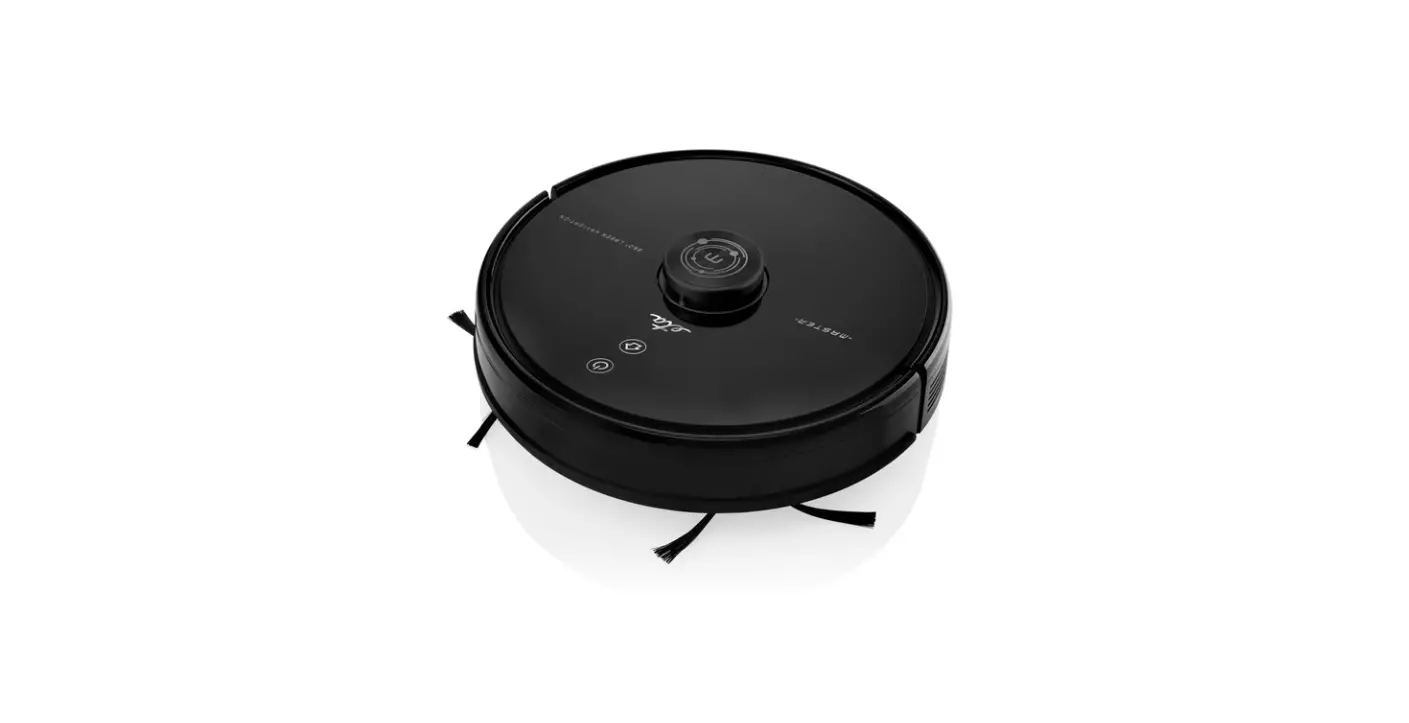
MASTER
ETA522990000
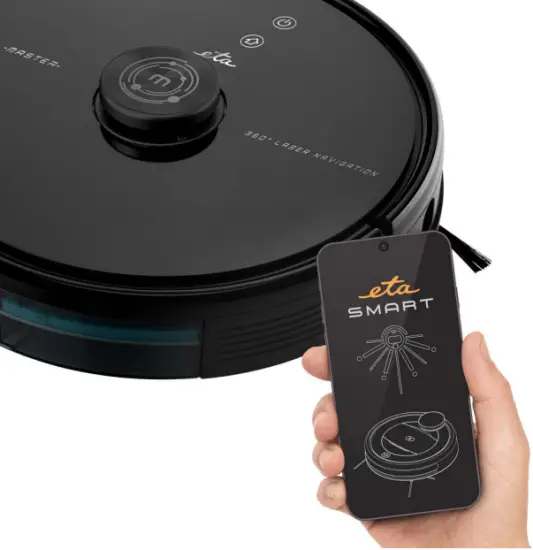
ETA SMART
BASIC STRUCTURE OF THE APPLICATION MAIN CONTROL MENU
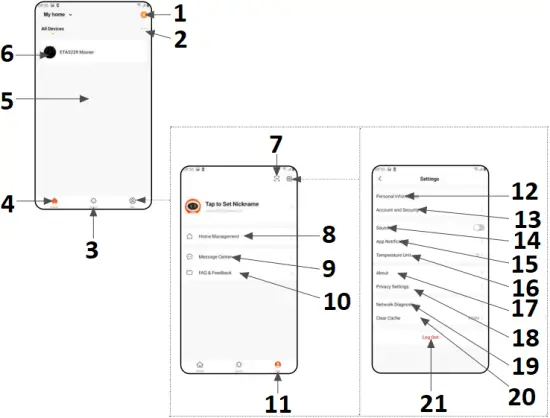
- Icon “+” for adding an appliance
- Other settings
- “Smart” section icon
(It is not destined for this vacuum cleaner) - “Home” section icon
- A space for the added (paired) appliances
- Added (paired) appliance
(click to go to the control section of the application) - Icon for reading QR codes
(It is not destined for this vacuum cleaner) - Household settings
(It is not destined for this vacuum cleaner) - Review of different notifications
- Feedback, questions and replies
- “Me” section icon
- Personal data setting
- Account security setting
- Sound setting
- Notification setting
- Temperature measure unit setting
- Information on application
- Setting of personal date protection
- Wi-Fi network diagnostics
- Delete the cache
- Account logout
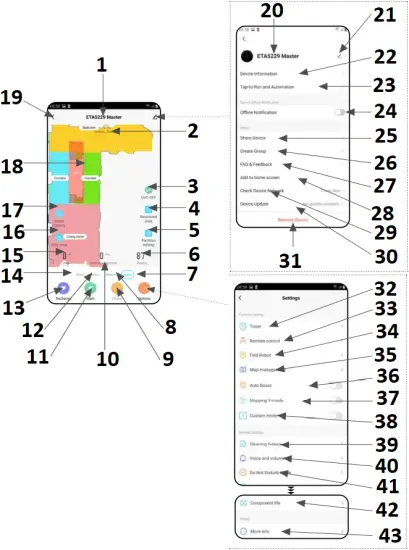
- Vacuum cleaner name
- Vacuum cleaner state
- UV lamp control of
- Setting prohibited zones
- Map modifying and editing
- Actual accumulator capacity (%)
- Automatic cleaning
- Cleaning in a selected room
- Suction power setting
- Time of cleaning (min)
- Start / Stop (Pause)
- Zone cleaning
- Sending to the charging station (for charging)
- Local cleaning
- Cleaned area (m²)
- Mopping function on / off
- Mopping intensity setting
- Actual map
- Step back
- Vacuum cleaner
- Editing of this vacuum
- Detailed information about appliance
- Setting of automation
(It is not destined for this vacuum cleaner) - Switch-on/switch-off of warnings that the vacuum cleaner
- Setting of sharing with other users
- Creation of groups
(It is not destined for this vacuum cleaner) - Feedback, questions and replies
- Addition of the application to the home screen
- Check of Wi-Fi signal quality
- Information about network
- Withdrawal of the vacuum
- Setting of planned cleaning
- Vacuum cleaner manual control
- “Find the vacuum cleaner” function
- Map saving and uploading
- Suction power increasing in case of driving onto a rug
- Special Y-mode for mopping
- Cleaning mode depending on settings for a room
- Detailed history of cleaning
- Audio warning volume setting
- Switch-off of audio warnings at a certain time
- Monitoring of service life of components
- More information on the appliance
USER’S MANUAL FOR ETA SMART APPLICATION
Dear customer,
Thank you for your confidence in the ETA brand products. This manual is destined for all owners of the ETA522990000 MASTER vacuum cleaner, who want to use in full range its potential by means of ETA SMART Application. You can find here simple instructions and procedures how to work with your new robotic friend.
1. APPLICATION INSTALLATION
You can find this application in the database of Apple Store or Google Play, or can also use this QR code for quickening:
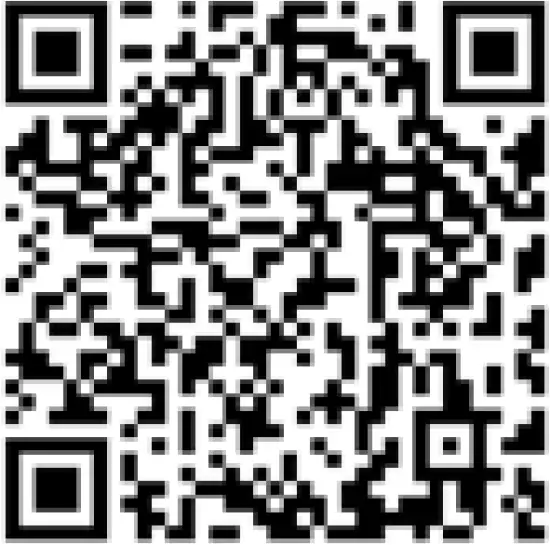
Download and install the application to your mobile phone (tablet).
| COMPATIBILITY | |
| Mobile phone (tablet) operation system | Android 6.0 and higher |
| IOS 9.0 and higher | |
| Wi-Fi network | 2,4 / 5 GHz |
| security WPA1 and WPA2 (WPA2 is recommended) | |
| ATTENTION The appliance cannot be operated with Wi-Fi networks secured with IEEE 802.1X protocol (as a rule, company’s Wi-Fi networks). | |
| 2. CREATION OF ACCOUND | ||
| 1 | 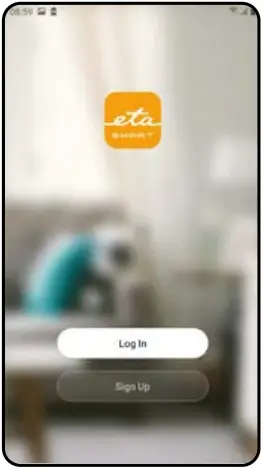 | • Switch-on ETA SMART |
| 2 |  | • Click on “Register”. • Afterward, it is necessary to confirm principles of personal data protection. • Set an email of your user’s account. • Then, click on “Get Verification Code”. |
| 3 | 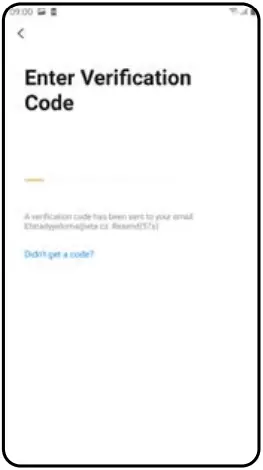 | • After that, an individual verification code will be sent to your e-mail. |
| 4 | 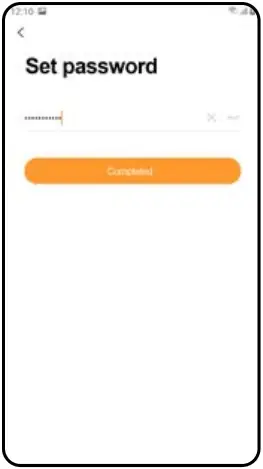 | • Set a password and finish creation of your account. |
| 5 | 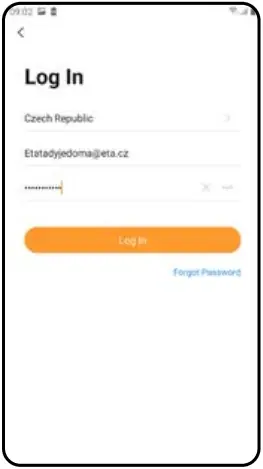 | • Login with this account to the application. |
| 3. PAIRING OF APPLIANCES | ||
| 1 |  | • Connect your mobile phone (tablet) to your Wi-Fi network. • Switch-on ETA SMART Application and login to your account. • After that, click on “Add Device” (or to “+” in the right upper corner). |
| 2 | 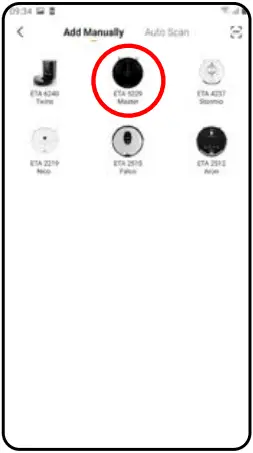 | • Select the “ETA5229 Master” vacuum cleaner. |
| 3 | 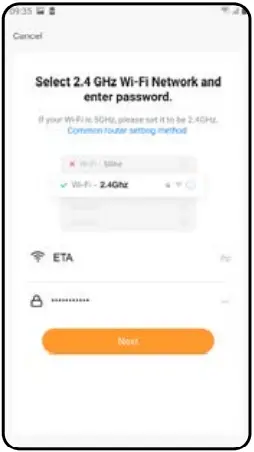 | • Enter your Wi-Fi network name and password. |
| 4 | 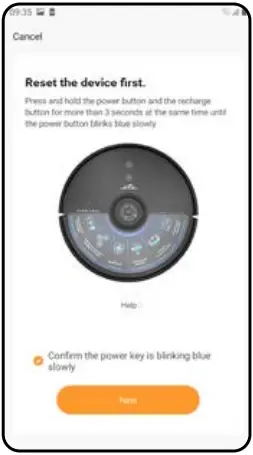 | • Press and hold the both buttons on the control panel of the vacuum cleaner for at least 3 seconds. • Check and confirm that light signalization on the vacuum cleaner is slowly blinking. • Afterwards click on “Next”. |
| 5 |  | • Click on “Go to Connect”, and then you will be automatically redirected to the list of Wi-Fi networks available in your phone (tablet). • Select the vacuum cleaner Wi-Fi network named “SmartLife-..” and wait for connection with the vacuum cleaner. Afterwards, “Internet may be unavailable” will appear, but it‘s all right. A mobile phone (tablet) is connected to the vacuum cleaner, and a pairing procedure will be performed in the next step. Now, return back to ETA SMART Application. |
| 6 | 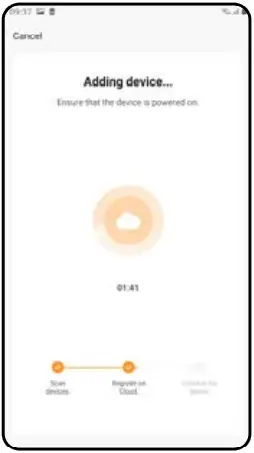 | • Wait for a while until all three steps of the pairing procedure have been performed correctly. |
| 7 | 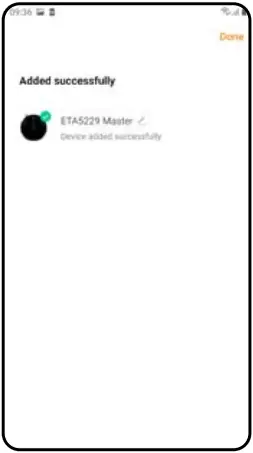 | • In the end, the application will inform you about successful pairing. |
REMARKS:
- Before pairing, we recommend that you fully charge the vacuum cleaner (or at least, 30% of the accumulator capacity).
- Follow attentively information and particular steps in the application.
| 4. MAP CREATION | ||
| 1 | 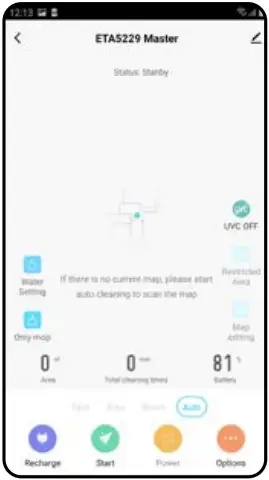 | • Place correctly the charging station in keeping with instructions in the manual • After that, place the vacuum cleaner onto the charging station and wait until the vacuum cleaner is fully charged. |
| 2 | 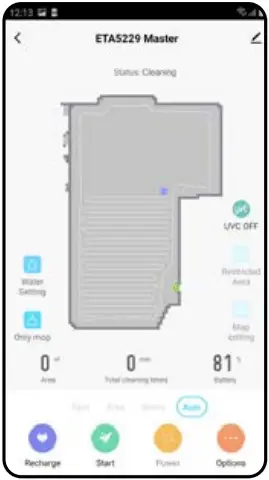 | • Make available all rooms, in which you want to clean up regularly (open the doors and remove all obstacles, which could prevent the vacuum cleaner from movement). • On the main screen, click on “Auto” and then on “Start” to switch-on the vacuum cleaner to automatic cleaning mode and wait until it cleaned the whole available area. |
| 3 | 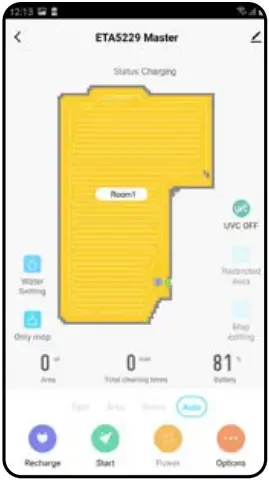 | • As soon as the vacuum cleaner maps out and cleans up the whole available area, it will return back to the charging station. • After that, you may save the map and continue to work with it. |
| 4 |  | • If you want to save a map, click on “Options” (in the right lower corner) on the main screen. • Select “Map management” in menu. • Then, click on “Save” to save the map. |
REMARKS:
- Save each map which you would like to use for a long time.
- In total, you can create an save up to 5 maps. This option may be used, especially, in case of multistage houses.
- If you want to create the next new map, always delete the actual map so that the vacuum cleaner started on a clear screen.
| 5. MAP MODIFICATION AND ADAPTATION | ||
| 1 | 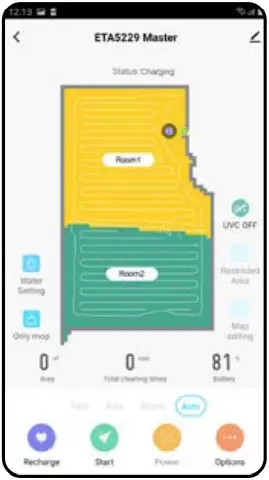 | Automatic division of the map into rooms • After the successful first automatic cleaning, the application will divide automatically the created map into particular rooms (Room 1, Room 2, Room 3, etc….). |
| 2 | 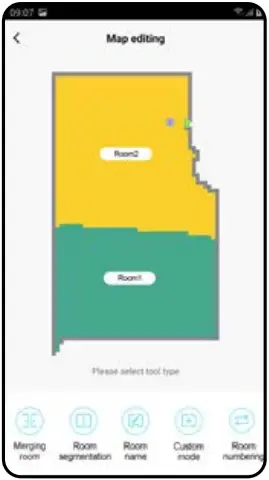 | Possible map modifications in menu “Map editing” Click on “Map editing” on the main screen to perform the following changes: |
| 3 | 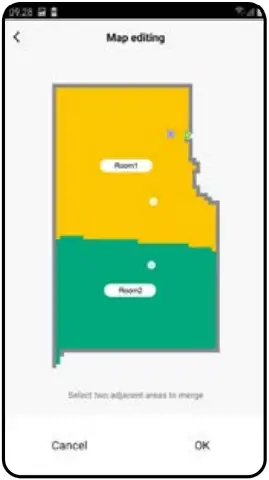 | Merging rooms • In the “Map editing” menu, click on “Merging room” and afterwards click on two adjacent rooms to select them. |
| 4 | 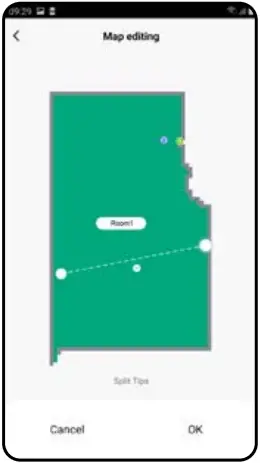 | Room segmentation • In the “Map editing” menu, click on “Room segmentation” and afterwards click on a room, which you want to divide. |
| 5 | 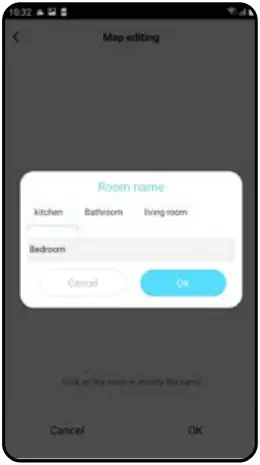 | Room name • In the “Map editing” menu, click on “Room name” and afterwards click on a room, the name of which you want to change. |
| 6 | 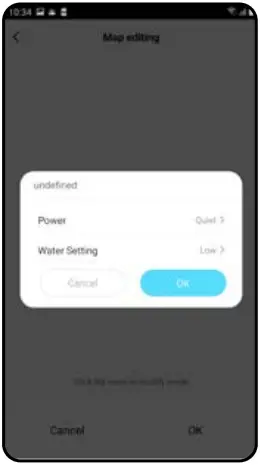 | Custom mode • In the “Map editing” menu, click on “Custom mode” and afterwards click on a room, the settings of which you want to change. |
| 7 | 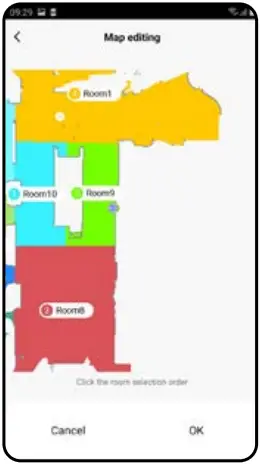 | Room numbering • In the “Map editing” menu, click on “Room numbering”. |
| 8 |  | Activation of custom mode • Return to the main screen and click on “Options” (in the right lower corner). |
| 9 | 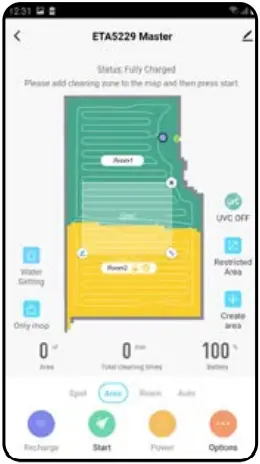 | Cleaning zones • On the main screen, click on “Area”. |
| 10 | 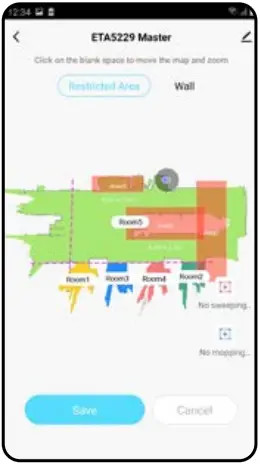 | Restricted areas and virtual walls • On the main screen, click on “Restricted area”. |
| 11 | 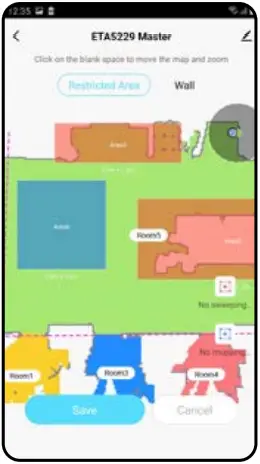 | Restricted areas It is possible to set 2 types of prohibited zones:• “No sweeping…” – full prohibition of the movement of the vacuum cleaner in this zone. • “No mopping…” – no mopping can be used in this zone. Addition of a restricted area: |
| 12 | 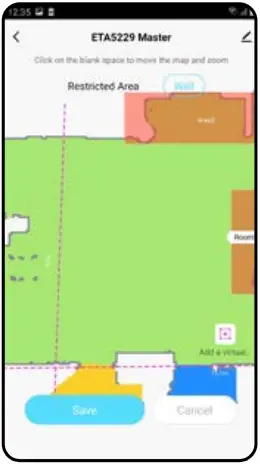 | Virtual wall • Switch over setting to “Wall”. |
REMARKS:
- Having finished all necessary settings, save the map.
- In total, it is possible to insert up to 15 different restricted areas and 15 virtual walls.
| 6. LOADING OF A SAVED MAP | ||
| 1 | 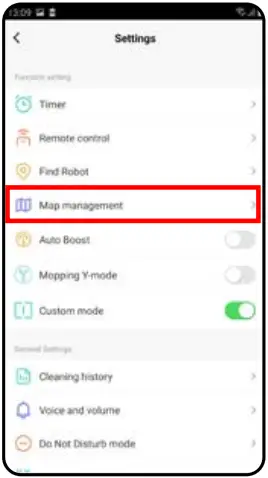 | • On the main screen, click on “Options” (in the right lower corner). • After that, select “Map management” in menu. |
| 2 | 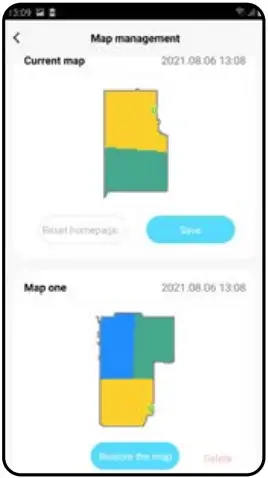 | • Before loading the saved map, delete the actual map. • After it, select a map, which you want to load, from the list of the saved maps. • Click on “Restore the map” and click on “OK” to confirm it. The saved map will be then loaded. |
| 7. AUTOMATIC CLEANING | ||
| 1 |  | • On the main screen, click on “Auto”. • After that, click on “Start” to start cleaning. • The vacuum cleaner will clean up systematically all the rooms in the map to which an access is enabled. |
| 2 | 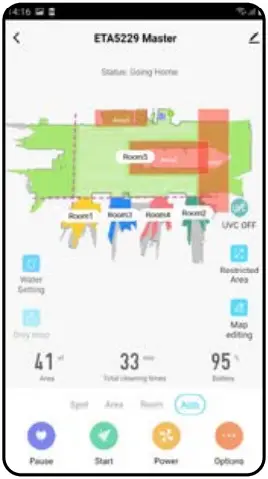 | • Having finished the cleaning, the vacuum cleaner returns automatically to the charging station. |
REMARKS:
- It is one of the most usable cleaning modes, when the vacuum cleaner cleans up the whole available area.
- Automatic cleaning is also being used for the primary creation of a map.
- Automatic cleaning may be also used with the mopping function. In this case, however, it is necessary to prevent the vacuum cleaner from driving onto a rug. If you have rugs in your house, you may use the prohibited zone function.
| 8. ROOM CLEAN-UP | ||
| 1 | 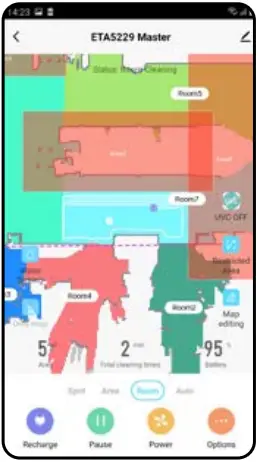 | • On the main screen, click on “Room”. • Consequently, click on a room, which you want to clean up. A digit on the left of the room name shows the order of cleaning. • After that, click on “Start” to start cleaning. |
| 2 | 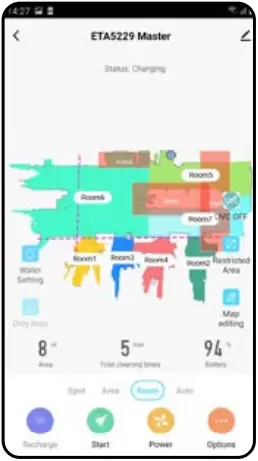 | • Having finished the cleaning, the vacuum cleaner returns automatically to the charging station. |
REMARKS:
- Before using the cleaning mode, at first, it is necessary to create a map.
- One room or several rooms may be cleaned up within one cleaning.
| 9. AREA CLEANING | ||
| 1 | 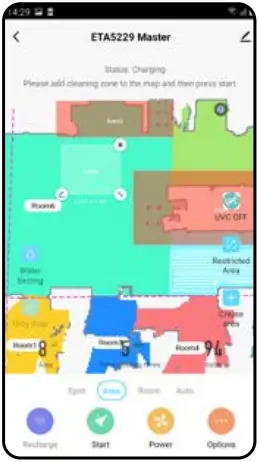 | • On the main screen, click on “Area”. • Click on “Create area” to insert a zone into a map. • You may freely shift a zone in the map and change its size. • If you want to remove a zone, click directly on it with a finger and then click on “Cross”. • Click on the pencil icon to set a zone name. |
| 2 | 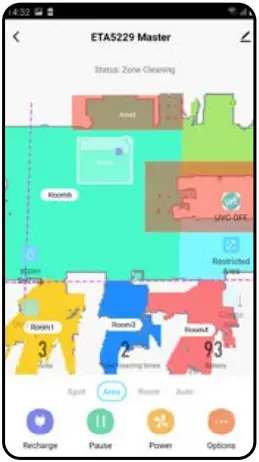 | • Click on “Start” to start cleaning. |
| 3 | 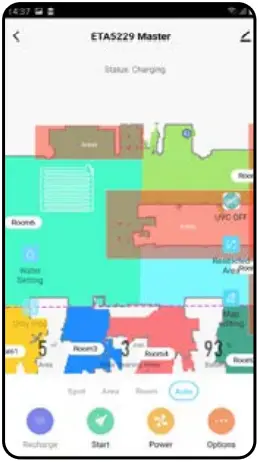 | • Having finished the cleaning, the vacuum cleaner returns automatically to the charging station. |
REMARKS:
- Up to 15 different zones can be set for zonal cleaning.
- Within zonal cleaning, the vacuum cleaner cleans up all set zones.
| 10. SPOT CLEANING | ||
| 1 | 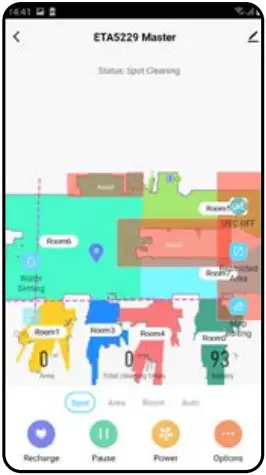 | • On the main screen, click on “Spot”. • Click on a place in the map with a finger, where you want to perform local cleaning. The point around of which local cleaning is to be performed will be shown in the map. • After that, click on “Start” to start cleaning. |
| 2 | 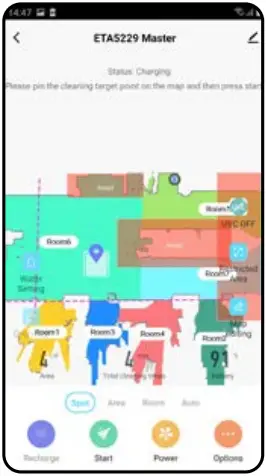 | • Having finished the cleaning, the vacuum cleaner returns automatically to the charging station. |
REMARKS:
- Within local cleaning, the vacuum cleaner cleans a square around the set point with sizes of 1.8 x 1.8 m.
- The vacuum cleaner uses the maximum suction power during local cleaning, and passes twice throughout the set areas.
| 11. SUCTION POWER SETTING | ||
| 1 | 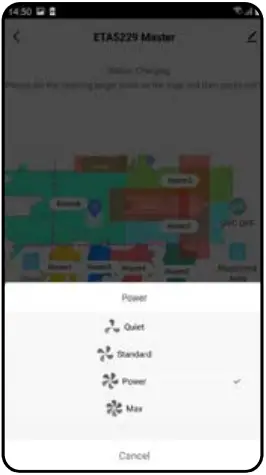 | • On the main screen, click on “Power”. • Click on the required setting with a finger to select it. In total, there are 4 stages of suction power. |
REMARKS:
- You may adjust suction power in each of the cleaning modes.
- In case of local cleaning, the vacuum cleaner is automatically switched over to the highest stage of suction power. However, even in this mode, it is possible to adjust suction power where necessary.
| 12. MOPPING | ||
| 1 |  | • The mopping function can be set on the main screen by means of icons of “Water Setting” and “Only mop”. |
| 2 |  | • To set mopping intensity, click on the “Water Setting” icon and choose the required level. |
| 3 | 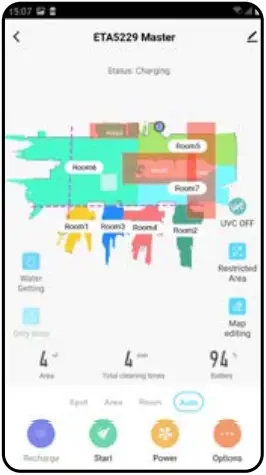 | • Using the “Only mop” icon, you may set that the vacuum cleaner only wipes without switched-on suction. The vacuum cleaner is the quietest in this mode. |
| 4 | 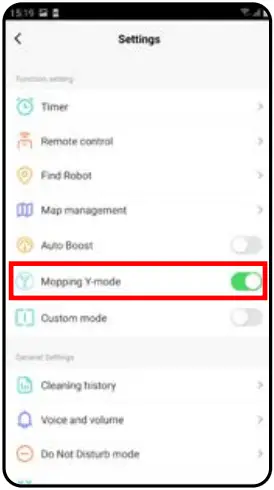 | • In the “Options” menu, you may switch-on/ switch-off special Y-mode for mopping. |
REMARKS:
- To use the mopping function, it is necessary to install a mopping adapter on the vacuum cleaner according to the instruction for use.
- When using the mopping function, it is necessary to prevent the vacuum cleaner from driving onto a rug.
| 13. UV LAMP | ||
| 1 | 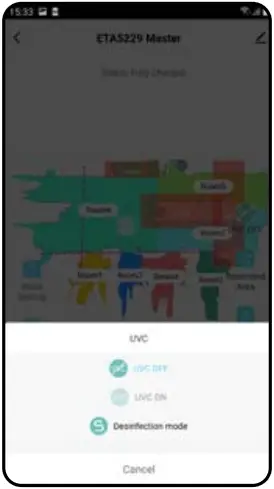 | The function of UV lamp can be set in the main screen by means of the “UVC” icon. • After that, you may switch-on/switch-off the UV lamp. |
| 2 |  | • If you only want to perform separate disinfection with UV light, switch-on “Desinfection mode”. Suction is switched off in this mode. |
| 14. PLANNING OF CLEANING | ||
| 1 |  | • On the main screen, click on “Options”. • Afterwards, click on “Timer” in menu. |
| 2 | 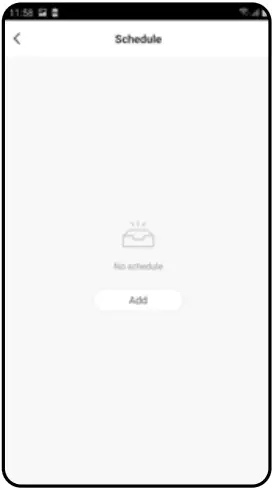 | • Click on “Add”. |
| 3 | 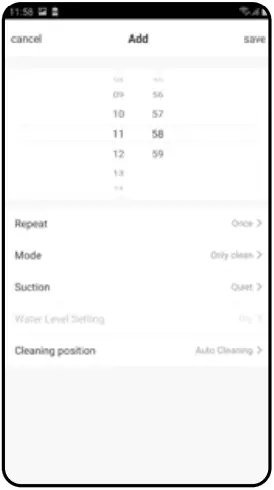 | • Set time in the upper part. • In the “Repeat” menu, set days when you want to repeat cleaning. • In the “Mode” menu, set cleaning mode. • In the “Suction” menu, set suction power. • In the “Water Level Setting” menu set mopping intensity. • In the “Cleaning position” menu, set rooms in which you want to perform cleaning. • Click on “Save” in the right upper corner to save setting. |
| 4 | 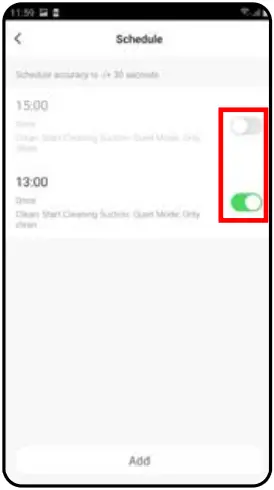 | • Using switches, you may activate/ deactivate particulars cleanings. • If you want to modify one of the planned cleanings, click shortly on the corresponding cleaning with a finger. |
| 5 | 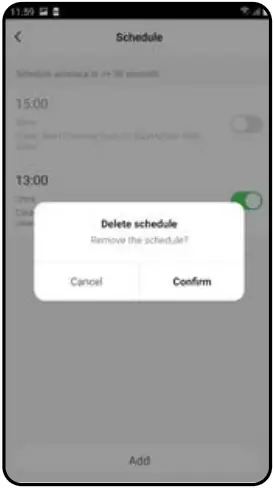 | • If you want delete a planned cleaning, click long on the corresponding cleaning with a finger and consequently confirm the deletion by clicking on “OK”. |
REMARKS:
- If you use more than one maps (for example, in a multistage house), always make sure that you activate only those planned cleanings which belong to the corresponding actually-used map.
- Up to 10 planned cleanings may be set.
| 15. REMOTE CONTROL | ||
| 1 | 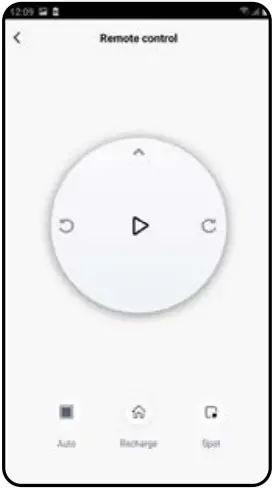 | • On the main screen, click on “Options”. • Afterwards, click on “Remote control” in menu. • Now you may control the vacuum cleaner similarly as with a standard remote control panel. |
REMARKS:
- In the manual control mode, you also may switch-on/switch-off some of the basic functions and of cleaning modes of the vacuum cleaner: automatic cleaning, local cleaning and sending to the charging station.
| 16. “FIND THE VACUUM CLEANER” FUNCTION | ||
| 1 | 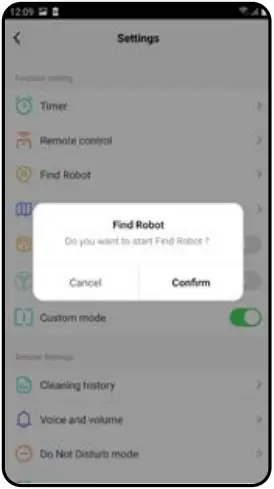 | • On the main screen, click on “Options”. • Afterwards, click on “Find robot” in menu. and consequently confirm it by clicking on “OK”. • After it, the vacuum cleaner will warn you acoustically to specify its position. |
REMARKS:
- This function can be used, especially, if the vacuum cleaner gets jammed in whatever part of the house (for example, under furniture).
| 17. HISTORY OF CLEANINGS | ||
| 1 | 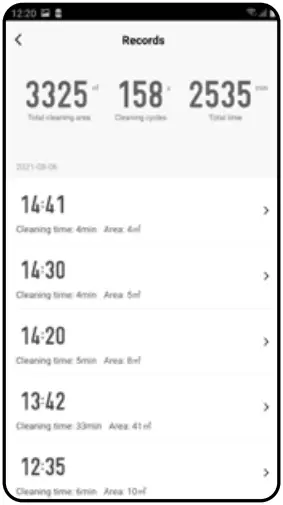 | • On the main screen, click on “Options”. • After that, select “Cleaning History” in menu. • By this, you will obtain simple review of the performed cleanings. |
| 2 | 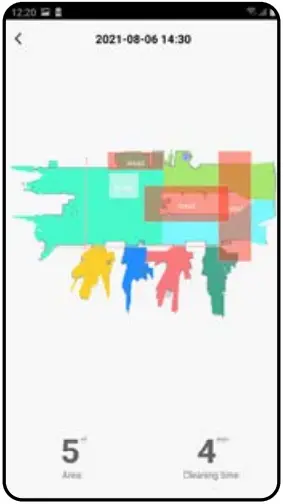 | • Click on a particular cleaning in the list of cleanings in the history to see detailed information on the corresponding cleaning. |
| 18. AUDIO WARNING VOLUME SETTING | ||
| 1 | 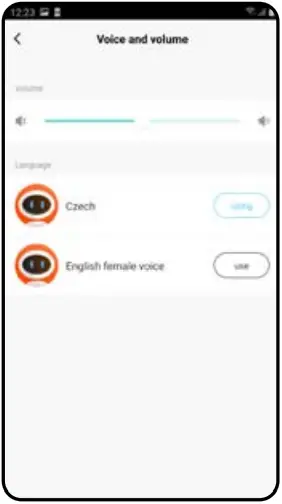 | • On the main screen, click on “Options”. • After that, select “Voice and volume” in menu. • Now you may set sound volume and language of the audio warnings or may fully switch-off them. |
REMARKS:
- Audio warnings may be also switched-off in a certain moment by means of „Do not disturb mode“ (see Chapter 19. DO NOT DISTURB MODE).
| 19. DO NOT DISTURB MODE | ||
| 1 | 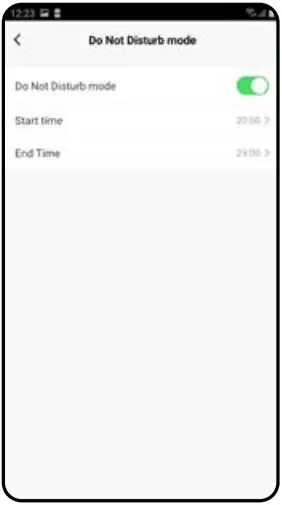 | • On the main screen, click on “Options”. • After that, select “Do not disturb mode” in menu. • Now you may set a time interval for switching-off audio warnings. • To activate this mode, use a switch in the right upper corner. |
| 20. MONITORING OF SERVICE LIFE OF COMPONENTS | ||
| 1 | 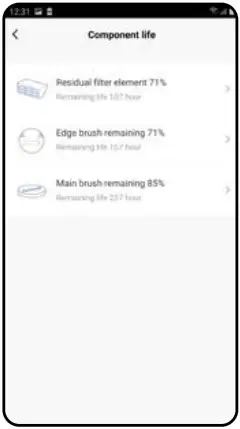 | • On the main screen, click on „Options“. • After that, select „Component life“ in menu. • You may here easily obtain information on the service life of particular components of the vacuum cleaner (HEPA filter, side brushes, main brush). |
| 2 | 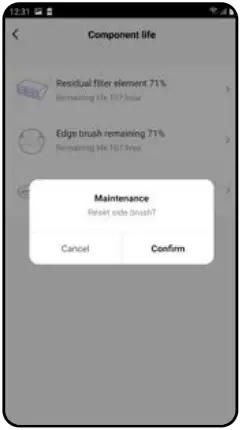 | • After the replacement of one of the components, it is necessary to reset it to start the deduction of percents from 100%. • To do it, click on the corresponding component first. • Then, click on “OK” to confirm the reset. |
REMARKS:
- The service life of particular components is being gradually deducted and is specified in % and hours (i.e. remaining service life).
- After the lapse of the service life of a component, we recommend that you replace this component to keep in the best way efficiency of suction and to prevent the vacuum cleaner from possible damage.
| 21. SETTING OF SHARING | ||
| 1 | 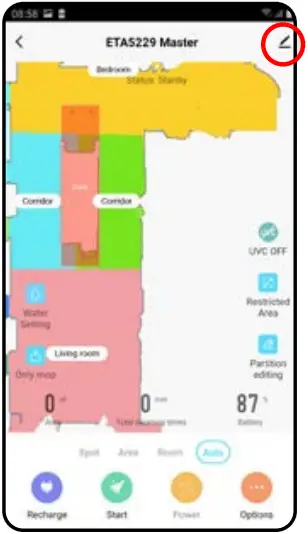 | • Click on the pencil symbol in the right upper corner of the main screen. |
| 2 | 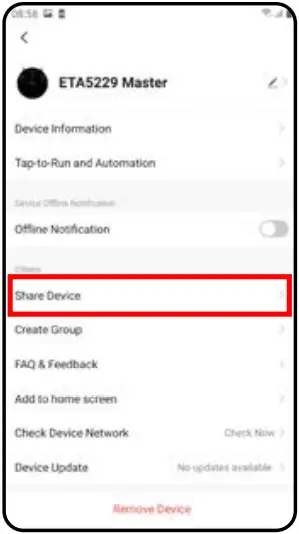 | • Select “Share Device”’ in menu. |
| 3 | 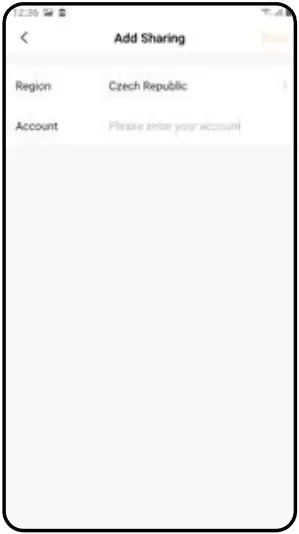 | • Click on “Add sharing”. • After that, choose a country and enter e-mail of the account with which you want to share the vacuum cleaner. |
REMARKS:
- Users, with which you share your vacuum cleaner, may also control it, but have partially limited possibilities.
- A user, to whom you want to set sharing, has to create his/her own account in the ETA SMART application.
| 22. FIRMWARE UPDATE | ||
| 1 | 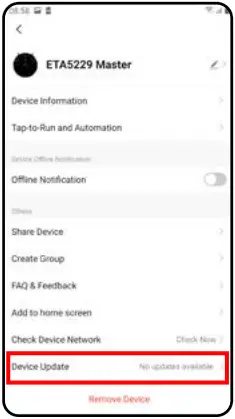 | The vacuum cleaner has software in its inner memory named Firmware. If a newer version has been issued, it is necessary to update it. • Click on the pencil symbol in the right upper corner of the main screen. |
| 2 | 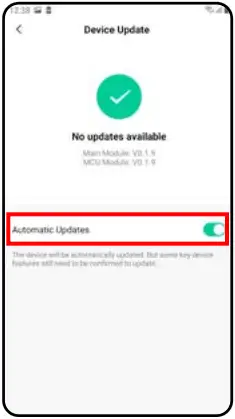 | If a new version is available, confirm update. Having finished updating, place the vacuum cleaner into the charging station. The vacuum cleaner has to be connected to a Wi-Fi network with available Internet connection. • If you require to check automatically new available versions, you may switch-on the “Automatic Updates” option. |
TROUBLESHOOTING
| Problem | Solution |
| The application gets jammed or is “frozen”. | Restart the application. If it doesn’t help, restart your smart appliance. |
| The application doesn’t react at all, although was functioning well earlier. | Most probably, the situation is caused by a change, which has been performed in your phone (for example, installation of other applications, system update, etc.) or in the WiFi network. If you cannot solve the problem by returning your phone or Wi-Fi network to the state before changing, uninstall ETA SMART Application and install it again. |
| You do not succeed with pairing the vacuum cleaner and a Wi-Fi network. | Check the version of the operation system in your mobile phone and use only supported versions (Android 6.0 and newer; IOS 9.0 and newer). |
| Use high-quality Wi-Fi router, which sufficiently covers your house. | |
| During paring, keep your mobile phone sufficiently close to the vacuum cleaner (in a distance approx. 2 m). |
![]()


