![]()
G30
QUICK START GUIDE
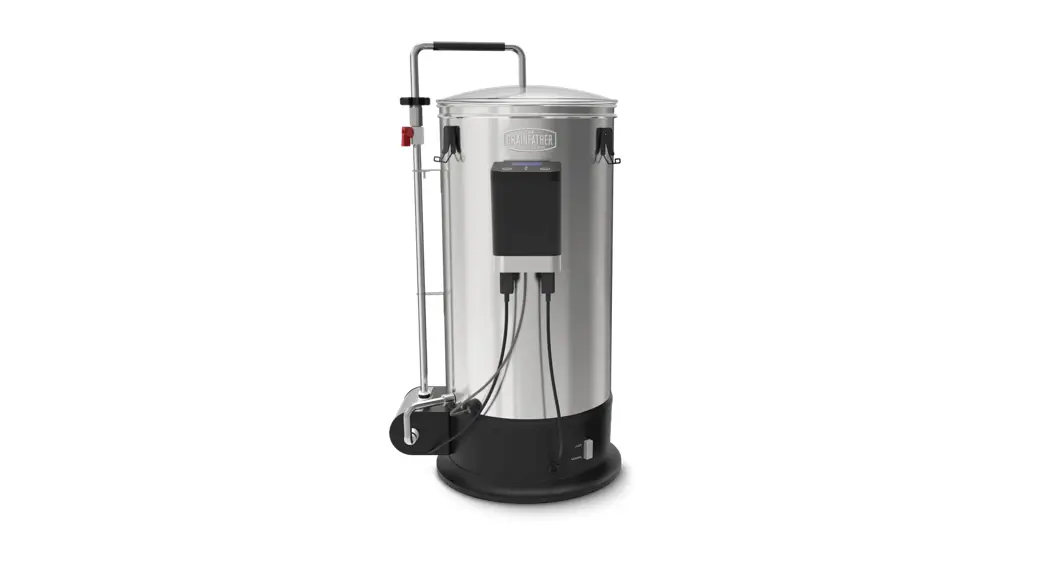
THANK YOU FOR CHOOSING THE GRAINFATHER G30.
Get your equipment ready by following these quick and easy steps and you’ll be brewing in no time.
NOTE: These are shortened instructions for product assembly only. The full online instructions provide more detail about the brewing process using your G30: grainfather.com/instructions/
WARNING! (USA 220 V ONLY)
Please check your unit rating label for the voltage. If your unit is a USA 220 V product, the Power Cord, Control Box and Boiler Body included in the box are designed to be used together with a 220 V supply. Using any of these components with another product (including the 110 V G30) may result in hazards and equipment damage.
SOCKET GUIDE (USA 220 V ONLY)
| POWER SUPPLY SOCKET | DESCRIPTION | COMPATIBILITY |
 | 3-pin workshop and power tools supply. | The brewing system is compatible using a power cord supplied in-box. |
 | 3-pin workshop and power tools supply. | Brewing system is compatible by using an adapter that includes a ground connection and has appropriate electrical certification. |
 | 3-pin laundry dryer supply, most common installation prior to 1996. | This power supply socket is NOT SUITABLE for use with the brewing system. This socket provides hot-hot-neutral connections. The brewing system requires a ground connection to perform safely in the event of an electrical fault. |
 | 4-pin modern laundry dryer supply, commonly installed after 1996. | Brewing system is compatible by using an adapter that includes a ground connection and has appropriate electrical certification. |
 | 4-pin electric oven supply. | The brewing system is compatible by using an adapter that includes a ground connection and has the appropriate electrical certification. |
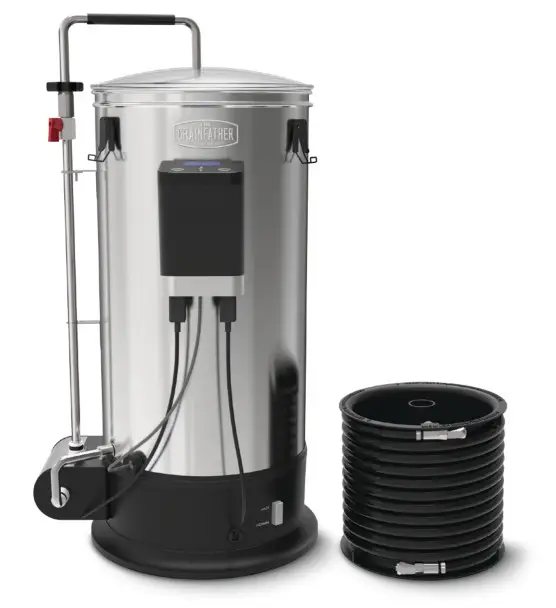
G30 PARTS LIST
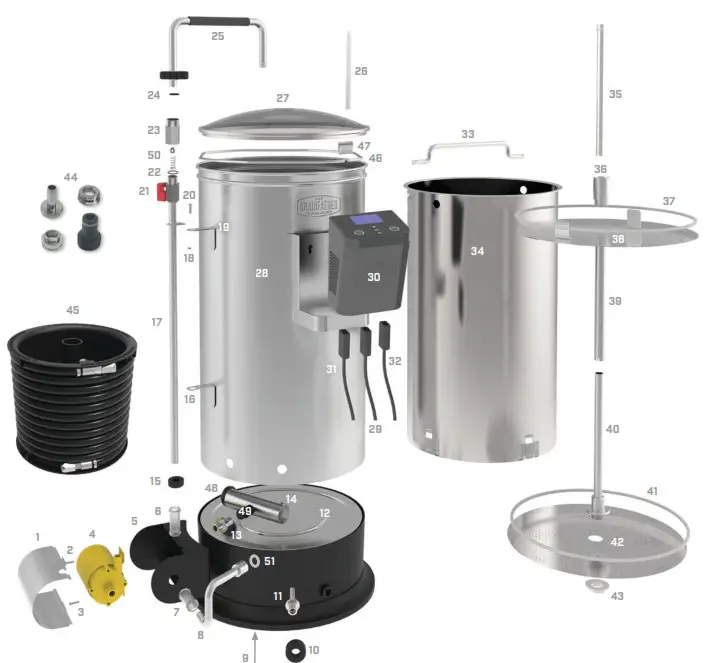
| 1. Pump Cover 2. Pump Screw 3. Pump Screw 4. Pump 5. Pump Housing 6. Pump Silicone Tube Top 7. Pump Silicone Tube Bottom 8. Pump Inlet Pipe 9. Reset Switch 10. Thermometer Probe Cover Nut 11. Thermometer Probe Cover 12. Element Cover | 13. Filter Inlet 14. Filter 15. Silicone Tube Retention Ring 16. Bottom Boiler Bracket 17. Discharge Pipe 18. Discharge Pipe Nut 19. Top Boiler Bracket 20. Discharge Pipe Screw 21. Ball Valve 22. Safety Valve Seal 23. Safety Valve 24. O-ring 25. Recirculation Pipe 26. Silicone Hose 27. Tempered Glass Lid |
| 28. Boiler Body 29. Control Box Power Plug 30. Control Box 31. Pump Plug 32. Heating Element Plug 33. Inner Basket Lifting Handle 34. Inner Basket 35. Grain Stopper 36. Overflow Inlet 37. Top Perforated Plate Seal 38. Top Perforated Plate 39. Top Overflow Pipe 40. Bottom Overflow Pipe | 41. Bottom Perforated Plate Seal 42. Bottom Perforated Plate 43. Overflow Nut 44. Tap Adapter Set 45. Counterflow Wort Chiller 46. Support Ring 47. Support Ring Retainer 48. Silicone Filter Cap 49. Silicone Filter Insert 50. Spring & Ball for Safety Valve 51. Pump Inlet O-Ring |
PRE-BREWING ASSEMBLY
We recommend that you clean your G30 and its components using the Grainfather High Performance Cleaner before use.
For details, refer to the full instructions online: grainfather.com/instructions/
INSTALL THE FILTER
With the Silicone Filter Insert (49) and Silicone Filter Cap (48) already fitted, install the Filter (14) into the Boiler Body by pushing the Silicone Insert into the Filter Inlet (13).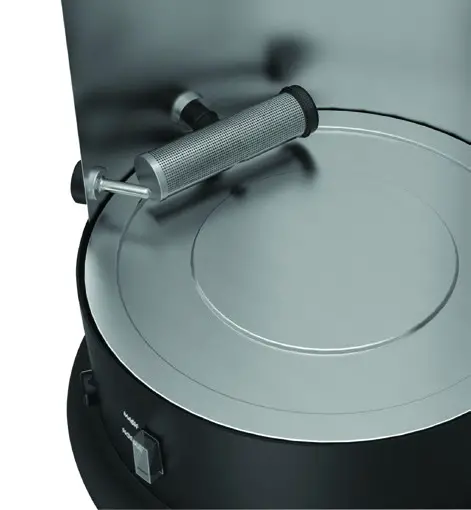
ASSEMBLE THE BOTTOM PERFORATED PLATE AND OVERFLOW PIPEWORK
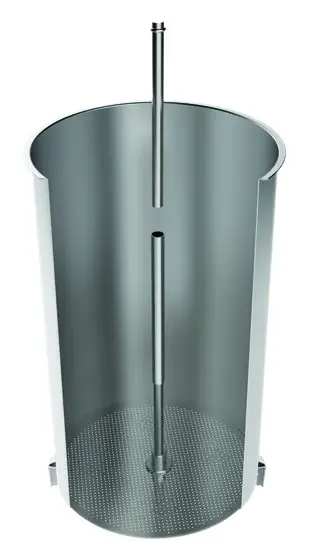
Take the Bottom Overflow Pipe (40) and unscrew the Overflow Nut (43). Insert the Bottom Overflow Pipe through the hole in the centre of the Bottom Perforated Plate (42) and screw the Overflow Nut to hold in place. Make sure the Silicone Bottom Perforated Plate Seal (41) is fitted around the outside of the Bottom Perforated Plate.
Install the Bottom Perforated Plate into the Inner Basket (34). This is most easily done by starting with the Bottom Perforated Plate at about a 30° angle and pushing it gently down to the bottom of the Inner Basket. Once at the bottom, gently press around the circumference of the Bottom Perforated Plate Seal until the Grain Plate sits flat at the bottom of the Inner Basket.
TIP: Wet the inside of the Inner Basket or run some grain dust around it to make installation easier. Take the Top Overflow Pipe (39) and insert this onto the top of the Bottom Overflow Pipe so that there is about an inch of overlap. Make sure that the wire springs are oriented at the bottom end. Insert the Grain Stopper (35) onto the top of the Top Overflow Pipe. The Grain Stopper has a cap on its top end which should sit on the top edge of the Top Overflow Pipe.


ATTACH THE CONTROL BOX
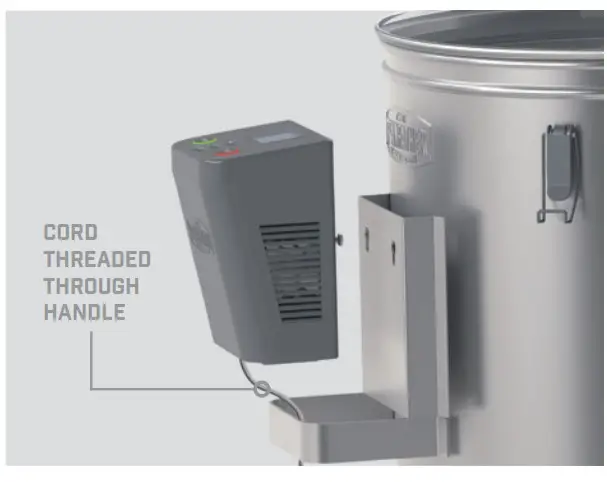 Feed the temperature probe cord on the Control Box (30) through the handle of the G30. Fit the lugs at the back of the box into the into the holes on the bracket and sit the Control Box on the cradle.
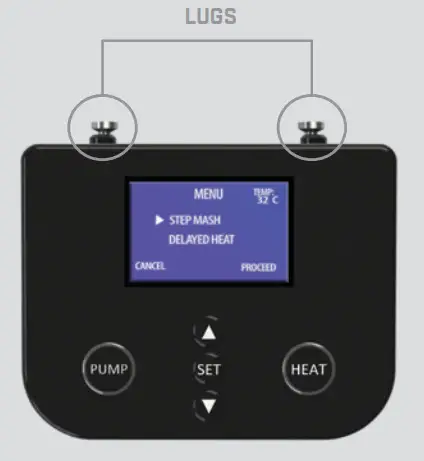
Insert the Pump Plug (31), and Heating Element Plug (32) into their respectively labelled sockets on the underside of the Control Box. Insert the temperature probe from the Control Box into the Thermometer Probe Cover (11) located at the bottom of the G30 as shown in the image below. Insert the Control Box Power Plug (29) into the middle socket on the underside of the Control Box. Next, plug the other end of the Control Box Power Plug into a 220 V power outlet (refer to page 2 for information about compatible 220 V power outlets).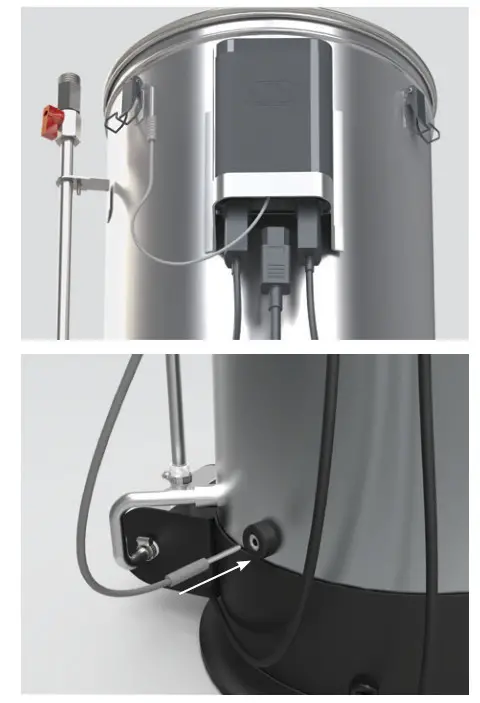
BLUETOOTH CONNECTION AND CONTROL FROM YOUR MOBILE DEVICE
At this point, you will be able to use your new G30 and complete a brew using the manual Control Box. However, the G30 has built-in Bluetooth, making it compatible with the Grainfather App where you can use your mobile device as a remote control. Once you’ve downloaded the app, registered and connected it to your G30, you have access to a completely connected brewing experience. Please refer to the full online instructions about how to connect your mobile device to the G30: grainfather.com/instructions/
SETTING UP TO BREW
NOTE: This section of the Quick Start Guide outlines the key aspects of assembly required during the brewing process. For further information on the brewing process, please refer to the full instructions online: grainfather.com/instructions/
ADD THE MASH WATER
Make sure that your G30 is on a stable, flat surface before you start brewing. We recommend placing the G30 on the floor due to heaving lifting later in the brewing process. Add the volume of mash water required by your recipe – you can use the advanced calculators available on the Grainfather App.
SET THE MASH TEMPERATURE
Using the Control Box, set the required mash temperature and press the ‘Heat’ button to initiate heating. Place the Tempered Glass Lid (27) on the G30 to reduce the heating time. At this stage, if your G30 is connected to the Grainfather App, you can run your brew session remotely on your mobile device.
NOTE: The clips on the side of the G30 should not be used to secure the Tempered Glass Lid. These should only be used with the distilling attachment.
INSTALL THE INNER BASKET COMPONENTS
Place the Inner Basket, complete with Bottom Perforated Plate and Overflow Pipework, inside your G30.
ADD GRAINS AND STIR
Once your water reaches the set temperature, add the grain to the Inner Basket, stirring well to avoid any dry clumps.
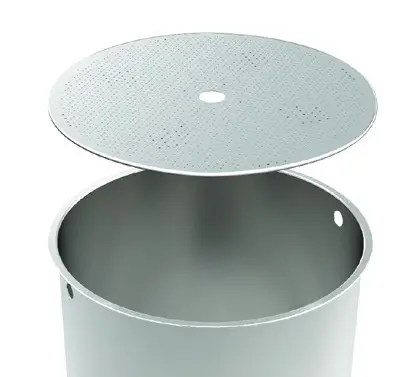
INSTALL THE TOP PERFORATED PLATE AND OVERFLOW INLET
Fit the Top Perforated Plate (38) with the Top Perforated Plate Seal (37). Insert the Top Perforated Plate into the Inner Basket until it rests on top of the grain bed, making sure that the plate is level. Next, remove the Grain Stopper (35) and fit the Overflow Inlet (36) onto the Top Overflow Pipe (39), gently pressing down until it fits into the hole of the Top Perforated Plate.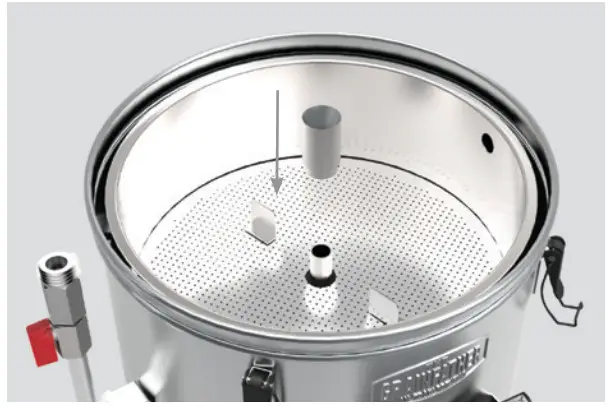
ASSEMBLE AND ATTACH THE RECIRCULATION PIPE
Insert the Silicone Hose (26) over the barbed end of the Recirculation Pipe (25). Place the Tempered Glass Lid on the G30. Feed the Silicone Hose through the hole in the Tempered Glass Lid and firmly screw the Recirculation Pipe onto the Safety Valve (23). Make sure that it is threaded on correctly and securely. The end of the Silicone Hose should rest on the Top Perforated Plate.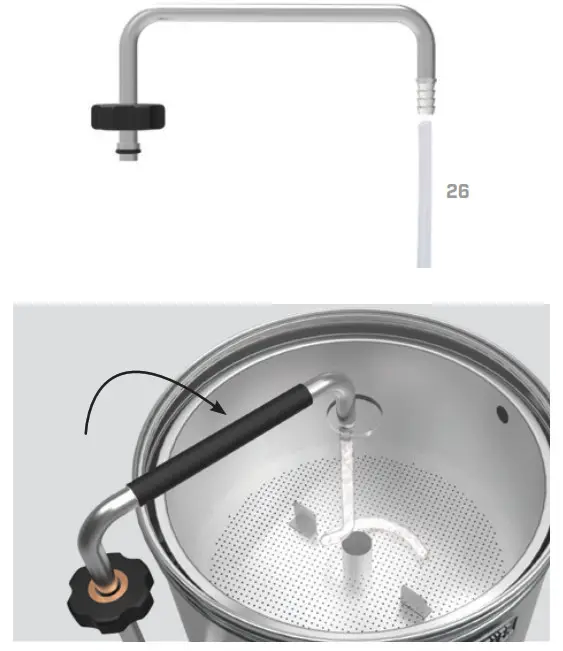
RECIRCULATE YOUR MASH (WORT)
Activate the pump to recirculate your wort. Use the Ball Valve (21) to adjust the flow rate so that the wort level is just above the Overflow Inlet, allowing a small amount of wort to overflow through the Overflow Inlet. Prepare your sparge water during the mash.
LIFTING THE INNER BASKET
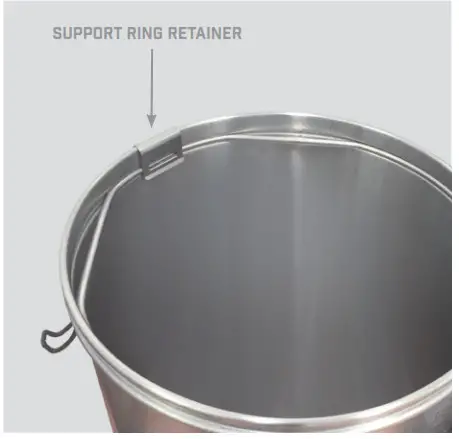
When the mash has finished, turn off the pump and remove the Recirculation Pipe and Glass Lid. Close the Ball Valve and insert the Inner Basket Lifting Handle (33) into the two opposite holes in the Inner Basket. Lift the Inner Basket, and then turn it 45° so that the feet at the bottom rest securely on the Support Ring (46).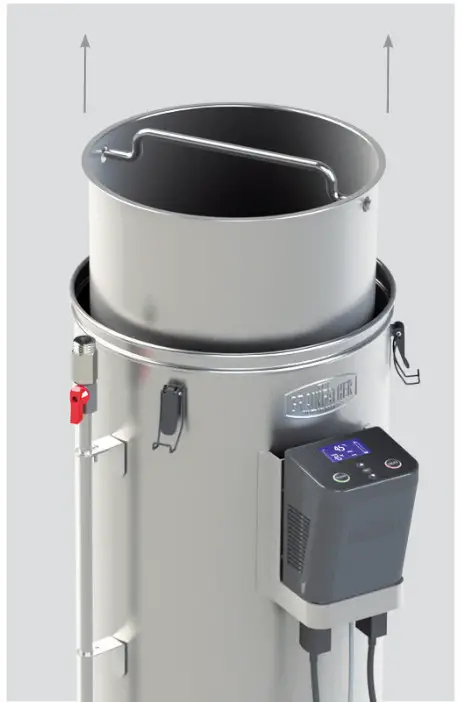
CAUTION!
BE VERY CAREFUL not to twist the Inner Basket while it is on the Support Ring in the sparge position as it could knock it off the Support Ring. If the sparge is “stuck” (not draining), then remove the Top Perforated Plate and slice the grain bed with a stainless steel paddle. Cut through the stuck mash from the centre towards the outside repeatedly until it starts draining. This should keep the Inner Basket safely in place on the Support Ring. Do not stir the grain bed as this could twist the Inner Basket off the Support Ring.
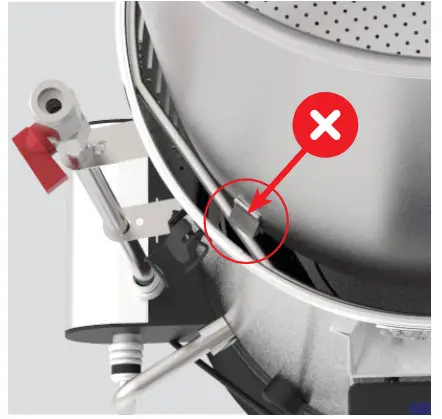
Always ensure the Support Ring fits tightly into its groove and is held in place by the Support Ring Retainer. If you remove the Support Ring for cleaning, ensure that it is correctly reinstalled along with the Support Ring Retainer.
SPARGE YOUR MASH
Gently press the Top Perforated Plate down until it comes to rest against the grain and then sparge the mash. Once the sparge is finished, use the Inner Basket Lifting Handle to remove the Inner Basket from the G30.
BOIL YOUR WORT
After removing the Inner Basket, complete the boil and add the hop additions required by your recipe.
CAUTION!
During the boil, do not fit the Glass Lid as you may cause a boilover.
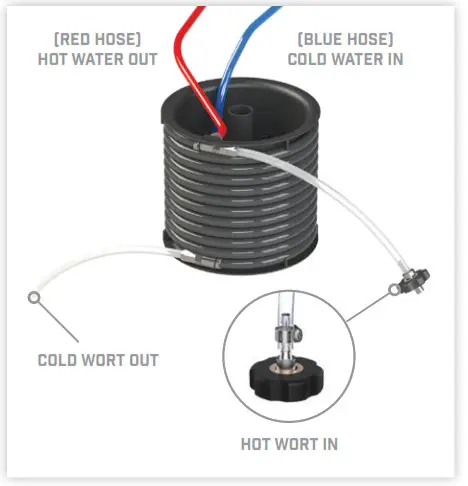
COOLING WITH THE COUNTERFLOW WORT CHILLER
The G30 includes a Counterflow Wort Chiller (45). This has been custom designed to efficiently cool your wort and allow easy, and sanitary transfer directly into a fermenter. At the end of the boil, circulate hot wort through the Counterflow Wort Chiller for 2 minutes to sanitise it. Then turn on your cooling water and transfer your wort through the Counterflow Wort Chiller into your cleaned and sanitised fermenter. For detailed instructions on how to use the Counterflow Wort Chiller, please see the full instructions online: grainfather.com/instructions/
CLEANING
At the end of your brew day, clean and dry the G30 and all its components thoroughly. We recommend using the Grainfather High Performance Cleaner, as it removes the need for tedious scrubbing. For further advice, please refer to the cleaning section of the full instructions online: grainfather.com/instructions/
IMPORTANT SAFEGUARDS:
READ AND FOLLOW ALL INSTRUCTIONS
CAUTION – Risk of fires and electric shock.
– Replace only with genuine Grainfather cord set.
– Do not immerse in water.
SAVE ALL WARNINGS AND INSTRUCTIONS FOR FUTURE REFERENCE FOR COMMERCIAL AND INDOOR USE ONLY
Download the FREE Grainfather App

https://grainfather.com/download