
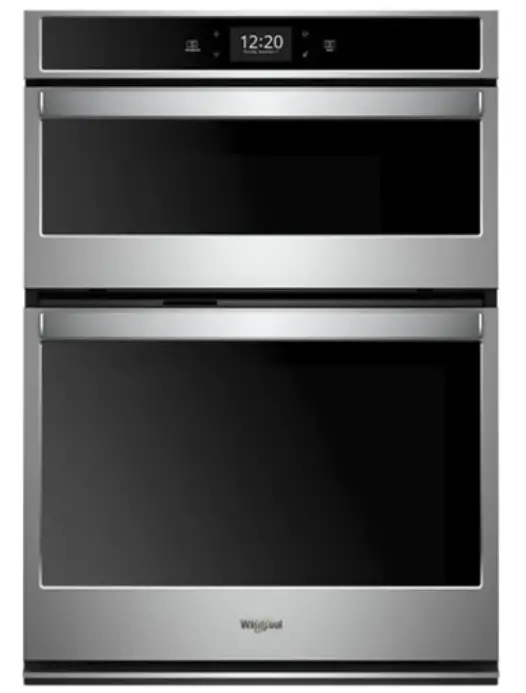
Whirlpool WOC75EC7HS 5.7 cu. ft. Smart Combination Convection Wall Oven
FEATURE GUIDE
WARNING: To reduce the risk of fire, electric shock, or injury to persons, read the IMPORTANT SAFETY INSTRUCTIONS, located in your appliance’s Owner’s Manual, before operating this appliance.
This manual covers several models. Your model may have some or all of the items listed. Refer to these instructions or Frequently Asked Questions (FAQs) section of our website at www.whirlpool.com for more detailed instructions. In Canada, reference the Customer Service section at www.whirlpool.ca.
| KEYPAD | FEATURE | INSTRUCTIONS |
| Oven Use Functions | Enables you to personalize the audible tones and oven operation to suit your needs. See the “Tools” and “More Modes” sections. |
| Home Screen | If pressed once, it enables the user to return to the “Cooking Methods” and “Assisted Cooking” screen. If pressed twice, the time of day is displayed. |
| Favorites | The Favorites keypad allows the user to save the cycles that they use on a frequent basis. |
| Oven Cavity Light | The oven light is controlled by a keypad on the oven control panel. While the oven door is closed, press the Oven Light keypad to turn the light on and off. When the oven door is opened, the oven light will automatically turn on. |
| Oven Function Power/Cancel | The Oven Power/Cancel keypad turns the oven on and wakes it from Sleep mode. If the oven is already on, the Oven Power/Cancel keypad stops any oven function except the Clock, Timer, and Control Lock. |
| Microwave Function | The Microwave Power/Cancel keypad turns the microwave oven on and wakes it from Sleep mode. If the microwave oven is already on, the Microwave Power/Cancel keypad stops any microwave oven function except the Clock, Timer, and Control Lock. |
 Tools
Tools Home
Home Favorites
 Oven Light
 Oven Power/ Cancel
 Microwave Power/Cancel
Touch Panel
The touch panel houses the control menu and function controls. The touch keypads are very sensitive and require only a light touch to activate. Scroll up, down, left, or right to explore the different options and features.
For more information about the individual controls, see their respective sections in this manual.
Display
The display is for both the menu and microwave oven function controls. The touch panel allows you to scroll through the oven menus. The display is very sensitive and requires only a light touch to activate and control.
When a oven/microwave oven is in use, the display will show the clock, mode, microwave oven temperature, kitchen timer, and microwave oven timer, if set. If the oven/microwave oven timer is not set, you can set it from this screen.
After approximately 2 minutes of inactivity, the display will go into sleep mode and the display will dim. When the oven is in operation, the display will remain bright. During use, the display will show menus and the appropriate selections for the options being chosen.
If the microwave oven is off, touch the Oven Power or the Microwave Power keypad for the desired oven to activate the menu. From this screen, all automatic cooking programs can be activated, all manual cooking programs can be set, options can be adjusted, and instructions, preparation, and tips can be accessed.
Setup and Demo Mode
- Select STORE DEMO MODE to enter Demo Mode.
OR
- Select NEXT to enter into product use.
- Follow the prompts on the display screen to select a language, set up Wi-Fi/connect to network, accept the terms of service, and set the time.
NOTE: The display screen will show the time and date (default screen/standby mode). - Select TRY THE PRODUCT to explore various features and options of the product.
OPTIONAL: Select VIEW PRODUCT VIDEOS to view a video about how to navigate and interact with the product and explore Voice Control. - Scroll and select EXPLORE.
- Select the Tools keypad.
To exit Demo Mode, see the “Tools” section.
COOKING METHODS
Food Poisoning Hazard |
| COOKING METHOD | FEATURE | INSTRUCTIONS |
| BAKE | Baking and Roasting |
|
| BROIL | Broiling |
|
| CONVECT BAKE | Convection Baking |
|
| CONVECT BROIL | Convection Broiling |
|
| CONVECT ROAST | Convection Roasting |
|
| KEEP WARM | Keep Warm | Food must be at serving temperature before placing it in the warmed oven.
|
| RAPID | Rapid Oven Preheating | Provides the fastest preheat time for the Bake function. Rapid Preheat is preset to off.
|
| DELAY START | Delayed Start | Delay Start is used to enter the starting time for an oven function with a delayed start. Once the cooking method is selected, input the bake temperature. Select DELAY and follow the prompts on the screen. NOTE: Delay Start should not be used for foods such as breads and cakes because they may not bake properly |
| COOK TIME | Timed Cooking | Cook Time allows the oven to be set to turn on at a certain time of day, cook for a set length of time, and/or shut off automatically. |
Favorites
The Favorites feature stores the oven mode and temperature for your favorite recipe. As you continue to utilize your Favorites tool, your product will refine and tailor suggestions towards your cooking cravings/needs.
NOTE: A select set of favorites and suggestions may be automatically shown on the Home screen based on your meal times.
To save a recipe, select the Favorites keypad and follow the prompts on the screen to customize your favorites. Add an image or name to the favorite to customize it to your preferences.
Assisted Cooking
Assisted cooking helps you select the right mode for your everyday cooking needs.
Some modes allow you to skip preheat. Follow the prompts on screen for guidance throughout the cooking process. NOTE: Traditional bake temperatures will be converted to convection bake temperatures. Convect Bake requires time and temperature input. It also requires preheat.
Traditional roast times will be converted to convection roast times. Convect Roast requires time and temperature input, but preheat is not required
Some modes will convert standard bake times for convection cooking. Input your time and temperature and your screen will convert accordingly.
| Assisted Cooking Modes | Food Selections | Tips for Best Results |
| FROZEN | Frozen Pizza Frozen Pie Frozen Fries Frozen Lasagna Frozen Nuggets Frozen Meals | Frozen foods do not require preheat. Insert food right away. Input the manufacturer’s maximum recommended time and temperature. For more information, see the “Frozen Bake™” section. |
| POULTRY | Chicken Pieces Whole Chicken | Poultry food items do not require preheat. Insert food right away. |
| SEAFOOD | Fish Fillet Fish Sticks | Fish fillet and fish sticks require preheat. Insert food when preheat is complete. |
| BAKED GOODS | Biscuits Croissants | Baked goods require preheat. Insert food when preheat is complete. |
| DESSERTS | Cake Fresh Pie Cookies Frozen Pie | Cake, cookies, and fresh pies require preheat. Insert food when preheat is complete. Frozen pie does not require preheat. Insert food right away. Input the manufacturer’s maximum recommended time and temperature. |
| PIZZA | Fresh Pizza Frozen Pizza | Fresh pizza requires preheat. Frozen pizza does not require preheat. Insert food right away. Input the manufacturer’s maximum recommended time and temperature. For more information, see the “Frozen Bake™” section. MEATS |
| MEATS | Meat Loaf Pork Roast Beef Roast Lamb Roast | Meatloaf requires preheat. Insert food when preheat is complete. Lamb, beef, and pork roasts do not require preheat. Insert food right away. |
| VEGGIES | Baked Potato Roasted Fresh Veggies | Roasted fresh veggies and baked potatoes do not require preheat. Insert food right way. |
| CASSEROLES | Casserole Frozen Lasagna | Casseroles do require preheat. Insert food when preheat is complete. Frozen Lasagna does not require preheat. Insert food right away. Input the manufacturer’s maximum recommended time and temperature. For more information, see the “Frozen Bake™” section. |
| SNACKS | N/A | Snacks require preheat. Insert food when preheat is complete. |
Tools
The Tools keypad allows you access to functions and customization options for your oven. These tools allow you to set the clock, change the oven temperature between Fahrenheit and Celsius, turn the audible signals and prompts on and off, adjust the oven calibration, change the language, and more. Select the Tools keypad to view the Tools features:
- Remote Enable
- Kitchen Timer
- Light
- Self-Clean
- Mute
- Control Lock
See the “More Modes” section for more information.
| Tools | Available Selections |
| Remote Enable | Select REMOTE ENABLE to enable the ability to utilize the Whirlpool® app. NOTE: Remote Enable does not turn off when the door is opened. Do not store any flammable materials or temperature sensitive items inside the oven. |
| Kitchen Timer | Set a kitchen timer by manually entering the desired time into the keypad.
|
| Light | Select LIGHT to turn the light on and off. When the oven door is opened, the oven light will automatically turn on |
| Turntable | Turn the turntable on or off |
| Self-Clean | Self Clean option is not available for the microwave oven. For further information, see the “Self-cleaning Cycle” section in the Owner’s Manual. |
| Mute | Select MUTE to Mute and Unmute the sound. |
| Control Lock | The Control Lock shuts down the control panel keypads to avoid unintended use of the oven(s). The Control Lock will remain set after a power failure, if set before the power failure occurs. When the control is locked, only the Oven/Microwave Power, Tools, and Oven Light keypads will function. The Control Lock is preset unlocked, but can be locked. To Lock or Unlock the Control:
|
Preferences
Times and Dates
Set time and date preferences.
NOTE: If user is connected to Wi-Fi, time and date will be set automatically.
- Your Meal Times: Adjust when breakfast/lunch/dinner is shown
- Time
- Date
- Time Format (AM/PM vs 24 hour [Military Time])
Sound Volume
Set sound volume preferences.
- Timers and Alerts
- +Buttons and Effects
Display Settings
Set the screen brightness.
- Display Brightness
Regional
Set regional preferences.
- Language: English, Spanish, or French
- Temperature Units: Fahrenheit and Celsius
Wi-Fi
- Connect to Network: Download the Whirlpool® App from the app store on your mobile phone. See the Connectivity Setup sheet for more detailed instructions.
- SAID Code: The SAID code is used to sync a smart device with your appliance.
- MAC Address: MAC Address is displayed for the Wi-Fi module.
- Wi-Fi Radio: Turn Wi-Fi on or off.
Info
- Service and Support: Displays model number, Customer Support contact info, and Diagnostics
- Store Demo Mode: Select Store Demo Mode to toggle Demo Mode off and on
To Start Demo Mode
- Select the Tools keypad.
- Scroll and select INFO.
- Select STORE DEMO MODE and select ON.
NOTE: The display screen will show the time (default screen/ standby mode). - Select the Tools keypad.
- Select TRY THE PRODUCT or VIEW PRODUCT VIDEOS.
If the unit is in Demo Mode after power up, follow these steps
to exit the Demo Mode.
To Exit Demo Mode
- Select TRY THE PRODUCT.
- Scroll and select EXPLORE.
- Select the Tools keypad.
- Scroll and Select INFO.
- Select STORE DEMO MODE and Select OFF.
- Select YES on the confirmation screen.
• Restore Factory: This will restore your product to the original factory default settings.
• Wi-Fi Terms and Conditions: www.whirlpool.com/connect.
• Software Terms and Conditions.
More Modes
Temperature Calibration
IMPORTANT: Do not use a thermometer to measure the oven temperature. Elements will cycle on and off as needed to maintain a consistent temperature but may run slightly hot or cool at any point in time due to this cycling. Opening the oven door will affect cycling of the elements and impact the temperature.
The oven provides accurate temperatures and has been thoroughly tested at the factory. However, it may cook faster or slower than your previous oven, causing baking or browning differences. If necessary, the temperature calibration can be adjusted in either Fahrenheit or Celsius.
On double ovens, the upper oven and the lower oven can each be calibrated independently.
A minus sign means the oven will be cooler by the displayed amount. The absence of a minus sign means the oven will be warmer by the displayed amount.
Adjust the oven temp up to +/-30°F (+/-18°C). It is recommended to make changes in 5°F (3°C) increments until desired results are achieved.
To Adjust Oven Temperature Calibration:
- Press the Tools keypad.
- Select MORE MODES.
- Select TEMPERATURE CALIBRATION.
- Scroll from left to right to increase or decrease the temperature.
IMPORTANT: Each oven calibration can be independently set.
Sabbath Mode
For guidance on usage and a complete list of models with Sabbath Mode, visit www.star-k.org.
The Sabbath Mode sets the oven to remain on in a bake setting until disabled.
When the Sabbath Mode is activated, only the Bake cycle will operate. All other cooking and cleaning cycles are disabled. No tones will sound, and the displays will not indicate temperature changes. When the oven door is opened or closed, the oven light will not turn on or off, and the heating elements will not turn on or off immediately.
Sabbath Mode is not available for the microwave oven.
If a cook timer is set, the countdown will appear. The timer will count down once the timer is set.
To Enable and Activate Sabbath Mode for Oven:
- Press the Tools keypad.
- Select MORE MODES.
- Select SABBATH MODE.
- Press SABBATH MODE again to enable Sabbath Mode (Sabbath Mode is preset to Off).
- Select YES if you would like to have your oven on and baking during the Sabbath.
- Input the temperature and cook time.
(Optional) For timed cooking in Sabbath Mode, press ADD A COOK TIME for the selected oven, enter the desired cook time and then press NEXT. - Select START
To Disable and Exit Sabbath Mode:
- Press the Oven Power/Cancel Keypad.
- Press and hold the display screen for three seconds
To Adjust Temperature for Oven:
- Press the +/- 25 on the display screen to select the new temperature.
NOTE: The temperature adjustment will not appear on the display, and no tones will sound.
Positioning Racks and Bakeware
Use the following illustration and charts as guides.
Rack Positions – Upper And Lower Oven
| Broiling | ||
| Food | Rack Position | |
| Most broiling | 6 | |
| Traditional Cooking | ||
| Food | Rack Position | |
| Large roasts, turkeys, angel food, bundt cakes, quick breads, pies | 1 or 2 | |
| Yeast breads, casseroles, meat and poultry | 2 | |
| Cookies, biscuits, muffins, cakes | 2 or 3 when singlerack baking; 2 and 5 when multi-rack baking | |
| Convection Cooking (For Convection Models Only) | ||
| Oven Setting | Number of Racks Used | Rack Position |
| Rapid Preheat Bake | 1 | 3 |
| Rapid Preheat Convection Bake | 1 | 3 |
| Convection Bake | 1 | 1, 2 or 3 |
| Convection Bake | 1 | 2 and 5 |
| Convection Bake | 1 | 1, 3 and 5 |
| Convection Roast | 1 | 1 or 2 |
| Convection Broil | 1 | 4, 5 or 6 |
| Bakeware To cook food evenly, hot air must be able to circulate. For best results, allow 2″ (5 cm) of space around bakeware and oven walls. Use the following chart as a guide. | ||
| Number of Pan(s) | Position on Rack | |
| 1 | Center of rack. | |
| 2 | Side by side or slightly staggered. | |
| 3 or 4 | See the rack position graphic in this section for pan placement recommendations. | |
NOTE: Bakeware materials and color may affect results. Dark, dull, non-stick, or glass pans may require shorter baking times. In contrast, insulated or stainless steel pans may require longer baking times. Follow bakeware manufacturer’s recommendations.
Preheating and Oven Temperature
Preheating
When beginning a Bake or Convent Bake cycle or Convect Roast cycle the oven begins preheating after Start is touched. The oven will take approximately 12 to 17 minutes to reach 350°F (177°C) with all of the oven racks provided with your oven inside the oven cavity. Higher temperatures will take longer to preheat. The preheat cycle rapidly increases the oven temperature. The actual oven temperature will go above your set temperature to offset the heat lost when your oven door is opened to insert food. This ensures that when you place your food in the oven, the oven will begin at the proper temperature. Insert your food when the preheat tone sounds. Do not open the door during preheat until the tone sounds.
Rapid Preheat (on some models)
Rapid Preheat can be used to shorten the preheating time. Only one standard flat oven rack should be in the oven during Rapid Preheat. Extra racks should be removed prior to starting. The preheating cycle should be completed before placing food in the oven. When the Rapid Preheat cycle is complete, the oven starts a normal Bake cycle.
IMPORTANT: Rapid Preheat should be used only for one-rack baking.
Oven Temperature
While in use, the oven elements will cycle on and off as needed to maintain a consistent temperature, but they may run slightly hot or cool at any point in time due to this cycling. Opening the oven door while in use will release the hot air and cool the oven which could impact the cooking time and performance. It is recommended to use the oven light to monitor cooking progress.
NOTE: On models with convection, the convection fan may run in the non-convection bake mode to improve oven performance. Before baking and roasting, position racks according to the “Positioning Racks and Bakeware” section. When roasting, it is not necessary to wait for the oven preheat cycle to end before putting food in unless it is recommended in the recipe.
Baking and Roasting
IMPORTANT: The convection fan and convection element may operate during the Bake function to enhance performance and heat distribution.
The oven will take approximately 12 to 17 minutes to reach 350°F(177°C) with all oven racks inside the oven cavity. The preheat cycle rapidly increases the temperature inside the oven cavity. Higher temperatures will take longer to preheat. Factors that impact preheat times include room temperature, oven temperature, and the number of racks. Unused oven racks can be removed prior to preheating your oven to help reduce preheat time. The actual oven temperature will go above the set temperature to offset the heat lost when the oven door is opened to insert food. This ensures that the oven will begin at the proper temperature when you place food in the oven. Insert food when the preheat tone sounds. Do not open the door during preheat until the tone sounds.
During baking or roasting, the bake and broil elements will cycle on and off in intervals to maintain the oven temperature.
Depending on the model, if the oven door is opened during baking or roasting, the heating elements (bake and broil) will turn off approximately 30 seconds after the door is opened. They will turn on again approximately 30 seconds after the door is closed.
Frozen Bake™
Frozen Bake™ Technology automatically adjusts the manufacturer’s bake time by combining preheating and baking to deliver great packaged frozen food results without the wait. There are multiple preprogrammed food options. The Frozen Bake™ cycle have been customized to work only with these foods. When using Frozen Bake™ Technology, it is important that you follow all manufacturer’s instructions including venting, covering, stirring or placing on a baking sheet to ensure a good result. When cooking frozen meals, only cook items that provide instructions for cooking in a conventional oven. Place your dish in the center of the rack and select one of the rack positions recommended for Frozen Bake™ in the “Positioning Racks and Bakeware” section and bake only one package or pan at a time. Use the temperature and maximum bake time from the package.
A tone will alert you to check the food for doneness before the cook time is complete and again at the end of the cook time. The display will prompt you to add additional cook time if needed.
Broiling
When broiling, no preheating is necessary unless recommended otherwise in the recipe. Position food on grid in a broiler pan, and then place it in the center of the oven rack. Close the oven door to ensure proper broiling temperature.
NOTE: Odors and smoke are normal the first few times the oven is used or if the oven is heavily soiled.
Changing the temperature when broiling allows more precise control when cooking. The lower the broil setting, the slower the cooking. Thicker cuts and unevenly shaped pieces of meat, fish and poultry may cook better at lower broil settings. Place the food in the lower oven. Refer to the “Positioning Racks and Bakeware” section for more information.
On lower settings, the broil element will cycle On and Off to maintain the proper temperature.
- For best results, use a broiler pan and grid. It is designed to drain juices and help avoid spatter and smoke.
If you would like to purchase a Broiler Pan Kit, one may be ordered. See the Quick Start Guide for contact information.
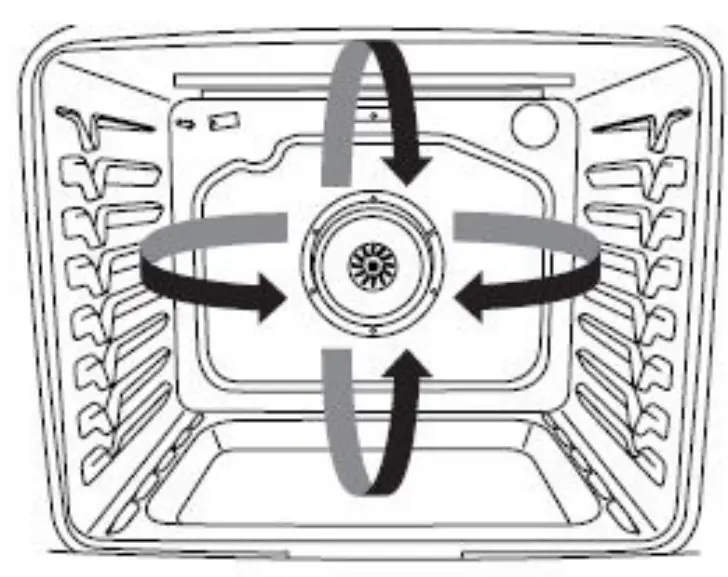
Convection Cooking
In a convection oven, the fan-circulated hot air continually distributes heat more evenly than the natural movement of air in a standard thermal oven. This movement of hot air helps maintain a consistent temperature throughout the oven, cooking foods more evenly, crisping surfaces while sealing in moisture and yielding crustier breads.
During convection cooking, the bake, broil and convection (true convection only) elements cycle on and off in intervals to maintain the oven temperature, while the fan circulates the hot air. If the oven door is opened during convection cooking, the fan will turn off immediately. It will come back on when the oven door is closed.
NOTE: The oven door must be closed for convection broiling.
With convection cooking, most foods can be cooked at a lower temperature for a shorter length of time. These adjustments can be made using the following chart.
| Setting | Guidelines |
| Convect Bake | Reduce the standard baking temperature 25°F (15°C). |
| Convect Roast | Use standard recipe temperature. Cooking time may be reduced by 15% to 30% with Convect Roast so the food should be checked for doneness early |
| Convect Broil | Use standard recipe temperature. Cooking time may be reduced so the food should be checked for doneness early. |
Convert Time/Temp
Convection temperatures and times differ from those of standard cooking. The Convert Time/Temp convection feature is a function that converts a standard thermal bake or roast cook time and temperature into an ideal cook time and temperature for convection cooking. The displayed time and temperature will be the converted for convection values.
®/™ ©2020 Whirlpool. All rights reserved. Used under license in Canada.


